Clematis Cutting Methods and Steps Explained in Detail
1. When choosing branches, try to pick relatively young ones that have not yet fully lignified. Young branches take root and sprout more easily.
2. After cutting the branches short, place them in a vitamin B solution for two hours, then take them out and apply a little rooting powder.
3. Insert the branches into a seedling tray filled with perlite. After all are inserted, spray with water promptly.
4. Cover with a transparent, breathable box. Never let the branches suffocate, and avoid direct sunlight.
5. In daily care, open the box every two days for ventilation, and spray with a nutrient solution containing vitamin B.
6. Once white roots have grown, they can be transplanted into flower pots. For the soil, you can choose perlite or peat soil. After transplanting, place them in a sunny spot and water frequently in daily care.
Those are the steps for clematis cuttings! In fact, the steps for clematis cuttings are very simple; just do these few things well. So, is there anything to pay attention to when growing clematis?
Methods for Propagating Clematis by Cuttings (Example Operating Steps)
Clematis has only started to become popular in the last two years or so. Indeed, its flowers are very beautiful and deserve the title of “Queen of Climbing Flowers.”
At present, clematis is still mainly propagated by cuttings. However, because its internodes are relatively long, there are not many cuttings that can be cut from a single clematis plant. Therefore, the survival rate is especially important for clematis cuttings! Because there is not much material!
Methods for Clematis CuttingsPropagation and Cultivation of Clematis. Propagation methods: seed sowing, layering, grafting, division, or cuttings are all possible.
1. Selection of CuttingsThis step is the most critical point for the survival of clematis cuttings. First of all, of course, you need healthy and robust branches, with at least one node. Secondly, choose semi-lignified new shoots from this year; they should be neither too young nor too old. Finally, the cut should be smooth, the knife should be sharp, and do not crush the cut.
2. Selection of SubstrateClematis generally prefers a fertile substrate with good drainage. You can use a substrate mixed with peat and perlite at a ratio of 3:1 or 2:1. Water thoroughly before cutting.
3. Before CuttingThe cuttings can be soaked in rooting solution for half an hour. Make holes with a wooden stick, place the cuttings in, and press firm with your hands. Insert them 2-3 cm deep, or you can leave a node above the surface. After inserting, water thoroughly.
4. Avoid SunlightNote that they should not be placed in strong light, but they need diffused light, and ventilation should be good. In addition, maintain humidity, and the temperature is best controlled at 20 to 30°C. You can cover with a plastic bag to retain moisture. Generally after about 15 days, the cut will swell and begin to show signs of rooting, and the buds above will also sprout and grow leaves; in about one month they will be able to root.
Introduction to the Cutting Steps for 4 Common Potted Plants
For flower and plant lovers, flowers and plants are everything in life. They not only please the mood and enrich life, but also green the environment and enhance home taste. However, growing potted plants is indeed a money-spending matter: buying flowers and plants costs money, buying pots and soil costs money, and buying flower fertilizer also costs money. Added together, this is truly a considerable expense. In this regard, netizens often say, “If you want to save money, learn cuttings.” In fact, many potted plants do not need to be bought; just pinch off a branch and insert it, and it can fill a pot. Below, the editor will introduce 4 potted plants that can fill a flower pot from just one pinched branch.
Image: Potted portulaca
I. Portulaca
I believe everyone is familiar with portulaca. Portulaca is famously easy to grow, tolerant of sun and drought, so friends who want to grow portulaca do not need to buy it; just pinch off a branch and insert it, and it will live.
Cutting Steps:
1. In summer, when the weather is hot, portulaca sometimes needs pruning. The branches cut off can be used for cuttings.
2. For the cutting branches, you can choose to cut them into short sections, or you can directly use the cut branches for cuttings.
3. Portulaca is especially easy to grow. As long as the cutting soil is loose and breathable, there are no other requirements. After that, water the soil thoroughly once.
4. Insert the portulaca branches into the soil and place them in a cool, ventilated place to recover for a few days. In a few days they will root.
5. After rooting, move them into full sun and give them plenty of sunshine. When you see the pot soil is dry, water thoroughly once, and they will soon grow to fill the pot!
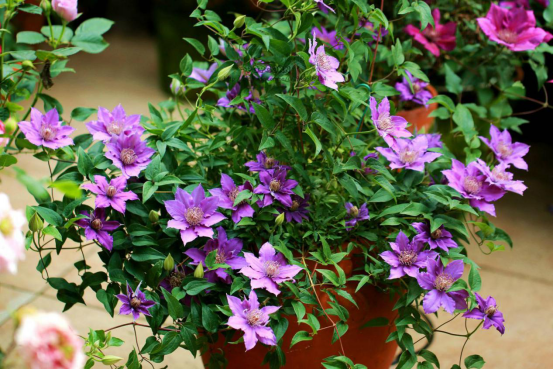
Image: Potted clematis
II. Clematis
Cutting Steps:
1. For clematis cuttings, it is best to choose branches that have already flowered, because such branches contain more nutrients and are more likely to root.
2. Cut the clematis branches brought back into short sections, with at least 1 pair of leaves retained on each branch.
3. For cuttings, you can choose black sponge, which can create a dark environment and promote rooting in clematis.
4. Make holes in the black sponge blocks, insert the cuttings into the sponge blocks, then insert a thin wire to fix the cuttings.
5. Use wire to fix the clematis branches on a foam box, then place it on a cool, ventilated north-facing balcony for care.
6. After about one month, the clematis cuttings will be able to root.
Image: Bougainvillea
III. Bougainvillea
Cutting Steps:
1. In summer, when temperatures are high, if bougainvillea branches are too dense and poorly ventilated, various pests and diseases are very likely to occur, so light pruning is needed. The cut branches are perfect for cuttings!
2. Place the branches in a carbendazim solution to disinfect. After the wounds dry, insert them into the soil. The cutting nutrient soil can be mixed with peat soil and perlite at a ratio of 2:1.
3. Place the inserted bougainvillea in a cool, ventilated place for care, and it will root in about one month.
4. If you want bougainvillea to root quickly, you can also do water cuttings. Insert the bougainvillea cutting branches into floral foam blocks, and place the floral foam blocks in a disposable paper cup filled with water.
5. With the water cutting method, bougainvillea also roots very quickly.
Image: Potted Anisodontea
IV. Anisodontea
Cutting Steps:
1. Choose robust branches from the anisodontea plant for cuttings to improve the cutting survival rate.
2. Prune the anisodontea branches to about 5-8 cm each, then soak them in a carbendazim solution for about 2 minutes, and place them in a cool, ventilated place to dry.
3. If you do not have a seedling tray at home, you can prepare disposable paper cups. The cutting soil can be a mix of perlite and vermiculite, which is both water-permeable and breathable.
4. Insert the dried anisodontea branches into disposable paper cups,
5. Before long, you will find that the anisodontea has rooted.
6. Besides the soil cutting method, you can also insert anisodontea branches into foam for water cuttings, and rooting is also very fast.
7. After rooting, transfer the anisodontea to a flower pot to continue care. Anisodontea likes sunlight, so it is best to place it on a south-facing balcony or south-facing windowsill to receive sufficient sunlight. In summer, when temperatures are high, pay attention to shading and ventilation to avoid sunburn on the anisodontea.
[Editor's Conclusion]Learning to make cuttings for flowers and plants can not only save money, but also bring great satisfaction. The above has introduced the cutting steps for 4 common potted plants. Come and try them quickly.