Introduction to Hoya propagation methods: master the common propagation techniques
Cuttings, layering and seed sowing. The most commonly used is cutting propagation, followed by seed propagation.
If you want to enjoy the beauty of hoya sooner, go to the flower market and pick out a pot; the editor has also checked the prices in advance for everyone: hoya that has already been planted, survived and is growing well costs 20-60 per pot.
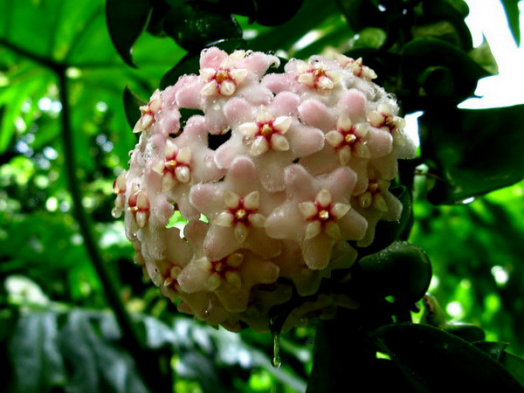
Hoya is non-toxic, so you can grow it with peace of mind! Would you choose to plant a pot yourself, or take a stroll through the flower market and pick one up?
Propagation and cultivation techniques for Hoya kerrii
Hoya kerrii is native to Thailand and Laos. It likes a warm, humid, semi-shaded environment, tolerates drought, dislikes waterlogging and is not cold-hardy. It enters its growing period from April to October each year. At this time, place Hoya kerrii in a spot with bright light but no direct sunlight for care, avoiding scorching sun exposure to prevent burning the leaves. However, too much shade will cause the plant to grow leggy, with thin leaves and long stem nodes. Today we will briefly introduce the propagation and cultivation techniques for Hoya kerrii.
Propagation methods for Hoya kerrii
Hoya kerrii is mainly propagated by cuttings. During the growing season, select healthy, plump vines, cut 2-3 nodes, and be careful to wipe away the white sap that flows from the wound. Let it dry for about 2 days, and after the wound has dried, insert it into media with relatively low fertility such as vermiculite, akadama soil or sandy soil.
Place it in a bright spot and keep the medium moist; it roots very easily. You can also cut leaves for cuttings, but although they can root, they rarely sprout to form a plant. It can also be propagated by layering, tissue culture and sowing; the latter two methods are more suitable for larger-scale propagation.
Cultivation techniques for Hoya kerrii
For watering Hoya kerrii, follow the principle of "do not water until dry, and water thoroughly when you do," but do not let water accumulate, so as to avoid root rot. Do not let it stay dry for a long time either, otherwise the leaves will become thin and lack vitality. You should often spray water on Hoya kerrii to increase air humidity, making the leaves thick and plump, and also wash dust off the leaf surface.
Apply decomposed organic liquid fertilizer or compound fertilizer once a month; the fertilizer solution should be dilute rather than concentrated. In summer, when temperatures are high, pay attention to ventilation and avoid a stuffy, hot environment. In winter, place it indoors in a spot with ample sunlight, control watering to let the plant go dormant; it can withstand low temperatures of around 5°C. Every 1-2 years in spring, it needs to be repotted once.
When repotting, cut off rotted roots and plant it in fresh potting soil. The potting soil should be loose, breathable, fertile, well-draining and somewhat granular. Since Hoya kerrii is a vine, supports should be set up for it to climb and grow. You can also regularly pinch off the growing tips to encourage branching and form a plant shape with an even balance of density and openness. It can also be planted in a taller cylindrical pot so that its branches grow downward.
Cultivated this way, Hoya kerrii spreads out elegantly and has a distinctive character. During cultivation, pay attention to removing withered leaves to keep the plant looking attractive. The main pests of Hoya kerrii are aphids, red spider mites, scale insects and other damage caused by poor ventilation. Diseases include black spot, and root rot caused by water accumulation in the potting soil in summer. Attention should be paid to improving the cultivation environment for prevention. If pests or diseases occur, spray promptly for control.
That is all the editor has to introduce about the propagation and cultivation techniques of Hoya kerrii. I hope it is helpful to you!
Propagation methods for hoya
At first glance, hoya looks like an ancient embroidered ball, with round flowers, each direction having a small flower, extremely beautiful. If you see it, you really cannot help but look a few more times. So such a wonderful thing must be passed on, which brings us to the propagation methods of hoya. Some flower lovers still do not know the specific methods, so let us introduce them below.
Propagation methods for hoya
Hoya is mostly propagated by cuttings. Apart from winter and early spring, when temperatures are too low for it, cuttings can be taken at other times. Each year from March to April, propagation by cuttings is more suitable.
Both one- to two-year-old old stems of hoya and tender stems of the current year can be used as cuttings. Cut them into sections 5-8 cm long, keeping 2 nodes. Remove the leaves that would be inserted into the medium, leaving only 1-2 leaves on top. After the wound has fully dried, insert the cuttings into a sand bed or loose potting medium in a flower pot, burying 1/3 or 1/2 of the cutting for cultivation. If using a No. 180 flower pot, about 10 cuttings can be inserted per pot.
It is best to insert the cuttings right after cutting them to aid survival. From April to June, light is relatively strong; to maintain a cool environment, 2 layers of black shade netting can be set up. The cuttings can root in about 20 days, and after 1 month new leaves grow. Once the roots have developed well, they can be transplanted into a larger flower pot for final planting, then moved to a semi-shaded, ventilated place for routine care.