A detailed guide to the entire process of making an elm bonsai
Step 1: Pruning the roots and branches
Before planting, we first need to prune the branches and root system. The purpose is to make it easier to plant and also to help it grow better.
Step 2: Treating the cut surfaces
Sticky sap often flows from the cuts on an elm. If the elm exudes too much liquid, it will seriously endanger the elm's health and may even cause the elm to die. Therefore, we can seal the cuts with wax or paint, or apply a layer of sulfonamide ointment or erythromycin ointment on them, and then sprinkle fine sandy soil on top of the applied ointment.
Step 3: Pressing the soil and watering
After planting, we should press the soil down as firmly as possible. A newly planted elm does not need to be watered immediately; we only need to spray water evenly on the branches 1-2 times a day, and after 3-4 days water it thoroughly once. After that, as long as the soil is not dry, do not water, and absolutely never let the soil become waterlogged.
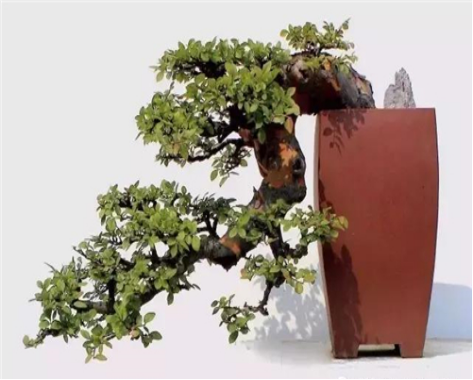
Step 4: Styling
We first need to choose the time for styling. The editor suggests that either the dormant period after leaf drop or the growing period is fine, but the bud-break period must be avoided, because pruning at this time will cause some harm to the elm. Through our skillful and careful pruning, wiring and bending, and so on, we can make the elm into many different styles of bonsai, such as curved-trunk style, waterside style, root-on-rock style, slanting-trunk style, and more.
The making process and care methods for elm bonsai
Below is an article from the Flower and Bonsai Network introducing the making process and care methods for elm bonsai.
Elm, a deciduous tree, up to 25 m tall, with a round spherical crown. The bark is grayish black, longitudinally fissured and rough. The twigs are gray and often arranged in two rows. It likes light, is cold-resistant, drought-resistant, and not tolerant of waterlogging. It can adapt to a dry and cool climate; it likes fertile, moist, well-drained soil, and can also grow in arid, barren, and lightly saline-alkaline soil, growing relatively fast.
Elm, especially old elm stumps grown in the wild, have gone through many years of human chopping and hacking, or wind stripping and rain erosion, animal gnawing, and so on, gradually forming many different strange postures. Some have twisted roots and gnarled branches, vigorous and ancient-looking; some turn decay into wonder, with dead roots and new leaves, opening up a world of their own. They are excellent material for making bonsai.
I. The making procedure for elm
Below is a brief introduction to the steps to be carried out when making an elm bonsai:
A newly dug old elm stump should be planted in plain sandy soil in the ground or in a clay pot for "stump cultivation." This is generally done from late autumn to spring (the survival rate is highest in the two or three months before bud break). Before planting, the root system and branches must first be pruned; sticky sap often flows from the cuts. If too much liquid seeps out, it will seriously affect the survival rate. You can seal the cuts with paint or wax, or apply a layer of erythromycin ointment or sulfonamide ointment, and then sprinkle fine sandy soil on top. After planting, press the soil down as firmly as possible. It is not necessary to water; just spray the branches with clean water 1-2 times a day, and after 3-4 days water thoroughly once. After that, do not water unless the soil is dry, and strictly prohibit waterlogging in the soil.
Second, when styling an elm bonsai, based on the basic form of the old stump, through wiring and bending, pruning, and so on, make it into different styles of bonsai such as straight-trunk style, curved-trunk style, slanting-trunk style, waterside style, cliff style, wind-blown style, forest style, root-on-rock style, and more. The styling time can be during the dormant period after leaf drop, or during the growing period, but the bud-break period must be avoided.
II. Care of elm bonsai
After it has taken shape, plant the elm bonsai in spring before growth starts into a fine pot such as a purple clay pot for viewing. It is best to use loose, breathable, well-drained sandy
soil rich in humus for planting. Usually place it in a well-ventilated spot with sufficient light for care, and keep the pot soil moist but not waterlogged. In summer, when it is hot and dry, you can sprinkle water on the ground around the plant, but it is not advisable to spray water directly on the leaves, so as to avoid the leaves becoming too large and losing their beauty. Apply a fully rotted, thin liquid fertilizer about once every 20 days.
Elm has very strong sprouting ability and grows relatively fast, so during the growing season it should be pruned frequently, cutting off overly long and messy branches to keep the tree shape beautiful. The best viewing period for an elm bonsai is when the new leaves have just emerged. If all the leaves are removed in early to mid-August and water and fertilizer management is then strengthened, new leaves will grow again by late September, increasing its ornamental value. In winter, move it to a bright, cool indoor space, or you can bury the whole pot in the ground outdoors in a wind-sheltered, sunny spot, reduce watering, and let the plant go fully dormant. During care, repot once every 2-3 years so that the bonsai grows vigorously and full of life.
Key points for caring for elm bonsai:
1. It likes light and is slightly shade-tolerant; avoid scorching sun in summer and autumn, and water more.
2. It can be pruned all year round, but do not prune on rainy days, to prevent sap flow and dead branches.
3. The soil should preferably be a humus mixed soil with a pH of 5.5~6.
4. During the growing period from April to October (except during the moldy rainy season), apply a thin organic fertilizer or cake fertilizer water once every 15~10 days. Use nitrogen, phosphorus, and potassium in combination. About 2 days after pruning, spray urea on the leaves. About 10 days before moving it indoors in winter, water once with an organic fertilizer or cake fertilizer water mainly based on phosphorus and potassium fertilizer, and after moving indoors apply cake fertilizer crumbs once;
5. Pruning: during the growing season, prune frequently to remove fine, dense branches and crossing branches;
6. For pests and diseases, use 80% dichlorvos at 1500x dilution or Fengleiji at 2000x dilution to spray and kill elm leaf beetles, scale insects, and longhorn beetles.
How to make an elm bonsai: rapid creation of an elm bonsai stump scene by large-trunk cuttings
Elm belongs to the elm family. It is a deciduous tree with alternate, small and dense, thick and hard, blue-green, rough leaves; the new leaves are fresh and tender and especially lovely. It blooms and bears fruit in March, and the fruit is called elm seed. It likes sunlight and is slightly shade-tolerant, suitable for a warm, humid climate and semi-dry soil, with strong adaptability, and can withstand cold, drought, barrenness, and sun. Usually watering should be sufficient, but there must be no waterlogging. It has strong sprouting ability, tolerates pruning, and its branches are flexible and easy to wire and shape, making it an ideal and excellent bonsai material.
Using large elm trunks for cutting propagation makes rooting easy and shaping fast, and is a good way to obtain relatively large, ideal elm stump scenes. The practice and experience of a flower-growing enthusiast are shared below:
Each year between Minor Cold and Great Cold, select a large, beautifully shaped trunk from a many-year-old elm and cut it off. According to the needs of the styling, cut off branches that affect the appearance, choose and keep one or two small branches at the top, but cut them short, then lightly hammer and break the surface near the cross-section (so that roots can grow out from the injured area), soak it in a rooting agent solution for a period of time, and then bury and insert it in a cutting bed or plant it in the ground.
The cutting stump requires good ventilation, sufficient light, and a south-facing position; the soil must have good water and air permeability, and coal cinders, plant ash, and so on can be added to the soil to help with water and air permeability. When inserting the cutting, press the soil around the cutting firmly so that the cutting is in close contact with the soil, and put on a plastic film bag and water thoroughly. After that, keep the soil moist, remove the bag in the morning and evening, and spray water on the cutting. Avoid the sun during the day, and remove the bag at night to let the branches contact dew. After one month, bud points appear, roots form and leaves sprout. When the buds grow to about 5 cm, the film bag can be removed, but shading is still needed. After one week, new branches have formed, and light can be gradually increased, up to full sun, to increase photosynthesis and promote branch and leaf growth and root development. After that, strengthen water and fertilizer management. After growth becomes normal, apply fully rotted farmyard manure once every 10 days to promote growth and thicken the trunk. Pest and disease control is also needed. Choose branch positions, wipe off excess branches and buds, correct the tree's vigor, and afterward let it develop freely.
In March of the second year, take it out of the ground, cut off useless branches, straighten out the direction of the root system, highlight the lateral roots and buttress roots, and at the same time cut the strong and support the weak (cut off thick long roots and protect fine roots), then transplant it into a large pot. Pay preliminary attention to styling the branches, and after it has adapted to the pot, strengthen water and fertilizer management and pest and disease control. During the growth process, cut off and wipe away useless branches and buds.
In the third year, while adjusting the direction of branch growth, also observe the development of the root system. In March and April, split the bark at positions lacking roots to force new roots to grow, making the root layout beautiful. In September, take it out of the pot again and readjust the root system. The second ground planting lets it grow well. At this time, because of the ground planting and strengthened water and fertilizer management, the root system is very developed, and the branches and leaves are lush, with very good growth.
In the fourth year, take it out of the ground again and change to pot cultivation. Each time it is taken out of and put into the pot, the root layout must be adjusted and the fine roots protected to help growth; at the same time, prune the branches and root system, cut off all excess branches, and also shorten the retained branches and thick roots. When finalizing the shape and potting, pay attention to choosing the viewing side. Press the pot soil firmly to about 3 cm from the pot rim, water thoroughly to settle the roots, and shade it. After growth becomes normal, it can receive full sun. Remove unwanted young shoots promptly when found.
The process of forming and caring for an elm stump scene by large-trunk cuttings is: first ground planting, then pot cultivation, then ground planting, then pot cultivation, repeated over and over, with careful cultivation, and also repeatedly adjusting the tree's vigor and root system, pruning branches and thick roots, choosing the viewing side, and so on.
Below, by the way, a few key points on elm care:
1. Location
Elm likes light and is cold-resistant, so it should be placed in an environment with good light and air circulation. In summer, the bonsai can be placed on wooden boards or foam boards to reduce root scorching caused by heat conduction from the ground.
2. Watering
Keep the pot soil moist, but it should not be waterlogged. When the weather is hot, you can spray water on the ground to increase humidity and lower temperature. However, it is not advisable to spray water on the leaves, so as to avoid the leaves becoming too large and affecting the shaping of the elm bonsai.
3. Fertilizing
During the growing season, apply a thin fertilizer once a month, mainly nitrogen and potassium fertilizer. Do not fertilize in winter.
4. Shaping
Elm has a relatively strong sprouting ability, so it should be pruned frequently during the growing season. Defoliating an elm can promote leaf sprouting and make the leaves smaller. Before entering autumn, remove the old leaves in several batches. After about 20 days, new leaves can grow, and it re-enters the viewing period, and leaf drop can also be delayed.
5. Repotting
Generally, repot once every 2-3 years, and it is best to choose the time during the spring growth-start period.
6. Pest and disease control
You can spray dichlorvos to control many pests such as elm leaf beetles, scale insects, and longhorn beetles.
Summary: The above is an introduction to knowledge about elm bonsai. I hope it is helpful to flower-growing enthusiasts who like growing elms.