How to Grow Gloxinia? Detailed Guide to Cultivation Methods and Precautions
1. Soil
For cultivating gloxinia, it is best to choose loose, fertile soil rich in humus, and the soil may be slightly acidic.
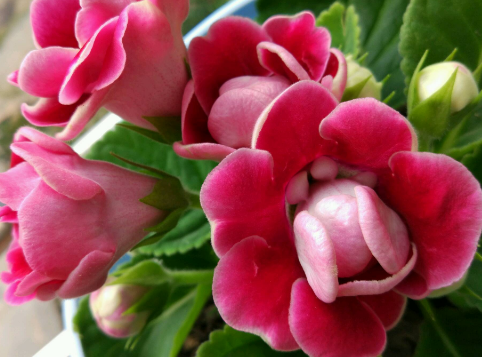
2. Temperature
Gloxinia prefers warmth, with an optimum growing temperature of 10-25°C, and the optimum growing temperature varies by season. From January to October, it is best at 18-25°C; from October to January of the following year, 10-12°C. A suitable temperature is more conducive to the plant blooming.
3. Light
Gloxinia likes sunlight and also enjoys semi-shaded environments. It is best to receive diffused light. Usually, appropriate shading is needed, and the gloxinia flowers will be more brilliant.
4. Water
Gloxinia needs moderate watering. Once there is too much water, it is very easy to cause tuber rot. In summer, when temperatures are high, watering can be appropriately increased, and water mist should be sprayed frequently.
Gloxinia Cultivation Methods
The gloxinia cultivation methods in this article include practical growing experience such as gloxinia sowing, cutting propagation, and flowering techniques, which are very valuable references for beginner flower lovers. Sowing is included because many flower lovers choose to start growing gloxinia from seed.
I. Gloxinia Sowing
1. Sowing: Pure peat is fine, a one-to-one mix of peat and perlite is also fine, and a three-in-one mix will also do, but the peat soil type is best finer, and the substrate should be kept moist before true leaves grow. Thoroughly wet the soil, then evenly scatter the dust-sized seeds,No need to cover with soil!!!You can place the growing medium one cm above the bottom, soaking it in a bottom tray, and let the water wick upward to keep the growing medium constantly moist until four true leaves grow out. Cover with a transparent lid and wait for germination in a place with sufficient diffused light.
2. Transplanting seedlings: Generally, gloxinia needs to be transplanted twice to grow quickly. I still do not understand the reason. Transplant once when there are four true leaves, and then transplant once more when a single leaf is only over 10CM long. This way it grows very quickly.
3. Final planting: When final planting, an appropriate amount of base fertilizer can be applied to help fully support the flowering period.
II. Leaf Cutting and Shoot Cutting Propagation
Leaf cutting
1. Healthy leaves are better as propagation leaves. Too old and they have poor vitality; too tender and they are immature. A petiole of 2-3CM is enough. The method is similar to that for violets: when the soil is wet, poke a hole, insert the leaf, and press lightly. For larger leaves, they can be split in two for insertion.
2. After the leaves are inserted, maintain appropriate moisture. They will sprout in about 1.5 months.If the leaves have not rotted and still have not sprouted after more than two months, you can remove the leaf blade, leaving only a short leaf stalk at the soil surface, control watering, and let the soil dry slightly. This may speed up sprouting.
3. Once sprouts emerge and reach four true leaves, they can be transplanted and finally planted. After the seedlings recover, place them in a location with relatively sufficient light for growing.
Shoot cutting
Remove excess side shoots or terminal shoots from gloxinia and use them as propagation material. This gives better growth speed and survival than leaf cutting.When using them for shoot cutting, remove the terminal flower buds to reduce nutrient consumption. Do not rush to see flowers. Once the plant is grown well, the flowers will definitely come, and they will be fuller and more brilliant.
III. Tuber Cultivation
1. Cutting back gloxinia is exactly the opposite of violets: keep the lower part, not the upper part. It is best to do this on a sunny day after the flowers have completely finished blooming, leaving 1-2 cm of stem.No watering is needed for 3 to 5 days after cutting back, to avoid wound infection causing tuber rot. After cutting back, new sprouts generally appear within ten days. When the sprouts reach four true leaves, you can change the soil and repot for transplanting, or continue growing in the original pot. Try not to repot and change soil immediately after cutting back, as this easily causes tuber rot.
2. After cutting back, the tuber usually sends out multiple sprouts at once. If not for propagation,you can keep only one among the many sprouts, remove the weak small sprouts. This helps concentrate nutrients, and the flowers will be more numerous and full.
IV. Gloxinia Flowering Techniques
1. Light must be sufficient. Gloxinia needs more light than violets. Direct sunlight before ten in the morning is fine. Insufficient light makes seedlings weak, with fewer and smaller flowers.
2、Keep only one sprout, do not pinch the top, so there will be more flower buds and higher flower quality.
3. During the flowering period, try not to let water fall on the flowers when watering. This will prolong the flowering time, especially for single-petal varieties.
4. Once a single-petal variety is successfully pollinated, the flower quickly drops. You should know that all plants consume a lot of energy to bloom. Flowers do not bloom to show off for us; they bloom for reproduction.
5. Because mature gloxinia plants are mostly top-heavy, it is best to give them support when they are blooming, propping them up with something, otherwise the flowers cannot be held upright properly.
V. Pests
1. Root mealybugs are good companions of gloxinia. Dry soil easily attracts root mealybugs. Although gloxinia can tolerate drought, it is best not to let it get too dry before watering. To treat root mealybugs, strong pesticides are needed. Phosmet can be used, but it has a strong odor, so use it with caution.
2. Mite damage is also common and can be killed with imidacloprid.
VI. Resistance
Gloxinia has average resistance and especially likes a clean environment. Many people feel that gloxinia says goodbye as soon as it says goodbye, with no psychological preparation at all. Miniature gloxinia has better resistance than large gloxinia, and trumpet gloxinia also has better resistance than large gloxinia. Once large gloxinia is found to be infected with bacteria, the slightly soft but not blackened leaves should be removed as soon as possible, and the petioles soaked in water until firm, then leaf-cut as a remedy. VII. About Flower Type and Flower Color
Many people agonize over flower color. Whether it is violets, gloxinia, or other gesneriads, after growing gesneriads for so many years, I have found that gesneriad flowers share some common traits: the flower shape is basically trumpet-shaped, and they can open sideways, facing upward, or hanging down. The color is not very stable. So-called stability is only relatively stable in a specific environment. Of course, there are also times when it runs completely wild; perhaps that can be considered a kind of mutation! Inthe legendary rainbow series, unstable flower color is especially obvious. Many times, flowers on the same gloxinia plant differ somewhat in color according to their order, and even the same flower differs somewhat from early to late flowering. So everyone should not agonize too much over flower color. If the plant is grown well and the timing is right, I think the flowers that bloom are the authentic flowers, at least authentic for that period.
VIII. Tubers
1. Relatively speaking, double-flowered tubers are smaller, upward-facing ones are a bit larger, large-flowered side-facing ones are even larger, and small-flowered side-facing ones are the largest.
2. For large tubers, it is better to plant them with 1/6 exposed above the soil surface, as this makes tuber rot less likely. It is also said that tubers over three years old will age, so you can consider cutting them into small pieces at the sprouting points, drying them, and replanting new double-flowered plants.
Gloxinia Cultivation Methods
If you want gloxinia to bloom more, you should first choose excellent imported F1 hybrid varieties that bloom abundantly, have short and sturdy plant shapes, strong disease resistance, rapid growth, and are easy to manage as mother plants. Single-petal varieties bloom more than double-petal varieties. Seedling raising generally uses sowing. After seedlings emerge, promptly strengthen daily management, and pay attention to small seedlings that simultaneously have three cotyledons. Such seedlings often bloom more, and this trait is hereditary, so it can be used through asexual propagation.
The suitable growing temperature for gloxinia is 10-25°C. Different seasons have different requirements: from January to October, 18-25°C; from October to January of the following year, 10-12°C. A suitable temperature can make the leaves grow luxuriant and green, and the flowers large and vivid. When the plant wilts and goes dormant, take out the tuber and store it in slightly moist sand.
Gloxinia is a semi-sun plant. Usually, appropriate shading is needed to avoid direct strong light on gloxinia. In winter during the seedling stage, sunlight should be sufficient to promote robust seedling growth. In summer, it must be carefully maintained in a ventilated shade shed with diffused light. During the growing period, light must not be too strong, otherwise growth will be inhibited. When blooming, shading time should be appropriately extended to help prolong the flowering period.
Gloxinia flowers and leaves have fine hairs. Once they get water droplets on them, they rot very easily, so do not spray water on the flowers and leaves. It is best to use the immersion watering method. Usually, watering should be moderate. Too much water very easily causes tuber rot, yellowing leaves, and even death of the whole plant. During the high-temperature period in summer, water 1-2 times a day. When the air is dry, frequently spray water around the plant to increase environmental humidity. Watering should be even, not too dry or too wet, and avoid sudden changes from cold to hot. During the flowering period, rain must be avoided. In winter, the potting soil should be a bit drier.