How to propagate Gloxinia? A detailed guide to common propagation methods
1. Seed propagation
To sow Gloxinia seeds, soak them for one day to encourage germination, then evenly scatter the seeds over the potting soil, moisten the pot with water, cover with glass, and place in an environment of 18-20°C; they will generally germinate after about ten days.
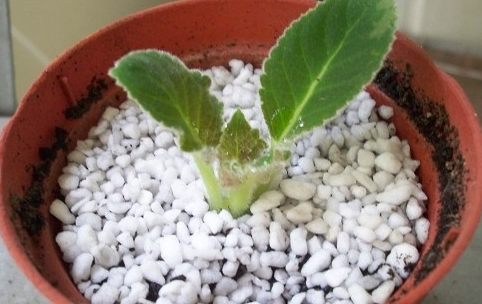
2. Division propagation
The corms need to be two to three years old, and this should be done while they are in a dormant state. Bury the corms in soil, water thoroughly, and place indoors at 22°C to encourage sprouting. When the young shoots grow to about 1 cm, dig out the corms and cut them into two to four pieces. Each piece must have at least one bud. Place each piece in a new pot to form a new plant. This is usually done in autumn.
3. Stem cutting propagation
Select newly sprouted tender shoots about two to three cm long from the plant's corms and insert them into fine sand or soil. Then place them in a spot with scattered light, keep the temperature between 18-20°C, and roots will grow in half a month.
4. Leaf cutting propagation
Select healthy leaves and remove them together with the petiole, cut off half of the leaf, insert it at an angle into the growing medium, keep the soil moist, then cover with glass and place in a shaded environment, maintaining a room temperature of 25°C and high humidity; roots will grow about 20 days after insertion.
How to grow Gloxinia
1. Soil
For cultivating Gloxinia, it is best to choose loose, fertile soil rich in humus; the soil may be slightly acidic.
2. Temperature
Gloxinia prefers warmth, with an optimal growing temperature of 10-25°C, and the optimal growing temperature differs by season: from January to October it is best at 18-25°C, and from October to January of the following year at 10-12°C. Suitable temperatures are more conducive to the plant blooming.
3. Light
Gloxinia likes sunlight and also likes semi-shaded environments; it is best to receive scattered light. Normally provide appropriate shade, and the Gloxinia flowers will be more vibrant.
4. Water
Gloxinia needs moderate watering; once there is too much water, the tubers are very prone to rotting. In summer's high temperatures, watering can be appropriately increased, and water mist should be sprayed frequently.
How to grow Gloxinia
The Gloxinia growing methods in this article include practical growing tips such as Gloxinia sowing, cutting propagation, and flowering techniques, which are very valuable for beginner flower enthusiasts. Sowing is included because many flower enthusiasts choose to start growing Gloxinia from seed.
I. Sowing Gloxinia
1. Sowing: Pure peat is fine, a one-to-one mix of peat and perlite is also fine, and a three-in-one mix works too, but the peat soil type is best finer, and the medium should remain moist as much as possible before true leaves grow. Thoroughly wet the soil, then evenly scatter the dust-sized seeds,No need to cover with soil!!!You can place the growing medium with its bottom one cm soaked in a saucer, letting water wick upward to keep the growing medium constantly moist until four true leaves grow out. Cover with a transparent lid and wait for germination in a spot with ample scattered light.
2. Transplanting seedlings: Generally, Gloxinia needs to be transplanted twice to grow quickly; I still can't figure out the reason. Transplant once at four true leaves, then transplant again when a single leaf grows beyond 10CM, which is better; this way it grows very fast.
3. Planting out: When planting out, you can appropriately add a little base fertilizer to help fully build up its flowering capacity.
II. Leaf cutting and shoot cutting propagation
Leaf cutting
1. Healthy leaves are better as propagation leaves; too old and their vitality is poor, too young and they are immature. A petiole of 2-3CM is fine. The method is similar to that for violets: wet the soil, poke a hole, insert the leaf, and press lightly. For larger leaves, they can be split in two and inserted.
2. After the leaves are inserted, maintain appropriate humidity; they will sprout in about 1.5 months.If the leaves have not rotted and still have not sprouted after more than two months, you can remove the leaves, leaving only a short petiole at the soil surface, control watering, and let the soil dry slightly; this may speed up sprouting.
3. Once shoots appear and there are four true leaves, you can transplant and plant out; after the seedlings recover, place them in a spot with relatively ample light for growing.
Shoot cutting
Remove the excess side shoots or terminal shoots of the Gloxinia to use as propagation material; this way the growth speed and survival rate are better than with leaf cuttings.When using shoot cuttings, remove the terminal flower buds to reduce nutrient consumption; don't rush to see flowers. If grown well, the flowers will surely come, and they will be fuller and more vibrant.
III. Corm growing
1. Decapitating Gloxinia is exactly the opposite of violets: keep the lower part, not the upper part. It is best to do this on a sunny day after the flowers have completely finished blooming, leaving a stem of 1-2 cm.No watering is needed for 3 to 5 days after decapitation, to avoid wound infection leading to corm rot. After decapitation, new shoots generally emerge within ten days. Wait until the shoots grow to four true leaves, then you can change the soil and pot for transplanting, or continue growing in the original pot. Try not to change the pot and soil right after decapitation, as this easily causes corm rot.
2. The corm after decapitation usually sends up multiple shoots at once; unless it is for propagation,you can keep only one among all the shootsand remove the weak small shoots. This helps concentrate nutrients, and the flowers will bloom more abundantly and fully.
IV. Gloxinia flowering techniques
1. Light must be sufficient. Gloxinia needs more light than violets; direct sunlight before ten in the morning is fine. Insufficient light makes the seedlings weak, with few and small flowers.
2、Keep only one shoot, do not pinch the top; this way there will be more flower buds and higher flower quality.
3. During the flowering period, try not to water onto the flowers when watering; this will extend the flowering time, especially for single-petal varieties.
4. Once a single-petal variety is successfully pollinated, the flowers drop quickly. You should know that all plants expend a lot of energy to bloom; flowers do not bloom to show off for us, but for reproduction.
5. Because mature Gloxinia plants are mostly top-heavy, it is best to give them support when they are blooming, propping them up with something, otherwise the flowers cannot be held up properly.
V. Pests
1. Root mealybugs are a good companion of Gloxinia; dry soil easily invites root mealybugs to visit. Although Gloxinia can tolerate drought, it is best not to let it get too dry before watering. To treat root mealybugs you need strong pesticides; phosmet works, but it has a strong odor, so use it with caution.
2. Mite damage is also common; you can use imidacloprid to kill them.
VI. Resistance
Gloxinia has average resistance and especially likes a clean environment. Many people feel that: Gloxinia says goodbye just like that, with no mental preparation at all. Mini Gloxinia has better resistance than large Gloxinia, and trumpet types also have better resistance than large Gloxinia. Once you find that large Gloxinia has been infected by bacteria, you should remove the slightly soft but not blackened leaves as soon as possible, soak the petioles in water until they harden, and then rescue them by leaf cutting. VII. About flower shape and flower color
Many people are quite conflicted about flower color. Whether it is violets, Gloxinia, or other gesneriads, after growing gesneriads for so many years, I have found that the flowers of the Gesneriaceae have some common traits: the flower shape is basically trumpet-shaped, and they can open sideways, upward, or downward. The color is not very stable; so-called stability is only relatively stable in a specific environment. Of course, there are also times when it goes completely off the rails; perhaps that counts as a kind of variation! Inthe legendary rainbow series, unstable flower color is especially obvious. Many times, flowers in different sequential positions on the same Gloxinia plant are not quite the same in color; even the same flower differs somewhat between its early and late blooming stages, so everyone should not be too conflicted about flower color. If the seedling is grown well and the timing is right, I think the flowers that bloom are the genuine flowers, at least genuine for that period.
VIII. Corm
1. Relatively speaking, double-petaled corms are smaller, upward-facing ones are a bit larger, large-flowered side-facing ones are even larger, and small-flowered side-facing ones are the largest.
2. For large corms, it is better to plant them with 1/6 exposed above the soil surface; this makes corm rot less likely. It is also said that corms older than three years will age, so you can consider cutting them into pieces again at the bud points, drying them briefly, and replanting them as new double-petaled plants.