How to grow Nemophila? Keep this cultivation guide handy
Humidity management
It prefers higher air humidity; if the air humidity is too low, individual flowers will fade faster. It also fears rain, so the leaves need to be kept dry at night. The optimal relative air humidity is 65-75%.
Temperature management
It prefers a warm climate and dislikes extreme heat. When summer temperatures are above 34°C, growth is noticeably poor; it is not tolerant of frost and cold, and when winter temperatures fall below 4°C, it enters dormancy or dies. The most suitable growing temperature is 15-25°C. It is generally sown in autumn or winter to avoid high summer temperatures.
Light management
In spring, summer and autumn, it needs to be grown under shaded conditions. When temperatures are relatively high (daytime temperature above 25°C), if it is placed in direct sunlight, the leaves will become noticeably smaller, the internodes of the branches will shorten, the lower leaves will yellow and drop, and growth will be very slow or it will enter a semi-dormant state.
In winter, since the temperature is not very high, it should be given direct sunlight to help it carry out photosynthesis and to form flower buds, bloom and set seed.
During the flowering period, after keeping it indoors for a period (10-15 days), it should be moved outdoors to a shaded spot for a period (about one month), and alternated back and forth in this way, to help the plant accumulate nutrients and continue blooming.
Fertilizer and water management
Like other herbaceous flowers, it has relatively high fertilizer and water requirements, but the fertilization (and watering) principle of "apply light fertilizer frequently, use small amounts but more often, and provide complete nutrition" should be followed, and after fertilizing, the leaves and flowers should be kept dry at night.
The above is an introduction to the question of how to grow Nemophila. Now let's look at what to pay attention to when growing Nemophila!
Cultivation methods and precautions for Nemophila
Cultivation methods for Nemophila
Pot and soil selection
To grow Nemophila, choose a flower pot of appropriate size, and leave enough growing space for the plant. Add soil to the pot: first sprinkle a layer of coarse sand in the pot as a drainage layer, then sprinkle on decomposed organic fertilizer, then add soil. The soil can be mixed yourself.
Light and temperature
Nemophila prefers a warm growing environment and is neither heat-tolerant nor cold-tolerant. The suitable growing temperature is between 15°C-25°C. When the summer temperature is above 34°C, growth will be poor, and when the winter temperature is below 4°C, it will go dormant or die. Therefore, avoid high summer temperatures and low winter temperatures.
Light should be sufficient, but take care not to expose it to direct light for long periods. In spring, summer and autumn, shading is needed; in winter, when the temperature is lower, Nemophila can be given direct sunlight.
Watering and fertilizing
Nemophila has relatively high water and fertilizer requirements; it likes more fertilizer and water and requires higher air humidity. Watering and fertilizing should follow the principle of frequent applications in small amounts. During the peak growing seasons of spring and autumn, water and fertilize more frequently, but be careful to reduce watering on cloudy and rainy days to avoid waterlogging. In summer's high temperatures and winter's low temperatures, water and fertilizer need to be controlled, and the intervals between watering and fertilizing should be longer. In summer, water as much as possible in the early morning when temperatures are low; in winter, mainly choose the warmer midday.
Precautions for growing Nemophila
Propagation methods
The commonly used propagation method for Nemophila is seed propagation, usually sown in autumn, or sown in April.
Pruning and pinching
During the growth of Nemophila, it needs frequent pruning or pinching. Pinching before flowering can encourage more branches to sprout. When pinching, take care to keep 4-6 leaves and remove the top shoot. In addition, yellow leaves and branches can be pruned regularly.
Morphological characteristics of Nemophila; cultivation and propagation methods of Nemophila
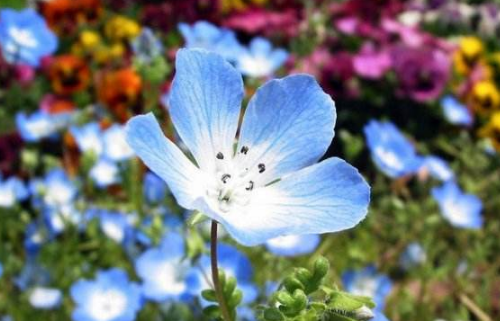
Nemophila is an herbaceous flower with fresh flowers, sky blue with a white center. The flowering period is spring and summer. There are white-flowered types and tricolor types (white edges, purple center, yellow inside). It is an annual herb, 10-30 cm tall, prostrate, semi-succulent, with branches generally trifurcate. It is a traditional North American flower used for flowerbed edges, and can also be sown in autumn as a greenhouse potted flower.
Nemophila is prostrate, semi-succulent, with branches generally trifurcate. The leaves are opposite, oblong-obovate, and pinnately parted. The flowers are solitary in the leaf axils, gamopetalous, with 5 lobes at the tip, forming a disc shape. The flowers may have a bright blue base with a white center, or a white base with a black center, or be blue with purple veins, etc., with a drop of purple at the tip of the petal. The flowering period is April-September, and the capsule is spherical.
Morphological characteristics of Nemophila
Nemophila is a weak, creeping herb, covered with short soft hairs throughout except for the corolla. The creeping stems are slender and spreading, up to 1 m long, with short internodes 1.5-4 cm long; the nodes are slightly swollen, with fibrous adventitious roots below. The leaves are solitary at the nodes, ascending, with long petioles 2.5-6 cm long, about 1.2 mm in diameter, as thick as or slightly thicker than the creeping stems; the leaf blade outline is ovate or oblong-ovate, papery, 2-5 cm long, usually pinnately parted almost to the midrib, rarely shallowly lobed with large rounded teeth, with 5-9 lobes, obovate, with rounded teeth bearing short mucros above the middle or in the upper part.
The flowers of Nemophila are solitary in the leaf axils; the pedicels are slender, nearly as long as the petioles, curling in the fruiting stage; the bracts are small, subulate-triangular; the calyx is campanulate, membranous, 5-7 mm long, 5-lobed to the middle, with lobes ovate to oblong-elliptic; the corolla is white, 7-12 mm long, funnel-shaped, the corolla tube about half the length of the corolla or slightly shorter, the inner surface densely covered with unicellular barbate hairs from the throat to near the base, with 5 lobes, oblong to spatulate; stamens 4, inserted at the throat of the corolla, anthers narrowly sagittate, 2-celled, connate at the apex; the disc is well developed and cup-shaped, enclosing 2/3 of the ovary; the ovary is ovate, with barbate hairs at the apex or nearly glabrous; the style is slightly shorter than the corolla, and the stigma is shallowly 2-lobed.
The capsule of Nemophila is spherical, 4-5 mm in diameter, enclosed in the persistent calyx; the seeds are large and few, flat-round, about 1.5 mm in diameter, with a mucilaginous seed coat densely covered with subpeltate long hairs. The flowering and fruiting period is April-September.
Ecological habits of Nemophila
Nemophila is not very cold-hardy and dislikes heat. Nemophila grows in fields, ditch sides, grasslands and open forests at an altitude of 1500-2500 m.
Cultivation methods for Nemophila
Humidity management
It prefers higher air humidity; if the air humidity is too low, individual flowers will fade faster. It also fears rain, so the leaves need to be kept dry at night. The optimal relative air humidity is 65-75%.
Temperature management
It prefers a warm climate and dislikes extreme heat. When summer temperatures are above 34°C, growth is noticeably poor; it is not tolerant of frost and cold, and when winter temperatures fall below 4°C, it enters dormancy or dies. The most suitable growing temperature is 15-25°C. It is generally sown in autumn or winter to avoid high summer temperatures.
Light management
In spring, summer and autumn, it needs to be grown under shaded conditions. When temperatures are relatively high (daytime temperature above 25°C), if it is placed in direct sunlight, the leaves will become noticeably smaller, the internodes of the branches will shorten, the lower leaves will yellow and drop, and growth will be very slow or it will enter a semi-dormant state.
In winter, since the temperature is not very high, it should be given direct sunlight to help it carry out photosynthesis and to form flower buds, bloom and set seed.
During the flowering period, after keeping it indoors for a period (10-15 days), it should be moved outdoors to a place with shade (and warmth) for a period (about one month), and alternated back and forth in this way, to help the plant accumulate nutrients and continue blooming.
Fertilizer and water management
Like other herbaceous flowers, it has relatively high fertilizer and water requirements, but the fertilization (and watering) principle of "apply light fertilizer frequently, use small amounts but more often, and provide complete nutrition" should be followed, and after fertilizing, the leaves and flowers should be kept dry at night:
Spring and autumn: These two seasons are its peak growing seasons. Fertilizer and water management follows the cycle of "Huabao" - "Huabao" - clear water - "Huabao" - "Huabao" - clear water (at least two applications of "Huabao" per week are guaranteed). The interval is about: 1-4 days for outdoor cultivation, shorter intervals on sunny days or during high temperatures, and longer intervals or no watering on cloudy and rainy days or during low temperatures; 2-6 days for indoor cultivation, shorter intervals on sunny days or during high temperatures, and longer intervals or no watering on cloudy and rainy days or during low temperatures.
Summer: During the high-temperature period in summer, it often enters a dormant state and has low fertilizer and water requirements, and may even need controlled fertilizer and water. Fertilizer and water management follows the cycle of "Huabao" - clear water - clear water - "Huabao" - clear water - clear water. The interval is about: 3-5 days for outdoor cultivation, shorter intervals on sunny days or during high temperatures, and longer intervals or no watering on cloudy and rainy days or during low temperatures; 4-7 days for indoor cultivation, shorter intervals on sunny days or during high temperatures, and longer intervals or no watering on cloudy and rainy days or during low temperatures. Watering should be done as much as possible in the early morning when temperatures are lower, keep the leaves dry at night, and also mist the plant frequently.
Winter: During the winter dormant period, the main task is to control fertilizer and water. Fertilizer and water management follows the cycle of "Huabao" - clear water - clear water - "Huabao" - clear water - clear water. The interval is about 7-10 days, shorter on sunny days or during high temperatures, and longer or no watering on cloudy and rainy days or during low temperatures. Watering should be done as much as possible at midday on sunny days when temperatures are relatively high.
Propagation methods for Nemophila
Seed propagation
Nemophila is often sown in autumn after mid-to-late September, or sown in pots in early April.
1. Substrate disinfection
Disinfect the substrate used for sowing. The best method is to heat it in a pot until hot, which will scald all pests and diseases to death.
2. Stratification
Soak the seeds in warm water (about the same temperature as face-washing water) for 3-10 hours, until the seeds absorb water and swell. For very common seeds that germinate easily, this step can be skipped.
3. Sowing
For tiny seeds that are difficult to pick up with hands or other tools, you can moisten one end of a toothpick with water, stick the seeds one by one onto the surface of the substrate, and cover with 1 cm of substrate, then place the sown flower pot into water with a depth of 1/2-2/3 of the pot's height, letting the water slowly seep up (this method is called the "pot immersion method"); for larger seeds that can be picked up with hands or other tools, place the seeds directly into the substrate and sow them in spots at a spacing of 3 x 3 cm. After sowing, cover with substrate to a thickness of 2-3 times the seed size. After sowing, use a sprayer or fine-hole watering can to wet the sowing substrate, and water again when the pot soil is slightly dry. Still be careful not to water too forcefully, to avoid washing the seeds up.
Post-sowing management
After autumn sowing, when a cold wave with low temperatures occurs, the flower pot can be wrapped in plastic film to help keep it warm and moist; after the seedlings emerge, promptly uncover the film, and let the seedlings receive sunlight before 9:30 a.m. or after 3:30 p.m. each day, otherwise the seedlings will grow very weak; after most of the seeds have emerged, appropriate thinning is needed: pull out diseased and unhealthy seedlings so that the remaining seedlings have some space between each other; when most of the seedlings have grown 3 or more leaves, they can be transplanted into pots.
Cutting propagation
1. Cutting substrate
This refers to the nutrient soil, river sand, peat soil and other materials used for cuttings. For home cuttings, it is difficult to obtain an ideal cutting substrate due to limited conditions. It is recommended to use the ready-mixed and disinfected cutting substrate provided by this site; medium-coarse river sand can also be used, but it should be rinsed several times with clean water before use. Do not use sea sand or river sand from saline-alkali areas; they are not suitable for the growth of flowers and plants.
2. Selection of cutting branches
The branches used for cuttings are called cuttings. Usually, in combination with pinching, the thick, pest-free top shoots that are removed are used as cuttings, and the top shoots are used directly for cuttings.
Post-cutting management
1. Temperature
The optimal temperature for cutting rooting is 18°C-25°C. Below 18°C, the cuttings root with difficulty and slowly; above 25°C, the cut ends of the cuttings are easily infected by pathogens and rot, and the higher the temperature, the greater the proportion of rot. When low temperatures occur after cutting, the main measure for keeping warm is to wrap the flower pot or container used for cuttings in plastic film; when the temperature is too high after cutting, the main cooling measure is to shade the cuttings, blocking out 50-80% of the sunlight, and at the same time mist the cuttings 3-5 times a day. On sunny days with higher temperatures, mist more often; on cloudy and rainy days with lower temperatures and higher humidity, mist less often or not at all.
2. Humidity
After cutting, the relative air humidity must be maintained at 75-85%. Humidity can be increased by misting the cuttings 1-3 times a day. On sunny days, the higher the temperature, the more often you mist; on cloudy and rainy days, the lower the temperature, the less often you mist or you do not mist. However, excessive misting makes the cuttings susceptible to infection by pathogens and rot, because many kinds of pathogens exist in water.
3. Light
Cutting propagation cannot do without sunlight, but the stronger the light, the higher the temperature inside the cuttings, the more vigorous the transpiration of the cuttings, and the more water is consumed, which is not conducive to the survival of the cuttings. Therefore, after cutting, 50-80% of the sunlight must be blocked. After the root system grows, gradually remove the shade net: on sunny days, remove the shade net at 4:00 p.m. each day, and put the shade net back before 9:00 a.m. the next day.
After reading the above introduction to the cultivation and propagation methods of Nemophila, do you have a better understanding of how to grow and propagate Nemophila? To learn more about Nemophila, please continue to follow us.