A Detailed Guide to Propagating Eustoma (Lisianthus) by Cuttings
Eustoma Cuttings: Choosing Material
For cuttings to succeed, choosing the right material is very important. It is best to choose the part of the eustoma with strong meristematic capacity; you can select the stem below the second pair of leaves beneath the heart leaf after jointing.
Do not choose the stem below the first pair of leaves beneath the heart leaf, because they are still rather tender and have high nutrient requirements, so the survival rate is not high, which is not conducive to taking cuttings.
It is best to select a cutting with only one pair of leaves, as this will increase the survival rate.
Eustoma Cuttings: Treating the Cuttings
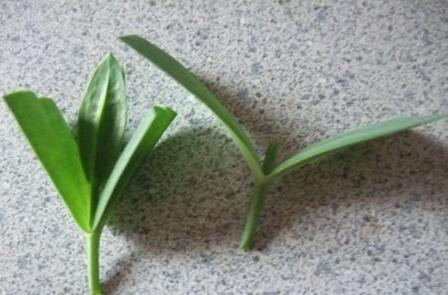
Cut the cutting diagonally into a small section containing one pair of leaves. The purpose of the diagonal cut is to increase the area of meristematic tissue at the cut end. This increases the contact area, which is more conducive to taking cuttings.
Then cut each leaf in half, because at the beginning of rooting the cutting has no root system, and all the nutrients it needs come from what was stored beforehand. You can only cut half, not remove them entirely, because then it would be unable to carry out photosynthesis.
Eustoma Cuttings: Preparing the Substrate
Before sowing, water the substrate thoroughly to keep it moist.
Choose a slightly alkaline substrate, with the pH kept at 6-6.5. You can use peat plus some vermiculite and perlite, add some carbendazim and mix, then disinfect the substrate to prevent the breeding of pathogens.
How to take eustoma cuttings? Propagation methods for eustoma by cuttings
The most commonly used method of propagating eustoma is sowing. In fact, besides sowing, cuttings can also be used for propagation. However, because many flower lovers do not master the correct method when taking cuttings, the survival rate of eustoma after cuttings is not high. Below, we bring you practical propagation methods for eustoma by cuttings, which can effectively increase the survival rate.
Image: Propagation methods for eustoma by cuttings
1. Choosing Material
Choose the part of the eustoma with strong meristematic capacity. It is best to choose the stem below the second pair of leaves beneath the heart leaf after jointing, as its meristematic capacity is stronger, so choosing the right cutting is very important. The stem below the first pair of leaves beneath the heart leaf is rather tender and has high nutrient requirements, so the survival rate is slightly lower. It is best to select a cutting with only one pair of leaves, as the survival rate will also increase.
2. Treating the Cuttings
Cut the cutting diagonally into a small section containing one pair of leaves. The purpose of the diagonal cut is to increase the area of meristematic tissue at the cut end. Then cut each leaf in half, because at the beginning of rooting the cutting has no root system, and all the nutrients it needs come from what was stored beforehand; cutting the leaves in half can reduce nutrient consumption and is more conducive to rooting. But do not remove all the leaves, because then the cutting would be unable to carry out photosynthesis and produce nutrients.
3. Preparing the Substrate
Choose a slightly alkaline substrate, with the pH kept at 6—6.5. You can use peat plus some vermiculite and perlite, add some carbendazim and mix, then disinfect the substrate to prevent the breeding of pathogens. Before sowing, water the substrate thoroughly to keep it moist.
Image: Propagation methods for eustoma by cuttings
4. Specific Steps
1. Use a chopstick or wooden stick to poke a small hole in the potting soil, and place the cutting into it;
2. Press the potting soil firm with your hands and water thoroughly;
3. Cover with plastic film or a transparent lid, and poke a few small holes in it for ventilation;
4. Place the flowerpot in a bright place that is not too warm; in winter and early spring it can receive direct sunlight;
5. After 10 days the plastic film or plastic lid can be removed, and in 3—5 weeks the cutting can take root; once rooted to a certain degree, the above-ground part will begin to sprout new shoots;
6. When the new shoots grow their second pair of leaves, they can be transplanted, and at this point normal care can be carried out.
The above is an introduction to the propagation methods for eustoma by cuttings. Eustoma likes a warm, humid environment with plenty of sunlight, is relatively drought-tolerant, and is not tolerant of waterlogging, so everyone needs to pay special attention during care.
How to propagate eustoma: sowing and cutting propagation methods
How to propagate eustoma: eustoma can be propagated by sowing seeds and by stem cuttings, so next let us learn about the cutting and seed-sowing methods for eustoma separately.
How to propagate eustoma 1. Cutting propagation method a. Choosing branchesBe sure to select relatively robust ones from mature plants, as this can effectively increase the success rate.
b. Cutting methodFirst choose the growing soil, then use a stick to poke a hole in the soil and put the cutting in, then bury it firm with soil, water it thoroughly, and cover the top layer with plastic wrap.
To maintain ventilation, poke a few small holes in the plastic wrap, then place it in a bright place. After about a week or more, the wrap can be removed, and after a month you will find that the cutting has taken root.
2. Seed-sowing method a. Choosing soilFor sowing eustoma seeds, the soil is generally chosen with peat as the main component, then add a little perlite and other soil with relatively large particles, which can increase water permeability and air permeability, and then add some disinfectant to disinfect.
b. Seed-sowing methodAfter scattering the seeds into the growing soil, there is no need to cover the seeds with a layer of soil. Generally the germination temperature needs to be controlled at around 24°C, and after about half a month you can see the seeds sprout. After germination, keep plenty of sunlight, and the potting soil can be kept slightly moist, but there must be no waterlogging.
c. Planting out and pottingWhen the eustoma gradually grows four or five leaves, it can be planted out. When planting out, you can plant several together, so that when the eustoma reaches the flowering stage it will look very beautiful. Generally a flowerpot with a diameter of about 21 cm can hold five eustoma plants. After the eustoma is potted, be sure to remember to fertilise, which helps development.