High-Yield Bed-Rack Cultivation Techniques for Button Mushrooms in Mushroom Houses
1. Mushroom house and bed rack structure. The mushroom house is 19.6 m long from east to west, 9 m wide from north to south, with front and rear walls 2.5 m high and gable walls 3.5 m high. The walls are built of bricks with lime mortar. The outside is pointed with cement; the inside is first coated once with lime mortar, then whitewashed once with lime mortar. The front and rear walls have 4 ventilation windows each of 25 cm x 20 cm, positioned above and below facing the walkways, with the first ventilation window 20 cm from the ground. Doors are set at both ends of the front wall, 1.0 m wide and 1.8 m high; the floor is paved with bricks and joints filled with cement. The roof is constructed with bamboo poles and plastic film. The bed racks are 7.8 m long, 1.5 m wide and 2.3 m high, with 5 tiers in total. The first tier is 10 cm from the ground, and the spacing between the tiers above is 55 cm. There is 1 east-west walkway against the front wall, 0.7 m wide; and 10 north-south walkways, each 0.65 m wide. The total cultivation area is 500 sq m.
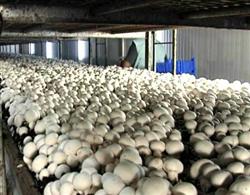
1. Mushroom house and bed rack structure. The mushroom house is 19.6 m long from east to west, 9 m wide from north to south, with front and rear walls 2.5 m high and gable walls 3.5 m high. The walls are built of bricks with lime mortar. The outside is pointed with cement; the inside is first coated once with lime mortar, then whitewashed once with lime mortar. The front and rear walls have 4 ventilation windows each of 25 cm x 20 cm, positioned above and below facing the walkways, with the first ventilation window 20 cm from the ground. Doors are set at both ends of the front wall, 1.0 m wide and 1.8 m high; the floor is paved with bricks and joints filled with cement. The roof is constructed with bamboo poles and plastic film. The bed racks are 7.8 m long, 1.5 m wide and 2.3 m high, with 5 tiers in total. The first tier is 10 cm from the ground, and the spacing between the tiers above is 55 cm. There is 1 east-west walkway against the front wall, 0.7 m wide; and 10 north-south walkways, each 0.65 m wide. The total cultivation area is 500 sq m.
2. Cultivation schedule. Button mushroom cultivation is generally carried out in spring and autumn. In our city, the pre-wetting time for wheat straw cultivation is August 5-15; the spawning period is September 5-15; while the pre-wetting time for cottonseed hulls is September 10-15; and the spawning period is September 15-20.
3. Strain selection. Select the As2796 strain, which has high yield, strong resistance to contaminants and wide adaptability.
4. Compost formula (calculated per 100 sq m of actual cultivation area). (1) Wheat straw 3000 kg, fresh chicken manure 3.5 cubic m (or dried chicken manure 900 kg), urea 35 kg, superphosphate 35 kg, gypsum powder 100 kg, lime powder 50 kg, calcium carbonate 50 kg; (2) Cottonseed hulls 1500 kg, special fertilizer for button mushrooms 100 kg, gypsum powder 30 kg, lime powder 15-20 kg.
5. Compost preparation
5.1. Wheat straw compost preparation. (1) First fermentation: according to the schedule, pre-wet the wheat straw. The more thoroughly and evenly it is pre-wetted, the better; err on the side of wet rather than dry. There are two specific methods: one is to soak it in 0.5% lime water in a pit dug in advance, then after it has absorbed enough water, take it out and mix it evenly with the pre-piled chicken manure in proportion to build a heap; the other is to spread the wheat straw 40-60 cm thick on a hard surface, then spray water to let it absorb fully; on the second day, pile it into a heap 1 m high, and spray 5% lime water around it; on the third day, continue spraying water until the wheat straw is thoroughly and evenly wet, with a moisture content of about 60% (pull out a few stalks of wheat straw and twist them by hand; water should seep out). However, note that lime powder should not be directly scattered during pre-wetting. Likewise, mix thoroughly and evenly with the pre-piled chicken manure in proportion. One day before building the heap, scatter a layer of lime powder or sprinkle a pass of 10% concentrated lime water on the base of the heap. On the second day when building the heap, evenly add the urea into the mixed wheat straw, and at the same time place the wheat straw that is not thoroughly wet locally into the pre-dug water pit to soak, then place it on top of the heap. The heap runs north-south, 1.6-1.8 m wide, about 2 m high, with unlimited length, vertical on all sides, and a turtle-back shaped top, covered with straw mats. Start measuring temperature on the second day, once every 2-3 h. When the temperature rises to 65 degrees C, maintain it for 3-4 d, then carry out the first turning. Before turning, leave a ventilation channel at the base of the heap or lay wooden sticks. In conjunction with turning, adjust the moisture so that the moisture content reaches about 75% (squeeze the compost tightly by hand; about 10 drops of water should drip out). At the same time, evenly add the gypsum powder as well. If the compost is on the acidic side when turning, adjust the pH to 8.0 with 2%-5% lime water. The heap height and width remain unchanged, and the length is shortened. After turning, sweep the debris around the heap clean. Start measuring temperature on the second day, and when the temperature rises again to 65 degrees C, maintain it for 3-4 d. Carry out the second turning. Before turning, first moisten the compost around the heap with a sprayer; alternatively, first gather the dry compost on the outer surface of the heap together and spray water to wet it thoroughly, then put it into the middle and upper part of the heap when turning. Adjust the moisture content to about 72% and the pH value to 7.8. After turning, still maintain at 65 degrees C for 2.5-3.0 d, then carry out the third turning. Before turning, likewise leave a ventilation channel or lay wooden sticks, and aerate for fermentation, maintaining for 2.5-3.0 d. Generally, if water is adjusted properly and the heap temperature is normal, 3 turnings are enough for the first fermentation; if water adjustment is improper or the compost temperature is on the low side, a fourth turning is still needed. After each turning, spray the surface of the heap with 0.5% dichlorvos and 1000-fold dilution of 80% deltamethrin. (2) Second fermentation (post-fermentation): wheat straw compost second fermentation is divided into two types: second fermentation outside the mushroom house and second fermentation inside the mushroom house. For the second fermentation site outside the mushroom house, first carry out a thorough cleanup. Then spray 1000-fold dilution of 80% deltamethrin; and scatter a thin layer of quicklime powder (just enough not to expose the ground surface). After building ventilation channels with bricks (with 5-8 cm gaps between bricks) and air draft chimneys (preferably built into brick cages with ventilation on all four sides), pile the compost in a north-south direction, with a heap height of 1.5 m, width of 1.2 m, length of about 20 m, a turtle-back shaped top, and vertical on all four sides. After the heap is built, block the air draft chimneys. Before 9:00 a.m. on the second day, cover the compost heap with plastic film, with a spacing of 20-30 cm between the film and the compost; for ease of operation, the spacing may be larger. When the air temperature within the spacing rises to about 45 degrees C, fumigate with an appropriate amount of potassium permanganate plus formaldehyde. After fumigation, when the temperature rises to 57 degrees C, keep it sealed for 8-10 h. After the compost has been strictly disinfected, control the air draft chimneys and ventilation channels in a planned way so that the compost ferments at 50-55 degrees C for 5-7 d; then open all ventilation channels and air draft chimneys. When the compost temperature drops rapidly below 28 degrees C, move it into the house, spread it and spawn. For second fermentation inside the mushroom house, the compost that has undergone first fermentation can be evenly spread on the bed racks; after sealing the doors and windows of the mushroom house, introduce hot steam into the house until the temperature reaches about 60 degrees C, maintain for 8-10 h, then slowly lower the temperature to 45-55 degrees C, maintain for 4-5 d, then rapidly cool to 28 degrees C, move into the house, spread the compost and spawn.
5.2. Cottonseed hull compost preparation. Choose a cement surface as the fermentation site; if it is not a cement surface, spread a layer of plastic film. First sweep the fermentation site clean, then spray a pass of 1000-fold dilution of 80% deltamethrin, and then scatter a layer of quicklime powder. According to the schedule, mix the cottonseed hulls and their auxiliary materials evenly so that the material-to-water ratio reaches 1:1.7-1.8. Before building the heap, build "non"-shaped ventilation channels with bricks, and build the heap centered on the ventilation channels. The heap height is 1.2 m, width 1.2-1.5 m, length as appropriate, with a turtle-back shaped top, and the smaller the edge slope the better. Then spray the surface with a pass of 0.5% dichlorvos and cover with straw mats. When the temperature rises to 60 degrees C, maintain for 18-24 h, then carry out the first turning and leveling; when the temperature rises again to 60 degrees C, likewise maintain for 18-24 h, then carry out the second turning; turn 3 times in this way. After each turning, spray the surface of the heap with 0.5% dichlorvos plus 80% deltamethrin. At the fourth turning, build air draft chimneys on the ventilation channels every 1 m. After the heap is tidied, cover it with plastic film, with the film 20-30 cm from the compost surface. When the temperature within the spacing rises to about 45 degrees C, fumigate and ferment using 0.5 kg potassium permanganate + 1 kg formaldehyde per 5000 kg of compost. During this period, control the temperature at 45-55 degrees C, and regulate the temperature by opening and closing the air draft chimneys. After 4-5 d, open all ventilation channels and air draft chimneys. When the compost temperature drops below 28 degrees C, spread the compost and spawn.
6. Mushroom house disinfection, compost spreading and spawning. One day before loading the compost, disinfect and sterilize the mushroom house once more. Fumigate with 10 mL formaldehyde and 5 g potassium permanganate per 1 cubic m of space. On the second day, evenly spread the compost that has been cooled below 28 degrees C on the mushroom beds, about 20 cm thick. Before spawning, if the compost is on the dry side, adjust the water so that the compost moisture content reaches 65%-68%. Break the selected spawn into granular pieces; disinfect all tools and hands that contact the spawn with 1% potassium permanganate water. First evenly mix-spawn 50% of the spawn into the upper half of the compost, then broadcast the remaining 50% of the spawn on the compost surface; for cottonseed hull compost, evenly mix-spawn 30% of the spawn into the upper half of the compost, then broadcast 70% of the high-quality spawn on the compost surface. Generally use 1.5 bottles of spawn per sq m (750 mL per bottle). After spawning, level the surface, press lightly and cover with film.
7. Spawn-running management. Within 3-5 d after covering with film, close doors and windows, control the temperature at 25-26 degrees C, and keep relative humidity at about 75%. If the compost temperature exceeds 28 degrees C, ventilate at night to cool down; if the compost temperature is below 20 degrees C, heat with steam. When the mycelium has basically covered the surface after about 7 d, remove the film and ventilate frequently. When the mycelium has grown to 1/2 the depth of the compost, loosen the compost layer once. During the spawn-running period, prevent the occurrence of various contaminants and pests. On the day the film is covered, spray 0.5% dichlorvos on the walls, walkways and film of the mushroom house; on the second day spray 1000-fold deltamethrin; thereafter spray once every 5-7 d. Generally after about 20 d, when the mycelium has grown to 2/3 of the compost, most of the spawn scattered on the surface has exuded yellow water, the mycelium has become thick and white, and patting the compost surface by hand gives a feeling of overall vibration, this indicates that the spawn has run well and casing can be carried out.
8. Casing. According to local conditions, the casing materials used for button mushrooms in our city are loam soil and imitation peat soil. Imitation peat soil formula: (1) Loam soil 4 cubic m (amount used for 100 sq m of compost), calcium magnesium phosphate fertilizer or superphosphate 15 kg, gypsum 17.5 kg, dry fermented wheat straw coarse chaff (during compost fermentation, make more, sun-dry and grind with a grinder to make it) 75 kg, lime 15 kg; (2) Loam soil 4 cubic m, calcium magnesium phosphate fertilizer or superphosphate 17.5 kg, gypsum 17.5 kg, wheat chaff 50 kg, lime 15 kg. Take clean, mold-free wheat chaff, soak it in lime water of pH 10 for 1 d, then take it out and sun-dry. For the loam soil, 15 d before casing, take soil from below 30 cm of the cultivated layer, break it up, sun-dry, grind and pass through a 9-mesh sieve. Three days before casing, according to the formula, pile the various casing materials on a cement surface, mix thoroughly, and spray with 5% dichlorvos while piling, building a long heap 0.8 m high and 0.8 m wide, cover with plastic film for 24 h, then pre-wet with 5% lime water and adjust the pH to 7.5-8.0. The moisture content should be such that it forms a ball when squeezed by hand and breaks apart when dropped. After pre-wetting, pile into a long arched shape and use on the second day. When casing, place the larger particles below and the smaller ones above. Loam soil casing is 3.3-3.5 cm thick, and imitation peat soil casing is 3.0-4.0 cm thick; the casing thickness must be uniform and consistent.
9. Fruiting management. On the day of casing, spray 500-fold dichlorvos; on the second day spray 1000-fold deltamethrin; after 3 d, adjust water according to mycelium growth. If the mycelium climbs the soil quickly and grows vigorously, spray more water; otherwise spray less. If the casing material is loam soil, spray less but frequently, strictly preventing the casing layer from caking, and the total amount of water sprayed should be less; if the casing material is imitation peat soil, reduce the number of sprayings but increase the total amount of water sprayed. Generally, within the first 2-3 d of water adjustment, spray the bed surface twice daily, 0.5-0.8 kg per sq m each time, then gradually increase the amount of water sprayed, using 3-4 d to bring the moisture content of the casing layer up to full, but water must not be allowed to seep into the compost. Ventilate after each spraying to remove surface moisture from the soil layer. When a soil particle pinched by hand is flat but not scattered, has slight cracks, does not stick to the hand, and has no dry core inside, the water is properly adjusted. After water adjustment is finished, close doors and windows and hang the mycelium for 2-3 d, controlling the temperature at 22-25 degrees C and relative humidity at 80%-85%. When the air temperature is above 30 degrees C and humidity is below 60%, spray more water on the compost; otherwise spray less. When the mycelium has climbed 3/4 of the soil, begin loosening the soil. One day before loosening, spray a pass of 1000-fold deltamethrin. When loosening the soil, make the soil layer uniform in thickness and consistency, appropriately blend the places where there is much good soil with those where the mycelium is small and poor, and at the same time strengthen ventilation to inhibit mycelial growth and promote the fluffy mycelium to knot into linear mycelium, thereby forming primordia. At this time, control the temperature in the fruiting area at 14-18 degrees C and keep relative humidity at about 90%. Thereafter, for watering, spray more when there are many mushrooms and less when there are few; spray more in the early stage and less in the late stage. In the early stage, spray 2 heavy waterings per flush of mushrooms on the soil layer. When each flush of mushrooms grows to the size of a soybean, spray 1 heavy fruiting water; before clearing the bed for each flush, spray another heavy watering. The amount of water sprayed is 1.3-1.8 kg per sq m. In the late stage, the amount of water sprayed should be relatively reduced, adopting a light and frequent spraying method. From the time button mushrooms emerge until harvest, control humidity at 90%-95%. After the harvest peak of each flush, humidity can be lowered to 85%-90%, the floor is no longer sprayed, and ventilation of the mushroom house is increased. Generally, ventilation should be strengthened in the early stage. When the temperature inside the mushroom house exceeds 18 degrees C, ventilation should be carried out at night and on rainy days. In windless weather, open all north and south windows; when there is wind, open only the leeward windows. In the late stage, gradually reduce ventilation of the mushroom house. When the temperature drops below 14 degrees C, ventilate during the day. If long-stemmed small-capped mushrooms, sparse mushrooms, red mushrooms or rust-spotted mushrooms appear, ventilate promptly; if small mushrooms, thin mushrooms, opened caps, hollow-stemmed white-core mushrooms or light individual mushrooms appear, control the wind.
10. Harvesting. For fresh-market sale, harvest at any size as long as the veil has not broken and the cap has not opened; for canning and brine mushrooms, harvest when the cap diameter is 1.5-4.0 cm, the mushroom shape is round and regular, the color is pure white, and there is no hollow-stemmed white core, no insect damage and no breakage. Before harvesting, do not spray water on the bed surface. When the fruiting bodies grow quickly, harvest 2-3 times a day. There are two harvesting methods: the rotation method and the pulling method. When mushrooms are dense, use the rotation method, that is, gently rotate the mushroom and pick it off; when mushrooms are sparse, use the pulling method, that is, pull the mushroom up directly; when many mushrooms cluster together into a ball, carefully cut off the standard-sized fruiting bodies with a small knife, harvesting the large ones and leaving the small ones. When harvesting, handle gently and place carefully to avoid damaging the mushroom bodies.