New Techniques and Management Key Points for Cultivating Button Mushrooms with Corncobs
1. Pressing water for the mycelium should be done at the right time. When mycelium emerges on the bed surface, it indicates that the mycelium has reached the bottom of the compost and has fully developed within the casing layer, and has already gained the ability to fruit. At this point, water should be sprayed at the right time to press the mycelium. Method: Increase ventilation to let strong wind blow into the mushroom shed, causing the mycelium on the soil surface to lie down; control the amount of water sprayed according to the mycelium development in the casing layer, generally...
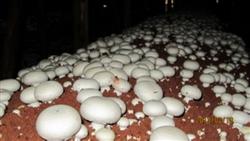 A large amount of corn is grown in northern China. After crushing, corncobs can be used for button mushroom cultivation. In recent years, the area of button mushroom cultivation using corncobs has grown rapidly. Corncobs have an organic matter content of 91.3%, soluble carbohydrates of 51.8%, and a carbon-to-nitrogen ratio of 56.70:1. For a button mushroom cultivation area of 100 sq m, 2000 kg of corncobs, 2000 kg of cow manure, 20 kg of urea, 150 kg of gypsum powder, 100 kg of superphosphate, 100 kg of cake fertilizer, and 200 kg of cottonseed hulls can be used.
1. Composting and fermentation of the cultivation material (the composting and fermentation time should be flexibly controlled according to actual temperature changes in each region). Pre-fermentation technology. Primary fermentation generally requires about 22 days of composting, with 5 turnings, mainly including technical steps such as pre-wetting, pile building, and turning of the fermented material.
(1) Pre-wetting. To allow the corncobs and cow manure to fully absorb water, pre-wet 3 days before building the pile. The pre-wetting method can be as follows: on a clean, tidy hardened road surface, spread the corncobs as the bottom layer, cover with cow manure, and build a large pile about 1.0 m high according to the size of the site, with unlimited length and width. Sprinkle lime water with a pH of about 8.5 on top every day until water overflows from the bottom, so that the material is fully soaked.
(2) Building the pile. Choose a fermentation site with relatively high terrain, close to a water source, and near the mushroom house. It is best if the site surface is hardened to prevent mud clumps from mixing into the cultivation material during composting. The pile width is 2.0 m, the height is 1.5 m, and the length is unlimited. The material and cow manure should be mixed as evenly as possible. If the material is somewhat dry, water can be added fully during the composting process. Start measuring the temperature on the second day after building. Normally, the pile temperature should rise to 70°C on the third day. If it does not reach this, the cause should be identified early and remedied promptly.
(3) Turning the pile. The specific timing of turning is determined by the temperature changes within the material. When the material temperature rises above 70°C, stops rising, remains for 1-2 days, and shows a downward trend, turn the pile immediately. The principle of turning is to alternate the top and bottom, inside and outside, but because corncobs are relatively broken, this is somewhat difficult in actual operation. In the first turning, all the urea should be scattered into the material and mixed evenly, and water should be sprayed appropriately according to the dryness or wetness of the material. Auxiliary materials should be added in batches during the first and second turnings. If there is a certain degree of "white bloom" phenomenon in the material, it is normal. If the proportion of "white bloom" is too large, it indicates that the material lacks water, and water should be added promptly to adjust moisture. During turning, if the material becomes sticky and has a sour, foul odor, it indicates that the material is too wet and the pile temperature is low. It should be turned and aired promptly, and lime and gypsum should be added appropriately. Material infected by pests and tending to be under-fermented should be turned as much as possible into the central high-temperature zone of the pile. Pay attention to testing the pH value. If the material is too acidic, it can be adjusted with quicklime or lime water.
After pre-fermentation is completed, the criteria for judging high-quality cultivation material are: the cultivation material is dark brown, the corncobs have fully softened, and when held in the hand it does not prick the hand and has a luster. Slightly dry cultivation material may show white actinomycetes. The moisture content of the cultivation material is moderate; when held in the hand, 5-6 drops of water can fall, and the moisture content is about 70%. There is a small amount of ammonia odor and a faint fresh fragrance, not sour and not stinky. The pH value is about 8.0.
2. Post-fermentation technology. While still hot, transport the cultivation material that has completed pre-fermentation to the bed frames, close doors and windows tightly, and use a boiler or a modified oil drum to pass hot steam into the shed. When the temperature rises to about 63°C, reduce the fire to control the temperature, and if necessary, introduce fresh air to cool it, keeping the temperature at about 60°C for 12-24 hours. During the day, this temperature can generally be maintained; the key is to continuously introduce an appropriate amount of hot steam at night. When the temperature drops to about 50°C, maintain it for 5-7 days, and finally ventilate to cool down so that exhaust gas and residual ammonia produced during fermentation are discharged. When the material temperature drops below 28°C, spread the material and sow.
(1) After the material enters the shed, decide whether to adjust water according to the dryness or wetness of the material. Because a large amount of water in the cultivation material is consumed during post-fermentation, this water adjustment is to avoid adjusting water again after post-fermentation ends, thereby reducing the chance of contamination by competing microorganisms.
(2) Place the cultivation material as much as possible in the middle and upper layers. In principle, do not place it on the topmost layer or the bottommost layer; the upper layer has condensation water, and the lower layer has low temperature. The cultivation material should be placed loosely on the bed frames, and must not be compacted.
(3) Strictly control the material temperature during post-fermentation. In the early stage, the temperature should not exceed 65°C, so as to avoid the cultivation material becoming too dry and producing a large amount of actinomycetes, causing excessive nutrient loss. Strive to maintain the average temperature at about 60°C.
2. Management during the mycelium running period. 1. Sowing. Flexibly control the sowing amount according to the earliness or lateness of the sowing season and the thickness of the material, generally 1.5-2.5 bottles per square meter. Before sowing, all tools must be thoroughly disinfected with potassium permanganate solution. At the same time, loosen and level the cultivation material, generally with a thickness of 20-25 cm. Sow in real time according to local climatic conditions. In cities such as Heze, Jining, and Liaocheng in Shandong Province, the general sowing time is in August. In Taiyuan, Lyuliang, and other places in Shanxi Province, it is generally at the end of August and the beginning of September. In actual operation, the direct sowing method is generally used, that is, scattering all the spawn on the surface. This method is simple and quick, and the mycelium can cover the material surface within just a few days, making it difficult for competing microorganisms to invade. After sowing, gently compact with a disinfected wooden board, then cover with plastic film. If the material is slightly wet, newspaper or other disinfected paper can also be covered. Close doors and windows tightly and enter the mycelium running period.
2. Mycelium running. During the mycelium running period, frequently and gently shake off the water droplets attached to the plastic film onto the ground. After about 7-10 days of mycelial germination, the film can be uncovered. If there is contamination by competing microorganisms on the material surface or the humidity in the covering space is too high, the film can be uncovered earlier.
(1) During the mycelium running period, frequently observe the mycelial growth and the speed at which the mycelium colonizes the material, and deal with problems promptly to avoid delaying the best time for treatment, causing the spread of pests and competing microorganisms, and thereby reducing yield. If the cultivation material is too dry or too wet, the mycelium may fail to colonize the material or may recede. If too dry, spray water into the air to increase air humidity. If the cultivation material is too wet, use reverse punching or pry the material and increase ventilation.
(2) Always pay attention to observing changes in material temperature. If the material temperature is above 30°C, take measures such as punching holes and compacting the material surface, and ventilation can also be carried out at night. Also prevent excessive ammonia in the material from inhibiting normal mycelial growth. If ammonia in the material is heavy, take measures such as punching and loosening the cultivation material, and at the same time spray 2% formaldehyde solution on the ground, walls, aisles, and other places to neutralize it. If the ammonia odor in the material is indeed too strong and has already caused the mycelium to shrink irreversibly, then the material must be steamed again and then reseeded.
(3) If competing microorganisms or pests are found, deal with them promptly: apply chemicals when chemicals should be applied, and dig out when digging out is required. If mite damage occurs, do not be careless; treat it promptly, and if necessary, use chemical fumigation. This requires us to pay attention to the quality of the cultivation material after the end of pre-fermentation and post-fermentation, and to take timely measures when problems are found, so as to avoid various problems after sowing as much as possible and avoid delaying the best time for treatment.
(4) From 1-5 days of mycelium running, focus on heat preservation and moisture retention. When mycelial germination is normal, ventilate little or not at all to promote early germination and establishment of the mycelium and to seal the material surface. From 6-10 days of mycelium running, the mycelium has basically covered the surface. As the mycelium penetrates deeper into the material, gradually increase ventilation. From 11-18 days of mycelium running, when the mycelium has colonized 1/2 of the material layer, punch and ventilate promptly, and at the same time increase ventilation to increase the oxygen content in the material. When the mycelium has colonized more than 2/3 of the material layer, prepare to case with soil (it is best when it has grown through the entire material layer).
3. Casing with soil and management after casing
1. Selection of casing material. The soil texture, soil particle size, and thickness of the casing layer all directly affect the earliness of fruiting, the level of yield, and the quality. Overall, the casing material should have a good aggregate structure and good water-holding and air-permeability. The nutrients in the casing soil should not be too rich; nutrient-poor soil is better. It is required to choose soil from below 20 cm of the surface layer that does not contain pathogens or pests, and absolutely avoid alkaline soil with a high concentration of soluble salts. At present, the best casing material is peat soil, followed by sandy loam. Peat soil has good water-holding and air-permeability. Below is a brief introduction to management methods using peat soil as the casing material.
2. Preparation of peat casing material. Add 10 kg of quicklime (or prepare lime water with a pH of 7.5-8.0 to spray the peat soil) and 0.2 m3 of sand per cubic meter of peat soil. First mix the sand, quicklime, and peat soil together, turn twice to mix the three as evenly as possible, pile into a large heap, water from the top with clean water until water overflows from the bottom, and begin turning the next day. Generally turn 4-5 times until the entire soil heap is uniform and consistent, then cover tightly with plastic film and keep sealed for 24 hours.
3. Treatment of the bed surface before casing. Before casing, if there are competing microorganisms on the bed surface, spray 300-500 times diluted fungicide. If the bed surface is too dry, combine with spraying 0.5% lime water, then ventilate and air-dry. If the material surface is too wet, ventilate earlier and keep the material surface slightly dry.
4. Casing and management after casing. Flexibly control the casing thickness according to the thickness of the material. The soil layer thickness is generally controlled at 3.5-4.5 cm. Adjust the dryness or wetness of the soil to the point where water seeps out when held in the hand and it disperses upon falling to the ground. During this period, the key is to observe material temperature and strive to keep it below 28°C. If necessary, ventilate at night or punch into the material, and frequently spray water on walls, doors, and windows inside the shed to control temperature. The humidity in the shed is best controlled within the range of 65-70%.
4. Fruiting management
1. Knotting and fruiting. When the mycelium begins to climb the soil, spray water lightly. If it climbs quickly, spray frequently. As the mycelium position rises, gradually increase the amount of water sprayed. When spraying water, combine it with ventilation. When the mycelium has climbed to 1 cm from the surface, water thoroughly to the maximum limit, and at the same time ventilate strongly to lower the temperature, keeping the material temperature below 20°C so that the mycelium can effectively knot. Control mycelial growth well to prevent mycelial emergence. Once mycelial emergence occurs, increase ventilation and lower the temperature, and spray 0.5% lime water. If mycelial emergence is severe and forms a mycelial mat, use a small knife or rake to destroy the mycelial mat, then combine with the above management methods. When the mycelium begins to knot, close the ventilation holes according to the actual situation in the shed, or ventilate as little as possible.
2. Regulation of air, temperature, and humidity. When the mushroom buds generally grow to the size of soybeans, spray one heavy watering. For peat soil, from mycelial climbing of the soil to the beginning of knotting, the amount of water sprayed should reach 7-9 kg. Because the fruiting bodies are small and water still needs to be sprayed, this requires that the water not be sprayed too quickly or too heavily, and it should be completed within three days. At this time, the temperature in the shed should be controlled at 14-16°C, and as much as possible not exceed 20°C. However, in actual operation, due to constraints from natural conditions, the first flush of mushrooms often emerges unevenly, especially on the upper and lower layers, at the doorway, and in the corners. The fruiting time is very inconsistent, and the size and number of mushrooms on the bed surface are also different, which brings inconvenience to management. Therefore, we must apply methods flexibly in practice. For the first flush of mushrooms, generally spray enough water in split applications at the time of spraying fruiting water, so that the moisture content of the casing soil reaches saturation, then close the ventilation holes for 3-5 days. When the mushrooms have grown to about 1.5-2 cm, begin spraying water again: spray more when there are many mushrooms and less when there are few. When spraying water, avoid high temperatures as much as possible; spraying in the morning and evening can be used. When spraying water, ventilation must be provided, and absolutely avoid "closed-door water." When spraying water, combine with external weather conditions: spray more on sunny and dry days, and less on cloudy and rainy days. However, do not spray water before harvesting mushrooms, so as to avoid the fruiting bodies turning red and reducing commercial quality. But water can be sprayed the day before harvesting, or after harvesting and supplementing soil. After 80% of the mushrooms on the bed surface have been harvested, spray one heavy watering again, then remove dead mushrooms and mushroom roots, tidy the bed surface, and close the ventilation holes to wait for the next flush of mushrooms to emerge.
3. In daily management, be sure to accurately grasp the relationship among ventilation and air exchange, heat preservation, and moisture retention according to weather changes.
(1) In the early stage of autumn fruiting, the temperature is high, and the mycelium and fruiting bodies grow quickly. Ventilation should be strengthened and moisture adjusted promptly, and the humidity of the mushroom shed should be maintained well. Ventilation and watering are generally carried out in the morning and evening. In the later stage of autumn, the temperature gradually decreases, fruiting gradually becomes sparse, and growth is slow. Water spraying and ventilation should be reduced. Ventilation and water spraying are generally carried out at noon when the temperature is relatively high. When the temperature in the shed is below 8°C, maintain natural fruiting, occasionally spray a small amount of water at noon when the temperature is high, and ventilate briefly.
(2) As the temperature falls day by day, when the temperature is below 5°C, it is time to enter overwintering management. Basically stop spraying water, and just keep the casing soil from turning white. Ventilate at noon when the temperature is high, keep the soil dry, then begin tidying the bed surface, remove dead mushrooms, and remove old roots and aged, yellowing mycelial strands.
(3) If the autumn fruiting amount is large and the mycelium is vigorous, the surface soil should be gently raked with a rake, then a small amount of lime powder should be scattered on the surface. Scatter 4 kg of quicklime per 100 sq m, and thoroughly enter overwintering.