Detailed Explanation of the Key Points of Changshan Hericium erinaceus Cultivation Techniques
As early as the 1980s, Changshan Hericium erinaceus was famous nationwide, with its output ranking first in the world. Before the 1990s, bottles were used to cultivate Hericium erinaceus fruiting bodies; after the 1990s, plastic bag cultivation was adopted, that is, the substrate is placed in plastic bags, sterilized, inoculated, and cultivated, and then the cultivation conditions are controlled to grow fruiting bodies...
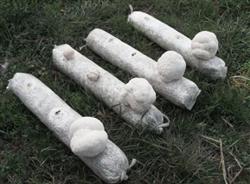
As early as the 1980s, Changshan Hericium erinaceus was famous nationwide, with its output ranking first in the world. Before the 1990s, bottles were used to cultivate Hericium erinaceus fruiting bodies; after the 1990s, plastic bag cultivation was adopted, that is, the substrate is placed in plastic bags, sterilized, inoculated, and cultivated, and then the cultivation conditions are controlled to grow fruiting bodies.
1. Site selection
The production site should be chosen with a good ecological environment, excellent water quality, no toxic gases, and no various sewage or other pollution sources within 300 m around it. It is required to face south with its back to the north, have good ventilation, and fresh air; the ground in the cultivation room is required to be level and must have ground windows, doors, and windows.
2. Selection of cultivation season
The suitable growth temperature for Hericium erinaceus mycelium is 25±2°C, and the suitable growth temperature for fruiting bodies is 12-18°C. Above 20°C, the fruiting bodies grow poorly, and below 10°C, the fruiting bodies grow slowly. From spawning to completion takes about 100 days, of which mycelial cultivation takes about 25 days. In the Zhejiang area, late September of the current year to early January of the following year is optimal.
3. Preparation of the substrate and bagging
Four aspects should be considered in substrate preparation: the optimal formula, the preparation method, reasonable moisture, and suitable pH. The substrate should be used according to local resources and adapted to local conditions, generally using commonly used raw materials such as cottonseed hulls, corn cob residue, wheat bran, sawdust, and rice bran.
First pre-wet the cottonseed hulls at a 1:1 substrate-to-water ratio, add other substrate materials according to the specific formula requirements, mix thoroughly and evenly, and control the moisture content at about 65%. Simple test method: when the substrate is squeezed by hand, if a few drops of water appear between the fingers, it indicates that the moisture content has reached the requirement.
Put the substrate into a 14 cm x 27 cm polypropylene plastic bag to a height of 12-14 cm. The tightness of the substrate is required to be uniform from top to bottom and slightly firm (after pressing the bagged substrate by hand, there should be no indentation). Tie the bag opening securely with plastic rope. Bagging must be completed within 6 hours.
4. Sterilization
For bagged substrate cultivation, normal-pressure sterilization is preferable. The normal-pressure sterilization temperature is 100°C and should be maintained for more than 12 hours. High-pressure sterilization is at 1.5 kg/cm2 for 2 hours. Taking a vertical high-pressure sterilizer as an example, the operating steps are: (1) Close the drain valve, open the water inlet valve or open the lid, add an appropriate amount of water into the sterilizer, then place the items to be sterilized into the sterilizer, but do not pack them too tightly, so as not to affect steam circulation. (2) Cover the lid, tighten the water inlet valve, do not let air leak, and begin heating. When the pressure gauge pointer rises to 0.5 kg/cm2 pressure, open the exhaust valve and release the cold air inside the sterilizer for about several minutes. After the air is completely released and the gauge pointer drops to zero, close the exhaust valve and continue heating. (4) After sterilization is completed, slowly open the exhaust valve, release all steam inside the sterilizer, open the lid, and take out the items. (5) After use, drain all remaining water inside the sterilizer and keep the inside dry to avoid rusting or scale formation.
5. Inoculation
Generally carried out in an inoculation room or inoculation box. The inoculation environment is required to be clean and dry and should be disinfected. The spawn used is required to meet quality standards. After the substrate temperature cools to below 28°C, place the bagged substrate, spawn, alcohol lamp, inoculation tools, etc. into the inoculation box or sterile room. In the inoculation box or sterile room, place 10 ml/m3 formaldehyde and 2 g potassium permanganate to react, or an appropriate amount of other disinfectant, and seal for fumigation for 0.5 hour before inoculation. During inoculation, first light the alcohol lamp, hold the inoculation rake in the right hand and burn it over the flame, hold the spawn bottle in the left hand and bring it close to the flame, remove the cotton plug, remove the old spawn blocks on the surface of the spawn, dig the spawn into small pieces, then place the spawn bottle horizontally on the spawn rack. Then hold the bag to be inoculated in the left hand, and within the sterile zone near the alcohol lamp, insert the spawn pieces into the bag and tie the bag opening securely. The operation movements are required to be quick, agile, and accurate. Each bottle of spawn inoculates about 35 bags. When inoculating stick-shaped bags, use a conical stick 1.2 cm in diameter in the right hand to pierce inoculation holes into the substrate bag, with a hole depth of 2 cm, then immediately use tweezers to pick 1 piece of spawn about the size of a peanut and insert it into the inoculation hole. One stick can inoculate 4-5 inoculation holes, with a hole spacing of 6 cm-7 cm. After inoculation, seal the hole openings with adhesive tape, or put another slightly larger sterilized plastic bag over the outside of the bag and tie the bag opening with rope.
6. Cultivation
Cultivation method: pot-shaped bags are arranged in double layers with the inoculation surface facing up; stick-shaped bags are stacked in a wall style, with a stack height of 8-10 bags, and a walkway about 70 cm wide should be left between the mushroom walls.
Cultivation management: (1) Disinfection, insect killing, and cleaning and sanitation work should be done well inside and outside the cultivation room. (2) The temperature of the cultivation room should be controlled between 22°C and 25°C; mycelial vitality is strong, and fruiting bodies will not form prematurely. If the temperature is above 28°C, the mycelium is prone to degeneration after growing fully; if the temperature is below 20°C, fruiting bodies will form before the mycelium has fully grown. (3) Use straw curtains and shade nets to block light, so that the incubation room is basically dark (50 lx-60 lx light intensity). (4) Frequently pick out contaminant microorganisms to reduce repeated infection.
7. Fruiting management
1. Removing the cover or opening the bag: the formation and growth of Hericium erinaceus fruiting bodies require an opening for mushroom growth and good air. Pot-shaped bags grow fruiting bodies from the bag opening, so the bag opening should be made into a bottle-neck shape. The specific method is to use a plastic packing strap 1 cm-2 cm wide and about 10 cm long, bend it into a ring 4 cm-5 cm in diameter, fasten the connection on both sides with staples or heat-seal it, then thread the bag opening through the plastic ring, fold it back outside the ring, straighten it, and tie the bag opening with a rubber band. For stick-shaped bags, tear off the adhesive tape from the inoculation holes, then lay them flat on the rack in a single layer with the hole openings facing up.
2. Environmental control: the fruiting room should properly control conditions such as temperature, air, light, and spatial humidity. If any one condition is unsuitable, it will affect the yield of Hericium erinaceus. The growth of Hericium erinaceus requires a relatively low temperature, relatively high air humidity, and good diffused light, and the carbon dioxide content in the air should not exceed 0.1%. During the fruiting period, temperature can be taken as the key for flexible management. Primordia can form from 10°C to 25°C, with 12°C to 18°C being optimal.
(1) When the air temperature is normal: sprinkle water on the ground and spray the air space to maintain the air humidity in the mushroom room at 90%, and ensure 100 lx diffused light to induce primordium formation. During the fruiting body growth stage, maintain spatial humidity at 85%-90%, keep the air in the mushroom room fresh with no stuffy feeling, open doors and windows for 4-8 hours each day, and hang straw curtains on the doors and windows to prevent direct wind.
(2) When the air temperature is relatively high: when the air temperature is above 25°C, fruiting bodies cannot form. Therefore, open the doors and windows, remove the ceiling, and also prop open the straw curtains hung outside the doors and windows, increase ventilation, lower humidity, and avoid high temperature and high humidity.
(3) When the air temperature is relatively low: when the temperature is low, the differentiation and growth of fruiting bodies are slow. Below 6°C, the fruiting bodies completely stop growing, causing the surface of the fruiting bodies to freeze stiff and become bald-type Hericium erinaceus. Therefore, increase insulation measures, add a layer of film in the air space, thicken the curtains, and even add heating.
8. Harvesting and management after harvesting
Hericium erinaceus should be harvested when the fruiting bodies are 70%-80% mature. The harvest standard is that the fruiting body sphere has basically reached full size and is firm, the spine length is 0.5 cm-1 cm, and it is picked in time before spores are discharged. The harvesting method is to cut it off from the base of the fruiting body with a cutting knife. Handle it gently when picking, and it should be sent to the factory for processing within 2 hours after harvest to prevent heating and deterioration. After harvesting, the residue left at the base should be removed, then stop watering to rest the mycelium and manage it on the dry side for 3-5 days. After 7-10 days, primordia begin to form again, and fruiting management can then be carried out again. Pot-shaped bag cultivation can generally harvest 4-5 times, and each hole of stick-shaped bags can be harvested about 3 times.