Detailed Explanation of Key Points for Cultivating Yellow-Back Wood Ear Mushroom (Auricularia polytricha) on Rice Straw
1 Rice straw softening treatment. The quality of rice straw treatment is the key to the success or failure of cultivating yellow-back wood ear mushroom and to achieving high yields. Rice straw is a loose material that easily accumulates water but is difficult to shape, and its epidermis in particular has a waxy layer that can hinder mycelial colonization of the substrate. Through experimentation, we have developed 3 methods for softening rice straw...
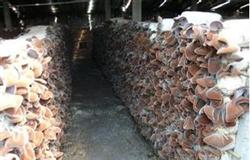
1 Rice straw softening treatment
The quality of rice straw treatment is the key to the success or failure of cultivating yellow-back wood ear mushroom and to achieving high yields. Rice straw is a loose material that easily accumulates water but is difficult to shape, and its epidermis in particular has a waxy layer that can hinder mycelial colonization of the substrate. Through experimentation, we have developed 3 methods for softening rice straw.
1.1 Spread the rice straw on clean ground and repeatedly crush it with a stone roller until it becomes soft.
1.2 Cut the rice straw into 2-3cm lengths and soak them in 3%-4% lime water. After 4 hours, remove them, rinse off the residue with clean water, and adjust the moisture content.
1.3 Use a feed grinder fitted with a 2cm diameter screen to grind the straw. After grinding, it becomes strip- and flake-like, thin, loose, and soft.
2 Substrate formula
The suitable carbon-to-nitrogen ratio for the growth and development of yellow-back wood ear mushroom is 20:1. Based on this, the substrate formula is designed as 78% rice straw, 15% wheat bran, 2% each of plant ash and superphosphate, and 1% each of gypsum powder, brown sugar, and salt; alternatively, the rice straw can be reduced by 15% and sawdust added to make the substrate firmer, which is beneficial to mycelial growth. Experiments have shown that adding a certain amount of plant ash and salt to the substrate for cultivating yellow-back wood ear mushroom, followed by fermentation of the substrate, is beneficial to the decomposition of rice straw by the mycelia of yellow-back wood ear mushroom. It also decomposes the silicate in the epidermal cells of the rice straw, changes the physical properties of the rice straw, and is beneficial to the mycelial growth of yellow-back wood ear mushroom.
3 Fermentation
During fermentation, the degree of decomposition must be well controlled. If the substrate ferments for too long or the fermentation temperature is too high, the yield of yellow-back wood ear mushroom will decrease. Therefore, during fermentation, attention should be paid to ventilation, temperature control, timely turning of the pile, and timely bagging and sterilization in the soil steamer. There are many methods for pile fermentation, including hemispherical pile fermentation and long pile fermentation. Taking long pile fermentation as an example, mix the softened rice straw with the auxiliary materials according to the formula, then pile it into a heap 1m high and 1m wide, with unlimited length. Slightly compact and pat the top and sides, then use a wooden pole 10cm in diameter to make holes vertically downward from the top at intervals of about 30cm. After the holes are made, cover with plastic film and straw curtains to keep warm and retain moisture, and press down the edges. The length of fermentation time depends on temperature changes. Generally, when the air temperature is 25°C, the material temperature can reach 60°C in about 1 day. When the air temperature is 15°C, the material temperature can reach 60°C in about 1-2 days; when the air temperature is below 10°C, it takes more than 2 days. After the material temperature reaches 60°C, uncover the film to ventilate and dissipate heat. Cover with straw curtains during the day and uncover them at night. After 6-10 hours, steam can be seen emerging from the air holes, and white actinomycetes appear (in the cut cross-section, the interior of the pile shows obvious colored layers: the dark brown surface layer is about 4cm thick, the white actinomycete layer further in is about 20cm, the central layer is brownish red, and the bottom layer is similar to the surface). At this point, turn the pile, placing the surface layer and bottom layer materials into the middle, and the white layer and brown layer materials on the surface, then rebuild it into the original shape. Generally, 12-24 hours after turning, the material temperature will again reach 60°C. At this time, uncover the film to ventilate and cool, maintaining the material temperature at 52-60°C. After about 10 hours, when a large amount of actinomycetes appears on the material surface and the material feels soft when squeezed by hand, tastes sweet, and has a fragrant aroma, it can be bagged, covered with soil, and sterilized in the steamer.
4 Selection of plastic bags and sterilization of the substrate
For the plastic bags, polyethylene bags 20-40cm in size and 3-4dmm thick can be selected. Before bagging, the pH is 9-10. Compact while filling the bags. After filling, press lightly on the bag surface with the hand; if it sinks and immediately returns to shape when released, the tightness is moderate. Then promptly place them in the soil steamer and stack them in a cross pattern for sterilization. Maintain the temperature at 100°C for about 10 hours, then allow them to cool naturally.
5 Selection of wheat grain spawn
For cultivating yellow-back wood ear mushroom, using wheat grain spawn has the characteristics of early revival, fast growth, and dense, robust mycelia.
6 Inoculation
Inoculate when the material temperature drops below 30°C. Before inoculation, use a previously sterilized conical rod to make a hole from one end to the other, inoculate part of the spawn into the hole, then inoculate some spawn at both ends.
Yellow-back wood ear mushroom has poor resistance to Trichoderma viride and Trichoderma koningii. Once infected, the yield will be reduced in mild cases and the cultivation will fail in severe cases. During production, a method of appropriately increasing the amount used should be adopted to increase contact between the spawn and the substrate. Generally, an inoculation amount of 10%-15% is appropriate.
7 Keep warm for mycelial growth and control infection
After inoculation, place the bags on the floor of the culture room and stack them 5-6 layers high so that the mycelia germinate quickly and inhibit the growth of contaminant microorganisms. When the mycelia at both ends of the bag have grown to 4-6cm, loosen the tying string to increase oxygen. Control the culture room temperature at 23-25°C to promote robust mycelial growth. To ensure that all bags receive consistent temperature, swap the positions of the bags from top to bottom about once every 7 days. When the mycelia have covered the bags after 40-45 days of cultivation, spread out the bag stacks and lay them flat.
8 Fruiting body management
Use the two-bag fruiting management method. The specific operation is as follows: first move the bags fully covered with mycelia into the fruiting room and arrange them in single rows in stacks 5-8 layers high, with row spacing of 60-70cm. Maintain the relative air humidity in the fruiting room at about 90%, and pay attention to ventilation and appropriate light to stimulate the formation of fruiting body primordia on the logs. After the primordia grow into young fruiting bodies, try to let the young fruiting bodies grow out from the openings at both ends, and harvest according to standards once mature. After harvesting the first flush, build a sun-facing bed under a shaded shed in the forest (requiring good ventilation and convenient drainage), with a bed width of 1m and the bed surface 30cm above the ground in a turtle-back shape. The covering soil should have a good granular structure and good water retention and permeability, with a soil particle size within 1cm. Disinfect the surface of the logs after harvesting the first flush with a 0.1% potassium permanganate aqueous solution. After the solution dries, use a blade to cut open the fungus bags and remove the film, then lay them flat on the bed surface close together, and immediately cover with 1-2cm of moist soil particles, and build an arched plastic film shed to retain moisture. After 2-3 days of soil covering, white mycelia can be seen extending into the soil. At a temperature suitable for fruiting, young fruiting bodies can emerge from the soil in about 10 days. At this time, the soil should be kept alternately dry and moist. When the young fruiting bodies emerge from the soil, remove the film and spray water to retain moisture for fruiting.