New Techniques for Cultivating Wood Ear Mushrooms
(1) Tree selection: There are many tree species suitable for the growth and development of wood ear mushrooms. However, it is necessary to adapt to local conditions and select tree species that are abundant in local resources and easy for wood ear mushrooms to grow on. Except for tree species containing pine resin, essential oils, alcohols, ethers, and economic tree species, all other tree species can be used to cultivate wood ear mushrooms. Currently, commonly used tree species include cork oak (Quercus variabilis), sawtooth oak (Quercus acutissima), Mongolian oak (Quercus dentata), and spiny oak...
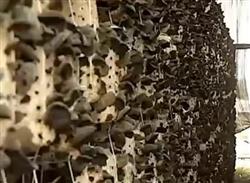 The new technique of large-bag three-dimensional cultivation of wood ear mushrooms can not only solve the drawbacks of low yield and easy contamination in bag-cultivated wood ear mushrooms, but also has the advantages of not being limited by climatic conditions, site, resources, or funds, and features labor savings, material savings, high yield, excellent quality, easy cultivation, short cycle, and high efficiency.
I. Cultivation Site
You can use vegetable greenhouses, idle spaces, balconies, rooftops, and areas under the shade of trees and fruit trees, but the site must be near a water source, well-ventilated, and far from pollution sources.
II. Cultivation Season
The best period for fruiting body formation is when the local temperature is stable at 15°C to 25°C.
III. Raw Material Formulation
1. Cottonseed hulls 90%, wheat bran 5%, cornmeal 3%, lime powder 1%, gypsum powder 1%.
2. Corn cob powder 80%, wheat bran 10%, cornmeal 5%, soybean powder 2%, quicklime powder 2%, gypsum powder 1%.
IV. Bag Filling
For the spawn bags, choose high-density polyethylene tubes measuring 22 cm x 38 cm x 0.04 cm. When filling with material, strive to pack it tightly so that no gaps form between the bag and the material, and tie the opening tightly to prevent water pockets from forming, which would cause cultivation failure.
V. Sterilization
Generally, steam sterilization is used, and boilers of different specifications are selected according to the scale of production. For household cultivation, an iron drum can be modified into a steam generator. When modifying, cut an opening on one side of the iron drum, insert a steel pipe with a diameter of 2 cm from the opening into the other side of the drum, and then weld the joint where the opening meets the steel pipe tightly. On the same side as the opening, cut a 4 cm opening at a different position, and weld a short 4 cm steel pipe (just slightly inserted into the drum wall) tightly to the opening. The 2 cm pipe serves as the water inlet pipe, and the 4 cm pipe serves as the exhaust pipe. Build a stove with bricks, place the drum on the stove, add water to the drum, and then light the fire in the stove to generate steam. During sterilization, water must be added frequently to avoid drying out the drum, which would affect the amount of steam generated.
VI. Inoculation
After entering the inoculation room, the inoculation personnel should first carefully wipe both hands with 75% alcohol cotton balls. Then, in groups of 3, one person digs out the spawn from the bottle, and two people untie and tie the bags. Insert 2 to 3 pieces of spawn, each the size of a red date, into each end of each bag. All spawn bags must be fully inoculated in one session, and no one may enter or leave at will during the process; otherwise, fumigation and sterilization must be repeated before operations can continue.
VII. Spawn Running Management
Place the inoculated spawn bags in a clean indoor room or greenhouse for cultivation away from light. Maintain the temperature at 25°C to 28°C. Do not ventilate during the first 5 days. Inside the greenhouse, temperature can be raised or lowered by increasing or blocking light; when increasing light, the bag stacks must be shaded with black film or straw curtains. After 5 days, ventilate moderately as appropriate, and keep humidity below 70%. After 40 to 50 days of cultivation, once the mycelium has fully colonized the bags, they can be transferred to fruiting body management.
VIII. Fruiting Body Management
1. Site management. If the fruiting site is chosen inside a greenhouse, make small soil ridges 15 cm wide and 15 cm to 20 cm high inside the greenhouse, with 80 cm spacing between ridges. Outdoors, soil ridges can also be made in the same way. If on a hardened surface, simply lay a layer of bricks at the above spacing.
2. Cutting openings in the spawn bags. After the site is prepared, cut fruiting openings in the spawn bags. First, clean the surface of the bags with 1% potassium permanganate solution or 0.2% ketoconazole solution, then use a sharp blade to cut 4 to 6 "V"-shaped openings at both ends, with the upper part of each opening having a diameter of about 2 cm.
3. Placing the spawn bags. After cutting the openings, place the spawn bags flat on the soil ridges, with 5 cm to 8 cm spacing between bags, and fill the gaps with soil. If on a hardened surface, soil filling may be omitted; for those filled with soil, add a 2 cm to 3 cm thick layer of soil on top of the bags as well, then place the second layer of spawn bags according to the first layer's placement method. For those not filled with soil, place two small bamboo poles with a diameter of 2 cm to 3 cm on top of the first layer of bags, then place the second layer of spawn bags. In this way, place 6 to 8 layers in sequence. Finally, lay a layer of plastic film near the soil pile to prevent soil particles from splashing onto the fruiting bodies when watering.