A Full Analysis of the Key Technical Points for Cultivating White King Oyster Mushroom (Pleurotus nebrodensis)
Making and Culturing the Fruiting Mushroom Logs. Formula for fruiting mushroom logs: (1) 92% cottonseed hulls, 3% cornmeal, 5% wheat bran, 65% moisture content. (2) 70% cottonseed hulls, 3% cornmeal, 20% sawdust, 7% wheat bran, 2% gypsum, 5% quicklime, 65% moisture content. Preparation before production: in Jixian County, bagging generally starts in mid-to-late August when the average temperature is 20°C...
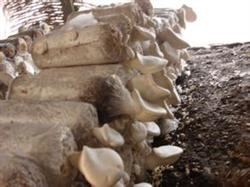
Making and Culturing the Fruiting Mushroom Logs
Formula for fruiting mushroom logs: (1) 92% cottonseed hulls, 3% cornmeal, 5% wheat bran, 65% moisture content. (2) 70% cottonseed hulls, 3% cornmeal, 20% sawdust, 7% wheat bran, 2% gypsum, 5% quicklime, 65% moisture content.
Preparation before Production
In Jixian County, bagging generally begins in mid-to-late August when the average temperature is 20°C. For a greenhouse generally 70 m long and 9 m wide, prepare 15 to 19 tonnes of cottonseed hulls, and calculate the quantities of other raw materials according to the formula. Each greenhouse can produce 30,000 to 38,000 fruiting mushroom logs. If the spawn is to be incubated inside the greenhouse, you also need to prepare the plastic film, straw curtains and ropes required for the greenhouse, and carry out comprehensive sterilization and disinfection of the greenhouse, generally by spraying quicklime and kemeiling fungicide and cleaning up the environment around the mushroom shed. If it is an old mushroom shed, it should be sprayed several times with a carbendazim fungicide at about 500 times dilution. For old mushroom sheds, you may also scrape off the wall skin and remove about 2 cm of the surface soil. Sun-expose for 7 to 10 days before use. From what we can see at present, a greenhouse is the best site for spawn incubation.
Making the Culture Substrate
Generally, 1 group of 3 people can mix about 2,000 kg of material per day. Calculate the quantities of the various main and auxiliary materials according to the formula, add water, and mix thoroughly at a material-to-water ratio of 1:1.1 to 1:1.4. Turn the material three times, then cover it with plastic sheeting and let it sit for about 12 hours so that the moisture is fully and evenly absorbed, and heat is generated to induce spore germination.
Bagging
Prepare 1 to 2 bagging machines in advance (generally choose a multi-function bagging machine; on the current market each costs about 350 to 500 yuan). Form a group of 8 to 12 people to carry out small-scale assembly-line work; generally 12 to 14 hours are enough to complete the bagging of 2,000 kg (dry material). Before bagging, tie off one end. Generally, the current specifications for white king oyster mushroom logs should use mushroom bags 17 to 18 cm wide, 35 to 40 cm long and 0.05 mm thick. When filling, the workers should fill an appropriate amount, and the bag should be neither too loose nor too tight; the suitable standard is that when you press the bag lightly with your finger, it feels springy but not too hard. If after a light press with the hand the bag shows obvious dents, this indicates the bagged material is too loose and it should be refilled. It is best to tie the bags with nylon rope or rubber rings; the tying should be neither too loose nor too tight. Twist a thin string twice around the bag opening and then tie a slip knot, to make things convenient for the inoculation operation. If the fungal film formed when moving the plastic bags breaks or the bag is punctured by a sharp object, the bag must be replaced or patched with thin plastic tape.
Sterilization
After the logs are made, they must be gently placed into sterilization baskets for sterilization. Generally, about 4,000 logs can be sterilized at one time, requiring about 180 to 200 sterilization baskets. Stack the sterilization baskets in order, generally 4 to 6 layers high and 6 to 8 rows wide, with the length determined by the number of logs, and cover them well with white nylon cloth or parachute cloth, then add a thick plastic sheet on top and cover tightly. Tie ropes tightly on all four sides, and weigh down the surroundings with nylon bags filled with sand. After the sterilization chamber is built, connect it with a sturdy thick rubber hose to the heat source, a mushroom-cultivation boiler. After the boiler is lit, the boiler steam can enter the homemade sterilization chamber. This method is mainly moist-heat sterilization, and it is also the most effective and most economical sterilization method available now. The boiler uses high-quality fuel (such as Datong lump coal); each sterilization requires 0.5 to 0.8 tonnes of coal. It must be ensured that the boiler does not run short of water, and that the insulation chamber is tightly sealed to prevent steam leakage. After lighting, immediately increase the fire, ensuring that the temperature inside the sterilization chamber reaches 100°C within 3 to 4 hours, and keep the temperature inside the sterilization chamber within the normal sterilization temperature range at all times. The atmospheric-pressure sterilization temperature is 95°C to 105°C, and within this sterilization range it should be maintained for 12 to 16 hours. Near the end, increase the fire for 30 minutes. After sterilization is finished, wait until the culture substrate temperature drops to about 60°C, then move the transfer baskets into the cooling room and wait for them to cool before inoculation.
Inoculation
For inoculation, generally choose high-quality spawn that feels heavy, sounds like a thud when tapped with the hand rather than a puff, is difficult to break apart by hand yet can be broken into small pieces at will, and has no sterile buds on the surface and no contamination, as the cultivation spawn.
When the ambient temperature is 20°C to 28°C, inoculate after the mushroom bags have cooled naturally; if the ambient temperature is below 18°C, inoculate while the bags are still warm after cooling to about 30°C, to ensure rapid germination of the inoculated spawn. Inoculation personnel should achieve three "quicks": quickly open the bag mouth, quickly inoculate, and quickly tie the bag mouth. Inoculation is generally done in groups of 4, placing the cultivation spawn and the logs on either side of the inoculation box. Each portion of cultivation spawn can inoculate 15 to 20 cultivation logs. Each box inoculates about 80 logs per round. During inoculation, strictly follow the operating procedures; inoculation personnel must strictly disinfect with 75% alcohol, disinfecting once after each box is finished. It is best to arrange twice the inoculation equipment and use them in rotation. When the temperature is relatively high, in order to enhance the dominance of the spawn, increase the amount of spawn used (no more than 15 logs per bottle) to raise the inoculation success rate.
Spawn Incubation
Place the inoculated logs in the shed (or other spawn-incubation facility). Straw curtains should be placed over the greenhouse, and the greenhouse must have a relatively dark environment. Scatter a small amount of quicklime inside the shed to keep the shed dry. When the temperature is above 20°C, generally stack no more than 4 layers, with a 50 to 60 cm gap between each row, to facilitate ventilation and cooling of the environment; when the temperature is lower, the number of layers can be appropriately increased.
From 3 to 7 days after inoculation, the ambient temperature should be controlled at 20°C to 28°C; under these conditions, ventilate little and try not to move the mushroom bags. From 6 to 8 days after inoculation is the mycelial development stage; the mycelium begins to feed on the substrate, so ventilation must be strengthened to ensure fresh air in the environment. During this period, the material temperature should be kept at 19°C to 22°C and the relative air humidity at 60% to 70%. When ventilating, cultivate gently and under dim light, and constantly monitor the growth of the mycelium. Pay special attention to the material temperature: if the material temperature rises to 32°C, turn the stack promptly; if the temperature exceeds 38°C, stack burning will occur, causing the undesirable phenomenon of mycelial shrinkage and cessation of growth, resulting in no fruiting or low yield from the logs. If the material room temperature is found to be too high, increase the ventilation volume and lower the ambient temperature.
The spawn incubation process should achieve dark cultivation, suitable temperature, sufficient oxygen and a dry environment.
When contaminating microorganisms or small-scale contamination are found in the mushroom bags, immediately use a syringe to inject high-concentration limewater or antibacterial agents to kill the contaminants in the bud.
Generally, the logs finish feeding on the substrate in 25 to 35 days, and the logs are pure white. At about 35 to 40 days, they reach post-ripening, and a thick layer of fungal skin appears on the surface of the logs. As long as the mycelium is thick, strong and white, they will still fruit normally even without fungal skin, but excessively thick fungal skin will delay fruiting. To reduce the formation of fungal skin, during the mycelial growth period the ambient temperature must not exceed 28°C and the bag material temperature must not exceed 30°C. After the mycelium has fully colonized the bag, the surrounding environment must not exceed 20°C and the material temperature must not exceed 25°C; after the mycelium is fully grown, it enters the fruiting stage very quickly.
Scratching (Scratching the Surface)
When the logs reach the post-ripening stage, carry out scratching to make fruiting more concentrated; fruiting generally occurs at the scratched spots. Scratching exposes fresh mycelium; the removed blocks of spawn should not be too large or too small. To reduce water loss from both ends of the log, tie the bag immediately after scratching, but not too tightly. After scratching, carry out cold-heat stimulation when white mycelial fuzz appears at both ends of the log.
Stimulation
Give the greenhouse a low-temperature stimulation of 0°C to 15°C; the most suitable stimulation temperature is 6°C to 12°C. The specific method is to open the film ventilation openings at the side doors of the greenhouse at night to increase the ventilation volume, use scattered light for stimulation during the day, and adjust the humidity inside the shed to about 75% to 80%. Mechanical electromagnetic wave stimulation can also be used. Generally, after about 10 days, block-shaped, gear-shaped primordia appear. When the low-temperature stimulation exceeds 20°C, it is very difficult to differentiate into fruiting bodies.
Fruiting
When the primordia are the size of soybean grains, untie the bag opening and trim in time. When trimming, use a sharp knife to cut off the excess primordia. When the primordia are the size of broad beans, open the bag mouth and immediately carry out mushroom trimming, keeping the large and removing the small, keeping the strong and removing the weak. When they are the size of a ping-pong ball, roll up the bag mouth. At this point, adjust the relative humidity inside the shed to 85% to 95% and provide scattered light. The light intensity is 600 to 1,500 lux, the light duration is 12 to 14 hours per day, and raise the temperature inside the greenhouse to 13°C to 18°C, with frequent ventilation and air exchange. Under the conditions of 13°C to 18°C, the white king oyster mushroom fruiting bodies are often thick and compact. Maintain the temperature inside the shed to promote stunted mushroom stems. When the carbon dioxide concentration exceeds 0.4%, it will cause the mushroom stems to become too long, growing into a white long-stemmed shape, leading to a decline in quality and affecting commercial value. White king oyster mushroom takes 10 to 15 days from primordium formation to harvest.
Harvesting
Harvest when the edge of the white king oyster mushroom cap is about to curl upward. Each white king oyster mushroom weighs 150 to 300 g, with a cap diameter of 8 to 15 cm, a cap thickness of 6 to 10 cm, and a stem smaller than 2 cm; this is the most suitable time for picking. Stop watering one day before harvest, and harvest in the morning and evening. White king oyster mushrooms can be roughly divided into three grades, namely Grade One (Grade A) mushrooms: the fruiting body is palm-shaped or stemless bun-shaped, regular in shape, pure white, with a cap diameter of 8 to 15 cm, each weighing 150 to 200 g, with a smooth cap surface, a rounded and neat edge, no wrinkles or cracks, and neatly arranged gills. For example, a palm-shaped stem is smaller than 2 cm; Grade Two (Grade B) mushrooms: the fruiting body is pure white, basically regular in shape, with a cap diameter of 8 to 16 cm, each weighing between 120 and 300 g, with a relatively smooth cap that has ripples, a basically flat cap with no obvious cracks, relatively neatly arranged gills, and a stem smaller than 2 cm; Grade Three (Grade C) mushrooms: the fruiting body is relatively pure white, irregular in shape, with deformed mushrooms, fine small cracks on the cap surface, an upturned edge, spoon-shaped, but with no obvious disease spots. Wrap the harvested white king oyster mushrooms in white copy paper, place each white king oyster mushroom in a foam box, and refrigerate below 10°C to keep fresh for 7 to 10 days; below 15°C it can be kept for 4 to 5 days; if stored in a 0°C to 1°C fresh-keeping warehouse, it can be kept fresh for 1 month.