How to Grow Oyster Mushrooms? A Detailed Guide to Cultivation Techniques
How do you grow oyster mushrooms? Here are the techniques. Oyster mushrooms are well suited to substrate-based cultivation and can be grown in bags, columns, bed frames, and sunken beds. Bag cultivation and column cultivation are superior, offering high yields, good quality, and high returns. Advantages of bag cultivation for oyster mushrooms: 1) It helps control the harm of contaminant microorganisms and pests, with a high success rate; ...
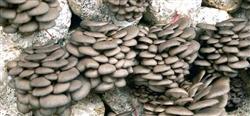
How do you grow oyster mushrooms? Here are the techniques
Oyster mushrooms are well suited to substrate-based cultivation and can be grown in bags, columns, bed frames, and sunken beds. Bag cultivation and column cultivation are superior, offering high yields, good quality, and high returns.
Advantages of bag cultivation for oyster mushrooms: 1) It helps control the harm of contaminant microorganisms and pests, with a high success rate; 2) It makes full use of space and occupies little ground area (a 15-18 sq m growing room can hold 1500-2000 bags); 3) It shortens the production cycle, using stacked incubation to raise substrate temperature, speed up mycelial growth, and shorten the mycelial growth period; 4) It is easy to move and manage, making full use of the site; 5) It helps control temperature, maintain humidity, produce uniform fruiting, good mushroom shape, and stable yields.
Technical requirements for bag cultivation of oyster mushrooms:
1. Selection of raw materials. Raw materials should be fresh, free of mold, free of insect damage, and free of pesticides or other harmful chemical components. Before cultivation, sun-dry them for 2-3 days to kill contaminant microorganisms and pests in the material. For raw materials such as corn cobs, bean stalks, rice straw, wheat straw, and mixed wood, chop or crush them in advance.
2. Culture substrate formulas
1) Cottonseed hulls 99% lime 1% carbendazim 0.1%
2) Corn cobs 76% cottonseed hulls 20% wheat bran or cornmeal 3% lime 1%
3) Corn stalks 87.5% wheat bran 5% cornmeal 3% lime 3% urea 0.5% salt 1%
4) Rice straw 74% cornmeal 25% gypsum powder 1% carbendazim 0.1%
5) Wheat straw 84% wheat bran 8% gypsum 2% urea 0.5% superphosphate 1.5% lime 4%
6) Sawdust 60% cottonseed hulls 30% wheat bran 9% lime 1%
7) Weeds 94% wheat bran 5% gypsum 1%
There are many raw materials that can be used for oyster mushroom cultivation. The principle is to use materials that are fresh, dry, easy to handle, and easy to collect and store. When mixing, pay attention to adjusting the nutrition and pH of the culture substrate. Before preparing the raw materials, corn cobs should be crushed into particles the size of peanut kernels, and corn stalks, wheat straw, rice straw, etc. should all be crushed and cut into small pieces 3-5 cm long.
3. Stack fermentation. According to the above formula requirements, weigh the materials accurately, mix them thoroughly (water-soluble ingredients should first be dissolved in water), then add water and mix evenly. For spring planting, when temperatures are low and air humidity is low, add slightly more water to the culture substrate; about 150 kg of water per 100 kg of dry material is suitable. The amount of water added also varies slightly with different culture substrates. Corn cobs and long-fibered cottonseed hulls can have slightly more water added, while short-fibered cottonseed hulls should have less water added. After mixing, pile the culture substrate and let it sit for 2 hours to absorb water thoroughly before stack fermentation. The method for building the pile is: spread a layer of wheat straw about 10 cm thick on a concrete floor, place the culture substrate on the wheat straw; when there is little material, form a round pile 1 m high; when there is more material, form a long pile 1 m high and 1 m wide. Every 30 cm or so, use a wooden stick to make ventilation holes down to the bottom of the material, then cover the pile with a straw mat or plastic film. When the temperature at the center of the pile rises to 55-60°C, maintain it for 18 hours, then turn the pile, moving the inside to the outside and the outside to the inside, and continue stack fermentation. When the center temperature of the pile rises again to 55-60°C, maintain it for 24 hours, then turn the pile once more. After two turnings, the culture substrate begins to change color, gives off a fermented aroma, has no moldy or foul smell, and has abundant white actinomycete mycelium growing, at which point fermentation is complete. Then use pH test paper to check the pH of the culture substrate and adjust it to about pH 8. When the material temperature drops below 30°C, bag it. Production practice has shown that cultivating oyster mushrooms with fermented substrate results in fast mycelial growth, fewer contaminant microorganisms, and high yields.
4. Bagging. Choose low-pressure polyethylene tube film 23 cm wide, 43 cm long, and 0.025 micrometers thick. Each kilogram of tube film can be cut into about 180 pieces, and each bag can hold 0.7-0.8 kg of dry material. When bagging by hand, hold the bag with one hand and add material with the other, pressing while filling. When filled to about 8 cm from the bag opening, press the surface of the material firm, clean the material from the bag opening, expel air, then wrap a rope tightly around 3-4 times close to the material surface, tying it tightly and securely to prevent water and air from entering. When bagging, note: 1) Before bagging, mix the material thoroughly once. The moisture of the material is moderate when water seeps between the fingers but does not drip when the material is tightly squeezed in the hand. Culture substrate that is too dry or too wet is not good for mycelial growth. When bagging, add material and mix material as you go, so that the upper material does not dry out while the lower material becomes wet; 2) The mixed material should be bagged within 4 hours as much as possible, to avoid the culture substrate fermenting and turning sour from being left too long; 3) When bagging, do not trample, drop, or knead; apply pressure evenly, handle gently, protect the bags, and prevent the plastic bags from being damaged; 4) When bagging, pay attention to moderate tightness, generally to the degree that it feels elastic when pressed by hand, shows slight indentation under hand pressure, and stands straight when held by hand. If packed too tightly, air permeability is poor, affecting mycelial growth; if packed too loosely, mycelial growth is scattered and weak, and it is easily broken and damaged when the stack is turned, affecting fruiting; 5) The filled bags should be dense, straight, and not soft; the thickness and length of the bags should be consistent, convenient for stacking for incubation and fruiting; 6) Check the filled bags one by one and immediately seal any breaks or micropores with transparent adhesive tape.
5. Sterilization. Technical points: 1) Clean the dirty water in the pot, replace it with clean water, and put the filled culture bags into the stove promptly, stacking them reasonably. In the stove, the bags are placed in a straight stacked arrangement, with each bag aligned directly above and below the one beneath it. This not only creates large gaps, which helps steam penetrate, but also makes the sterilized bags tetrahedral, which is good for inoculation and later management. Leave a 15 sq cm ventilation channel from top to bottom at the four corners inside the steaming chamber, and also leave gaps between rows to ensure smooth steam flow and thorough sterilization; 2) During sterilization, do the "three diligences." That is: watch the fire diligently and add coal promptly; add water diligently to prevent the pot from drying out; watch the temperature diligently to prevent temperature drops; 3) When tending the fire, grasp "attack the beginning, promote the end, maintain the middle." At the start of sterilization, a strong fire must attack the beginning, striving to raise the stove temperature to 100°C within 4-6 hours, and begin timing. Then keep the fire steady and control the temperature, keeping it at 100°C without dropping for 24 hours. In the last 2 hours of sterilization, burn with a fierce fire to achieve thorough sterilization. After stopping the fire, let the material stew; when the temperature drops to about 70°C, take it out while hot and quickly transport it to the inoculation room to cool. When cooling, the culture bags should be stacked in a "well" shape. Note: do not have "large ends, small tails, and looseness in the middle"; 4) Prevent air leakage. The door of the atmospheric-pressure sterilization stove must be sealed tightly.
6. Inoculation. Inoculation must be strictly carried out under aseptic conditions. First, a relatively sterile environment must be created for inoculation to prevent contamination by foreign microorganisms; second, operations must be carried out according to certain methods and procedures to prevent foreign microorganisms from entering the culture bags and ensure successful inoculation.
Inoculation process:
1) Environmental disinfection. One week before inoculation, clean the inside and outside of the inoculation room, and spread lime or Bordeaux mixture. 3-4 days before use, seal the inoculation room and fumigate and disinfect with 0.5-1 kg of sulfur (or 1 kg of formaldehyde) for 12-24 hours. Before the culture bags are brought in, spray the floor and space inside and outside the room with disinfectant solution;
2) Selection and disinfection of spawn. Choose high-quality spawn with white, thick, dense mycelium interwoven into blocks. Wash the outer wall of the spawn bottle with disinfectant solution and immediately move it into the inoculation room. Under aseptic conditions, break the bottle wall, take out the spawn, and break the spawn into pieces the size of broad bean kernels; they should not be too large or too fine;
3) When the temperature of the culture bags drops to 28°C-30°C, untie the rope at one end of the bag, straighten the bag, and evenly sprinkle the spawn over the bag opening. Be sure to completely cover the culture substrate at the bag opening, then gather the bag, put on a plastic ring, cover with paper, and use a soft rubber band to tie the paper and bag together onto the plastic ring.
When inoculating, note the following points: 1) Do a good job of sterilization during inoculation; 2) Movements during inoculation must be quick and accurate; 3) Inoculation and operating personnel must maintain personal cleanliness and hygiene, wash hands and hair clean, trim nails, and disinfect hands and arms with 70% alcohol.
7. Stacking for incubation. After the mushroom shed (room) is disinfected, transport the inoculated culture bags into the mushroom shed (room) and stack them facing each other on the bed for incubation. The number of stacking layers depends on the air temperature. In summer and autumn when temperatures are high, stack 2-4 layers, arranging the bags in a "well" shape with crosswise placement to facilitate heat dissipation. Leave 60-70 cm wide walkways between stacks for operation and ventilation, and also leave some open space for turning the stack and rearranging bags. In spring or winter when temperatures are low, spread a layer of rice straw or wheat straw on the bed to prevent the lower layer temperature from being too low and affecting incubation, and at the same time increase the stack height, stacking 10-12 layers, then cover with plastic film or straw curtains to keep warm, raise the stack temperature, and promote mycelial growth. If the mushroom shed has not been built yet, open-field incubation can also be used. The open-field incubation site should be dry, clean, and cool. Cover the stack with a layer of straw curtain for shade, add plastic film before rain, and remove the film after rain, keeping the temperature at about 20°C.
The key points of incubation management are as follows:
1) Maintain temperature and pay attention to changes in stack temperature. After stacking for incubation, regularly insert a thermometer between the culture bags to observe the stack temperature and pay attention to changes in stack temperature. The incubation temperature is best at 25-30°C. If it is higher than 30°C, disperse the stack promptly and increase ventilation to prevent high temperatures from damaging the mycelium. If the temperature is lower than 20°C, try to raise and maintain the temperature.
2) Ventilation. Ventilate the mushroom shed 2-3 times a day for 30 minutes each time. When the temperature is high, ventilate in the morning and evening; when the temperature is low, ventilate at noon.
3) Keep dry. The relative air humidity in the mushroom shed is best at 60-70%.
4) Light should be dim. Weak light is good for mycelial growth.
5) Turn the stack. After stacking, turn the stack once every 5-7 days, moving the lower bags up, the upper bags down, the inner bags outward, and the outer bags inward, so that the bags receive uniform temperature and incubate evenly. When turning the stack, if bags contaminated by foreign microorganisms are found, pick them out; if bags are found where the mycelium is not consuming the material, the cause must be identified and measures taken promptly.
6) Ventilation and oxygen supplementation. With closed incubation tied at both ends, in the early stage of incubation the oxygen content inside the bag can meet the needs of mycelial growth. As the amount of mycelial growth increases, insufficient oxygen supply inside the bag will affect normal mycelial growth. When the mycelium at both ends of the bag has grown 2-3 cm into the material, prick 8-10 holes all around 1-2 cm above the mycelial growth zone with a large-head pin (or sewing needle), or use a sharpened bamboo chopstick to pierce 3-4 holes from the bag opening inward, or slightly loosen the rope tied tightly at both ends of the bag and use the natural tension of the bag opening film after loosening to let fresh air enter the bag, so as to ventilate and supplement oxygen and promote robust mycelial growth.
7) Prevent rodent damage. Prevent mice from biting through the culture bags and causing contamination by foreign microorganisms.
8. Common problems during the incubation stage and solutions
1) Mycelium does not germinate and does not consume the material. Causes: the material has deteriorated and bred large numbers of foreign microorganisms; the water content of the culture substrate is too high or too low; the spawn is aged and its vitality is very weak; the environmental temperature is too high or too low, lime was added excessively, and the pH value is too high.
Solutions: Use fresh raw materials without mold; use spawn of the proper age (spawn age 30-35 days); master suitable water content, to the degree that water beads do not drip between the fingers when the material is tightly squeezed in the hand; during incubation, keep the shed temperature at about 20°C and the material temperature at about 25°C; the temperature should preferably be slightly lower, never too high, and strictly prevent burning the mycelium; do not add antibacterial agents to the culture substrate; add lime in an appropriate amount, especially when the temperature is relatively low, the amount added should not exceed 1%. pH 7-8 is suitable.
2) The culture substrate becomes sour and foul. Causes: during incubation, high temperatures were not promptly dissipated and cooled, bacteria multiplied in large numbers, causing the material to ferment and turn sour, rot, and stink; too much water in the material and insufficient air led to anaerobic fermentation, causing the material to rot and stink.
Solutions: Pour out the material, spread it out to dry in the sun, then add an appropriate amount of new material and continue fermentation, then bag and inoculate again; if the material has already rotted and turned black, it can only be discarded as fertilizer.
3) Mycelial shrinkage. Causes: the culture bags were stacked too high, and when fermentation heat occurred, the stack was not turned in time to dissipate heat, so the material temperature rose above 35°C and burned the mycelium; the bags were large and held much material, causing high fermentation heat; the incubation site temperature was too high and ventilation was poor; the material was too wet and packed too firmly, so air permeability was poor, and mycelial shrinkage can also occur when the mycelium lacks oxygen.
Solutions: Improve the incubation site environment and pay attention to ventilation and cooling; when stacking culture bags for incubation and the temperature is high, stack 2-4 layers in a "well"-shaped cross arrangement to facilitate heat dissipation; turn the stack in time to dissipate heat during the period when fermentation heat is generated in the bags; master the material-to-water ratio well when mixing, and keep tightness appropriate when bagging; the width of the film tube selected for bagging should preferably not exceed 25 cm, to avoid too much material causing excessively high fermentation heat.
4) The bag wall is covered with bean-dregs-like mycelial lawn. Causes: the culture substrate has high water content and poor air permeability, causing large numbers of yeast to breed and accumulate heavily on the bag film, and a fermented sour smell appears in the material.
Solutions: Use a sharpened round wooden stick 1 cm in diameter to pierce 2-3 holes from both ends of the culture bag toward the middle, 5-8 cm deep, to ventilate and supplement oxygen. Before long, the yeast lawn attached to the inner wall of the bag will gradually disappear on its own, and the oyster mushroom mycelium will continue to grow.
5) Mold contamination. Causes: the culture substrate or the spawn itself carries microorganisms; the hygiene conditions of the incubation site are poor or an old mushroom room was not thoroughly disinfected; the mushroom shed is hot, humid, and unventilated.
Click to get more oyster mushroom cultivation techniques
Click to get more edible mushroom cultivation techniques