What are the key technical points for cultivating oyster mushrooms in midsummer?
How do you cultivate oyster mushrooms in midsummer? Please provide guidance on the method. Midsummer oyster mushroom cultivation usually adopts the method of indoor spawn running and outdoor casing soil for fruiting. Using the opposite cultivation method - burying bags in open ground for spawn running and removing bags indoors for cooling and fruiting - can control contamination by competing microorganisms during high-temperature periods, favor the growth and reproduction of oyster mushroom mycelium, and increase...
How do you cultivate oyster mushrooms in midsummer? Please provide guidance on the method
Midsummer oyster mushroom cultivation usually adopts the method of indoor spawn running and outdoor casing soil for fruiting. Using the opposite cultivation method - burying bags in open ground for spawn running and removing bags indoors for cooling and fruiting - can control contamination by competing microorganisms during high-temperature periods, favor the growth and reproduction of oyster mushroom mycelium, and increase oyster mushroom yields.
1. Spawn and substrate. Choose high-quality medium-to-high temperature strains for spawn. Depending on the specific situation, select one of the following substrate formulas. Formula 1: 97 kg small cottonseed hulls, 1 kg gypsum powder, 1.5 kg lime powder, 100 g 50% carbendazim. Formula 2: 70 kg rice straw, 20-30 kg rapeseed pod husks, 2 kg compound fertilizer, 0.5 kg urea, 1 kg gypsum powder. Formula 3: 45 kg rice straw, 40 kg wheat straw, 13 kg millet chaff, 1.5 kg compound fertilizer, 1.5 kg gypsum powder. To prevent contamination by competing microorganisms, add 5 kg plant ash separately to each of the above formulas. Pile up and ferment for later use.
2. Bagging and spawning. Use 50 cm x 26 cm polyethylene tube bags. Bind thin dry rapeseed stalks into small bundles 7 cm long and 4 cm in diameter to serve as ventilation plugs. Tie one end of the plastic bag tightly with a rubber band, then fill the bag with the fermented substrate. Before filling, take a short wooden block and bore a hole 7 cm in both diameter and depth in the middle, so that the rapeseed stalk bundle can be inserted into the bottom of the bag. For every 100 kg of substrate, use 15 kg of spawn. Of this, 13.5 kg of spawn is evenly mixed into 20 kg of substrate and sown separately at the bag mouths at both ends, 80 kg of substrate is placed in the middle of the bag, and the remaining 1.5 kg of spawn is additionally sown on the surface at the bag mouths at both ends. After the substrate is filled, use a thin wooden stick 1.5 cm in diameter to punch a vertical hole through the center of the bag substrate all the way to the bottom; the upper opening, like the bottom, uses a rapeseed stalk bundle as a ventilation plug. The filled substrate bags are 35-40 cm long. Generally, 100 kg of substrate can fill 54-56 bags.
3. Burying bags for spawn running. Choose flat, shaded sandy soil and dig a pit 50 cm deep and 70 cm wide; the length of the pit depends on the number of substrate bags. Scatter poisoned soil in the pit to prevent underground pests. Use wooden stakes to make holes 4-5 cm in diameter and 10 cm deep at the bottom of the pit 14 cm from the pit wall. Place the spawn bags upright and insert the rapeseed stalk bundle ventilation plugs into the holes at the bottom of the pit. Make holes and arrange bags in sequence, placing two rows of spawn bags in the pit. After the pit is full, fill the gaps with lime soil (3 parts lime, 7 parts soil), cover with 10 cm of soil, and cover tightly together with the ventilation plugs. The soil covering the pit surface should be higher than ground level, forming a turtle-back shape. Finally, cover with wheat bran, rice husks or rapeseed pod husks. Dig drainage ditches around the pit to prevent rainwater from flowing into the pit. After 15-20 days of burying the bags, when the bags are fully filled with mycelium, they can be dug out.
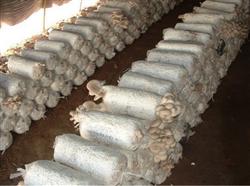
4. Removing bags for fruiting. Line the four walls and ceiling of the mushroom house with plastic film. On a sunny day, remove the bags in the open air (fully colonized bags are entirely white), rolling each bag off one by one (the plastic bags can be washed, dried and reused), leave them in the drying yard for 2-3 hours, then move them indoors and stand them upright on ground covered with wet sand. Spray well water (about 20°C) into the air and onto the wet sandy soil twice each morning and evening to keep the ground moist and lower the room temperature. Open the windows at 8 pm each night and close them at 7 am the next morning. In this way, even when the outdoor temperature is above 37°C, the indoor temperature remains only about 28°C, and the air humidity is maintained at about 90%, ensuring safe fruiting.
After the 3rd flush of mushrooms, switch to mushroom-wall fruiting or turning the bags around for fruiting, cover with fertile, loose, sterilized garden soil, and spray with nutrient solution, and 2-3 more flushes of mushrooms can be harvested.
Click to get more oyster mushroom cultivation techniques
Click to get more edible mushroom cultivation techniques