How to cultivate bagged oyster mushrooms in winter for high and stable yields
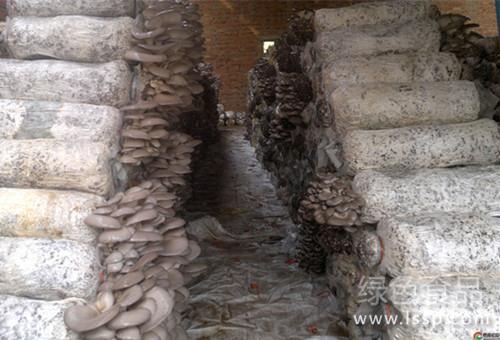
Bagged oyster mushroom cultivation
I. Scientifically select mushroom bags:(1) Bag specifications. In actual production, select corresponding bag specifications according to different cultivation times for oyster mushrooms. In late summer and early autumn, use 20cm×40cm or 22cm×45cm bags; in autumn, use 24cm×45cm or 25cm×50cm bags; in late autumn and early winter, use 25cm×50cm or 26cm×52cm bags; in winter, use 25cm×50cm or 28cm×55cm bags. (2) Bag quality. Do not use plastic bags with high transparency; use high-density low-pressure polyethylene plastic bags with a slightly dark gray color. (3) Bag preparation. During the slack farming season, first tie one end of the bag with a string about 20cm long, leaving a 1.5cm end when tying. You can punch 3 to 4 rows of holes in the bag in advance, which saves labor and time.
II. Strain selection and preparation:(1) Strain selection. Select oyster mushroom strains with different characteristics according to different cultivation times, and resolutely avoid cultivating low-temperature strains in high temperatures or high-temperature strains in low temperatures. Select more varieties, feed materials in batches, and supply different oyster mushroom varieties according to the season. Strains of the same line should be cultivated in rotation. (2) Strain preparation. If conditions permit, it is best to make your own strains to reduce costs. Stock strains can be prepared with wheat grains, corn kernels or sorghum grains; try to use pure cottonseed hulls to prepare cultivation strains, and some corn cobs can also be mixed in.
III. Build a mushroom house or mushroom shed:Old houses can be renovated: change the roof to a film roof, brush the walls with lime, spray insecticides such as phoxim and dichlorvos, then fumigate with sulfur; after leveling the floor inside the house, spread a 10 to 15cm layer of new soil, and during spawn running, spread another layer of plastic film. You can also build a mushroom shed in open space in front of or behind the village or beside a pond according to the amount of materials fed. If conditions permit, it is best to build a standardized mushroom house or shed, feed materials in batches, and carry out large-scale production.
IV. Culture material formula and treatment:(1) Formula. 1. Cottonseed hulls 100%, nitric phosphorus potassium fertilizer 0.8%, 802 or Nongfeng Dalishi 10 ml; 2. Cottonseed hulls 50%, corn cobs 48%, nitric phosphorus potassium fertilizer 1%, potassium dihydrogen phosphate 0.2%, edible mushroom nutrients 0.8%; 3. Corn cobs 100%, compound fertilizer 2%, edible mushroom nutrients 0.5%, salt 1.5%. For all the above formulas, add 0.15% to 0.2% carbendazim and 2% to 3% lime powder. (2) Mixing materials. 1. Manual mixing. On cement floors, reduce the water amount to 130%; on brick surfaces, soak thoroughly with water in advance to reduce loss of nutrient water. When mixing manually, turn and mix quickly for the first few rounds to ensure even mixing. 2. Mechanical mixing. For large-scale cultivation, mechanical mixing is mostly used, and the moisture of the material must be controlled well. (3) Stagger the timing of adding lime powder and spraying insecticides. Adjust the material first, then spray the pesticide. Adding lime powder and spraying fungicide should be staggered by 1 to 2 days; for raw material cultivation, stagger by 2 to 4 hours. Whether mixing or turning the material, after the pile is adjusted, seal the material with chemicals to prevent insects. (4) Inspection before bagging. During raw material cultivation in low-temperature seasons, the material temperature must not be too low; bag only after the temperature rises to 20°C. The adjusted material must not have an off odor; if there is an off odor, spray 2% alum water or 5% superphosphate clear liquid. The pH of the material should be 8 to 9. After the material is stable, bag it in a centralized manner.
V. Clear division of labor during bagging:(1) Material supply workers. Control material adjustment well, mixing and adjusting at the same time. (2) Strain supply workers. Disinfect the strains well, dip the strains in a large basin or bucket of disinfectant water (potassium permanganate), then peel the bags after disinfection. In high-temperature seasons, hold the strains in special small plastic buckets, one for each bagging worker; in low-temperature seasons, the peeled strains can be placed directly on the material pile. (3) Bagging workers. When bagging, pay attention to the tightness of the bag to avoid pulling off material chunks when harvesting mushrooms; if holes were punched in the bag in advance, place the strains at the holes; if holes are punched after bagging, arrange the strains as evenly as possible from top to bottom, so that during spawn running the mycelium grows evenly from top to bottom. (4) Bag moving and arranging workers. According to the air temperature during bagging, stack the bags in 3 to 5 layers in a crisscross pattern, spread a layer of plastic film where the bags are stacked, and sprinkle lime powder.
VI. Bag management:The quality of the bags determines the yield of oyster mushrooms. After bagging, the temperature in the mushroom house or shed must always remain suitable, and the environment should be on the dry and alkaline side. Mushroom growers can make an inspection card indicating the suitable temperature required during the mycelial growth period, check once every 2 to 3 hours, and record detailed temperature, humidity and ventilation conditions separately. Seven days after bagging, the material temperature can basically stabilize. Place several thermometers between the stacks above, below, left and right of the bags; check not only the temperature inside the house (shed) but also the temperature between the bag stacks. Try to run spawn at medium temperature, keeping the temperature at 18°C to 22°C. When the air temperature is high, turn the stacks to reduce the number of bag layers; when the air temperature is low, cover with film to increase temperature.