Design and Construction Methods for Low-Cost Rural Household Greenhouse Chicken Coops
Building a basic chicken coop for a small flock of birds is a solid weekend project, suited to a determined do-it-yourselfer with basic carpentry skills, while more elaborate coops can take weeks (and require advanced carpentry skills). The internet is full of
Building a basic chicken coop for a small flock of birds is a solid weekend project, suited to a determined do-it-yourselfer with basic carpentry skills, while more elaborate coops can take weeks (and require advanced carpentry skills).
The internet is full of backyard chicken coop plans, and it is a great place to find inspiration, but all coops have two main components: an enclosed space for sleeping and laying eggs, and an open-air “run” where the flock can roam around during the day. The enclosed space should open directly onto the run, but should be raised at least two feet above it so there is room to collect the droppings that fall to the floor. (More on that later.) There are many possible ways to configure a chicken coop, but here is how to build a basic model that can be easily customized to your aesthetic tastes.
Step 1: Plan the Dimensions and Location
The first thing to consider is size. The acceptable minimum is 2 to 3 square feet per chicken inside the coop and 4 to 5 square feet per chicken in the run. However, extra space is always better - just like humans, chickens are prone to squabbling when they are crammed into tight quarters at all times.
Chickens only need shade in hot weather, so placing the coop under a large deciduous tree is ideal - they stay cool in summer and can bask in the sunlight in winter once the leaves drop. If there is no site under a large tree, the run must be shaded with shade cloth.
Step 2: Build the Frame
As with most outbuildings, the simplest approach is to start with a rectangular frame and then add the various components you need. Use naturally rot-resistant wood - such as cedar or redwood - rather than pressure-treated wood containing heavy metals (such as arsenic), which can be harmful to chicken health. The open-air run should be covered on all sides with chicken wire (metal mesh) to keep predators out.
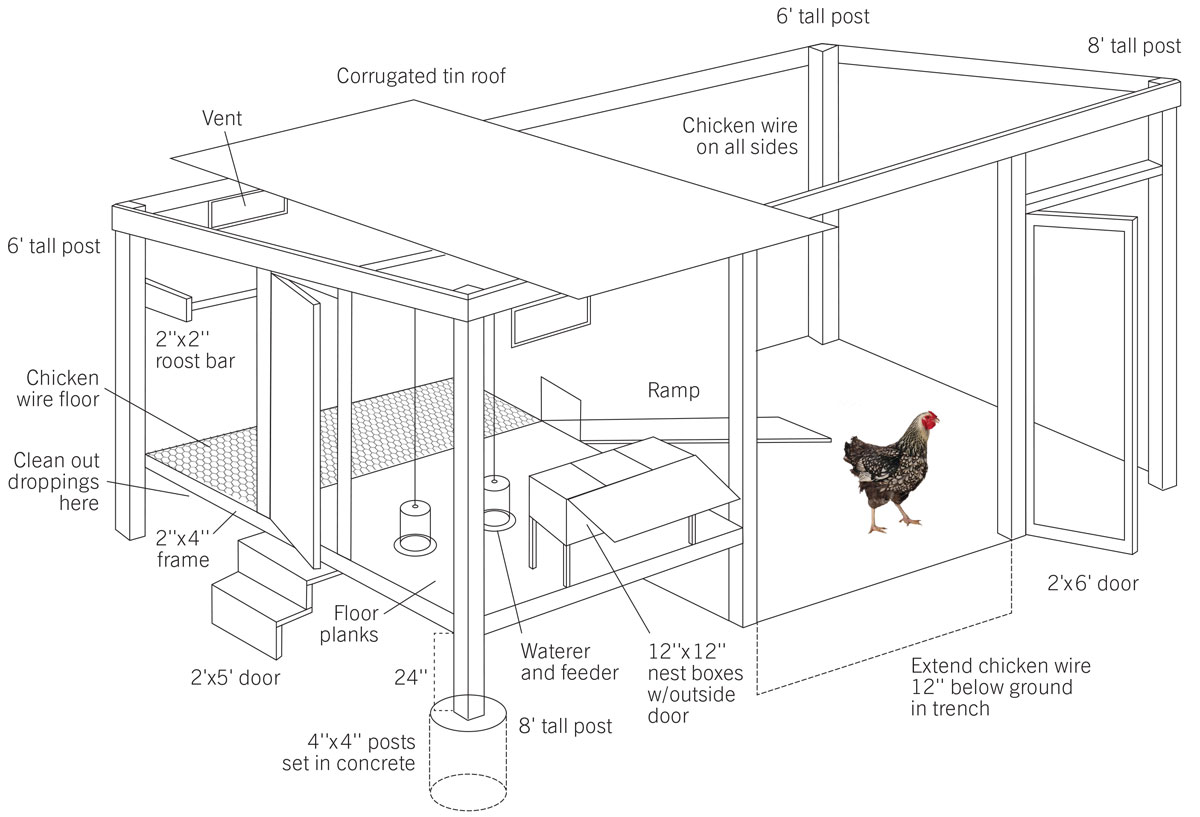
1. According to your desired coop dimensions (for example 4 feet by 8 feet or 6 feet by 12 feet or 8 by 16 feet), set four 4×4 posts in concrete in a rectangular shape. Cut the posts so that the height at the front is 8 feet and the height at the back is 6 feet, so that a sloped roof can be installed over the enclosed section.
2. Add a 4×4 post 2 feet from the right front corner of the rectangle. This post is to support a door that serves as the entrance to the run, and its height should be 8 feet.
3. Nail or screw 2 or 4 boards horizontally at the 6-foot height between the above-mentioned posts at the right front corner of the run.
4. Use 2×2 lumber to build a door frame to fit the space of the entrance passage (a 2×6-foot rectangle). This only requires a rectangle of 2×2s screwed or nailed together. Use an anti-sag gate kit to prevent the 2×2 frame from sagging. Use galvanized door hinges to mount the door frame to the corner post.
5. Add a pair of parallel 4×4 posts about one third of the distance from the left side of the rectangle. (For example, if the coop is 12 feet wide, these posts are 4 feet from the post on the left corner.) These posts are used to support the frame of the enclosed section of the coop. They should correspond to the heights of the other front and rear posts.
6. Install a frame of horizontal 2×4s between the tops of all the posts along the front and rear sides of the structure, and add three as rafters at an angle between the three pairs of taller front posts and shorter rear posts.
7. Attach a frame of horizontal 2×4s to the four posts more than 24 inches above the left side of the rectangle. These will support the floor of the enclosed area.
8. On the front two thirds of the structure, add flooring on top of the 2×4 frame, fastened with galvanized nails or trim screws.
9. Cover one third of the floor with chicken wire. The chickens will roost above this part of the floor, and the hardware cloth will allow droppings to pass through so they can be collected from below.
10. Dig a 12-inch trench around the run.
11. On the right two thirds of the rectangle, stretch chicken wire between the posts in the run area (as walls) and horizontally (as a ceiling), fastening it to the wooden frame with poultry staples. Install the chicken wire so that it goes into the bottom of the trench to prevent digging animals, and refill the trench with soil
to hold it in place. Cover the door frame with chicken wire. Because the edges are sharp, wear gloves when working with chicken wire.
Step 3: Equip the Interior
The interior of the run only needs a thick layer of straw on the ground to absorb chicken droppings and moisture when it rains. A watering device can also be hung from one of the rafters (by attaching wire to a nail) so they can drink when they are outside during the day. (The base of the drinker should be 6 to 8 inches above the ground.) If the run is not shaded during the hottest part of the day, add a layer of shade cloth on top of the chicken wire ceiling. Build a gently sloping ramp at least 8 inches wide on the platform above the ground up to the enclosed area. Before this area is enclosed, equip it with the following items:
Roosting bars of 2×2 lumber laid along the back wall on the chicken wire floor (at least 8 inches long per bird)
Nest boxes (at least one 12-inch square box per 4 birds)
A watering device and a feeder (hang them 6 to 8 inches above the floor of the chicken coop with wire attached to nails driven into a roof rafter)
Incandescent bulbs to extend the laying season (optional)
Locate the nest boxes along the front wall at least 24 inches from the floor. These can be as simple as wooden shelves with plywood dividers filled with straw. Add a 2-inch piece of wood to the front of the boxes to prevent the straw from spilling out. There are also prefabricated nest boxes, but some chicken keepers use plastic litter boxes as nests because they are easy to periodically empty and clean. Roosts should be located higher than the nests. Chickens are descendants of the arboreal jungle fowl and always seek the highest point to sleep (if chickens use them for roosting, the nests will quickly become dirty).
Step 4: Finish the Exterior
Now it is time to add the roof and walls to enclose the nesting and roosting area. Any weatherproof material can be used, but tin is a simple and stylish choice for the roof, and wood siding gives the walls a rustic look. (The wall and roof structures require additional 2×4 framing.) When you build the walls, be sure to plan for convenient egg collection and coop cleaning. All access points should be lockable with raccoon-proof latches - a typical door latch with a carabiner in the screw eye is usually enough to outsmart these masked bandits.
Plan for three access points:
A 12×12-inch door where the ramp enters from the run.
A 12×12-inch hatch on the front wall for access to the nests for collection.
A 2×5-foot door on the left wall for access to the water and feeder and for cleaning the coop.
The three types of access doors can be constructed with simple 2×2 framing in the same way as the main entrance door to the chicken run. Instead of covering them with chicken wire, use the same material as the exterior of the coop. (In this case, an anti-sag kit is not needed.)
Summer ventilation is very important. The chicken door and the section of floor covered with wire mesh will allow air in from below, but there also needs to be a place for hot air to escape from the top. Either leave a gap between the eaves of the roof and the tops of the walls, or cut vents near the tops of the walls. In either case, make sure these spaces are covered with chicken wire to keep creatures out.
These are the basics of a functional coop, but you can customize it freely and beautify it in any way you like. Fancy decorations, ornate knick-knacks and colorful artwork are all standard in chicken coop decor around the world.