What should you pay attention to when repotting orchids? Keep an eye on these few things
What should you pay attention to when repotting orchids.
There are five main points to keep in mind when repotting orchids, and I hope they can be of some help to your orchid growing.
1. Pay attention to disinfecting the orchid pot. When an old or previously used orchid pot is used again, it must be washed clean with water and then dried in the sun, which can disinfect and sterilize it. New pots (such as unglazed clay pots) should be soaked in water for a period of time before use, which both cleans them and removes their "fire qi."
2. Pay attention to the size and height of the orchid pot. When choosing an orchid pot, mainly select a pot of moderate size according to the orchid species, the number of orchid plants, and how robust the orchid seedlings are. If there are many plants and they are growing vigorously, choose an orchid pot with a larger diameter. Small seedlings and weak seedlings cannot be planted in large pots and deep pots, and large seedlings cannot be planted in small pots and shallow pots. Generally, for Cymbidium faberi and Cymbidium ensifolium, choose a slightly larger and deeper pot, while for Cymbidium goeringii, choose a smaller and shallower one.
3. Pay attention to covering the drainage hole. The drainage hole at the bottom of the pot should be covered with a piece of window screen, and a piece of tile should be pressed onto the window screen to prevent the potting soil from being lost while still allowing drainage. If it is a deep pot, in addition to the tile, fill another 1/5 of the pot's height with white plastic foam, or coarse-grained Xiantu, to form a drainage and air-permeable layer at the bottom of the pot, then spread a layer of growing medium, and the orchid can be planted.
4. Pay attention to planting and straightening the orchid plant: if only one clump is planted in a pot, the old pseudobulb should be placed toward one side of the orchid pot to leave room for future development. Use your hand to straighten the orchid plant, and try not to let the orchid plants crowd together.
Filling with material and planting the orchid: hold the orchid with one hand, and use a shovel to add the planting material with the other hand. When the planting material covers up to the pseudobulb, gently lift the orchid plant upward so that the root system spreads out more. At the same time, shake the orchid pot so that the planting material presses closely against the roots.
The planting depth of the orchid should be moderate: for Cymbidium goeringii, the pseudobulb should be slightly exposed, while for Cymbidium faberi, the pseudobulb must be completely covered.
5. Pay attention to post-planting care. After repotting, it should be placed in a semi-shaded and well-ventilated place, then use a watering can with a fine nozzle to water carefully over the surface soil layer. Note that the settling water must be watered thoroughly. After 10 to 15 days, normal care can be carried out.
1. Pay attention to the repotting time. Normally growing potted orchids do not need to be repotted every year; generally they are repotted once every 2 years. Repotting can be done in all four seasons (except in severe heat and severe cold). Most orchids are repotted in spring and autumn. In spring, it is usually from late February to late April, and in autumn, late September to mid-November is suitable. But one thing must be done: two days before repotting, watering should be controlled so that the inside of the pot is slightly drier, which makes it easier to remove the plant from the pot and also prevents the orchid roots from breaking because they contain too much water.
2. Pay attention to choosing clear weather. Repotting must be done on a clear day. The first step in repotting is to remove the plant from the pot. If it is cultivated with granular planting materials (such as Xianmei Xiantu or orchid base stone), just invert the orchid pot, pinch the base of the leaf cluster with your fingers, and gently pat the edge of the pot with the other hand to loosen the planting material, and the orchid plant and planting material can soon be separated. If the traditional method is used and it is planted with "orchid mud," first lay the orchid pot sideways, push inward from the bottom hole of the orchid pot with your fingers to move the potting soil, then invert the orchid pot, pinch the base of the orchid leaves with your fingers, and support the mud clump; with the other hand, push the orchid plant together with the mud clump out of the orchid pot.
3. Pay attention to root treatment. Pruning requires a cutting tool; it is best to prepare dedicated scissors, first soak them in boiling water for a few minutes, and use them after disinfection.
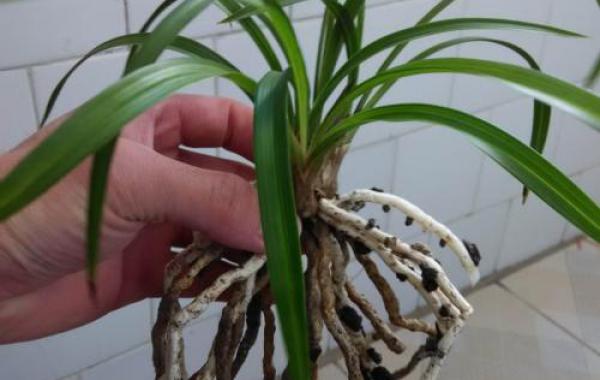
First, trim the root system. Cut off blackened roots, as well as rotten and hollow shriveled roots. When pruning, be careful not to damage new roots, and especially pay attention to protecting the extremely pointed transparent "crystal tips," which are the orchid's growth points. They are very tender, and will break with a single careless movement. Next, prune and remove decayed and hollow shriveled pseudobulbs. When pruning, special care must be taken to protect new shoots, and they must never be damaged.
The pruned orchid plant must be strictly disinfected. For disinfection, a solution made with potassium permanganate at 1000 times water or a solution made with thiophanate-methyl at 800 times water can be used. Soak the orchid roots in the solution for 5 to 10 minutes, for the purpose of killing pathogens.
Special attention should be paid to the fact that after the orchid roots are soaked and disinfected in the solution, the roots contain sufficient water, so they must not be rushed into the pot, as the orchid roots are prone to brittle breakage. The orchid plant should be placed in a cool and ventilated place, and only when the orchid roots appear milky white can it be planted in a pot.
4. Pay attention to disinfecting the orchid pot. When an old or previously used orchid pot is used again, it must be washed clean with water and then dried in the sun, which can disinfect and sterilize it. New pots (such as unglazed clay pots) should be soaked in water for a period of time before use, which both cleans them and removes their "fire qi."
5. Pay attention to the size and height of the orchid pot. When choosing an orchid pot, mainly select a pot of moderate size according to the orchid species, the number of orchid plants, and how robust the orchid seedlings are. If there are many plants and they are growing vigorously, choose an orchid pot with a larger diameter. Small seedlings and weak seedlings cannot be planted in large pots and deep pots, and large seedlings cannot be planted in small pots and shallow pots. Generally, for Cymbidium faberi and Cymbidium ensifolium, choose a slightly larger and deeper pot, while for Cymbidium goeringii, choose a smaller and shallower one.
6. Pay attention to covering the drainage hole. The drainage hole at the bottom of the pot should be covered with a piece of window screen, and a piece of tile should be pressed onto the window screen to prevent the potting soil from being lost while still allowing drainage. If it is a deep pot, in addition to the tile, fill another 1/5 of the pot's height with white plastic foam, or coarse-grained Xiantu, to form a drainage and air-permeable layer at the bottom of the pot, then spread a layer of growing medium, and the orchid can be planted.
7. Pay attention to planting and straightening the orchid plant: if only one clump is planted in a pot, the old pseudobulb should be placed toward one side of the orchid pot to leave room for future development. Use your hand to straighten the orchid plant, and try not to let the orchid plants crowd together.
Filling with material and planting the orchid: hold the orchid with one hand, and use a shovel to add the planting material with the other hand. When the planting material covers up to the pseudobulb, gently lift the orchid plant upward so that the root system spreads out more. At the same time, shake the orchid pot so that the planting material presses closely against the roots.
The planting depth of the orchid should be moderate: for Cymbidium goeringii, the pseudobulb should be slightly exposed, while for Cymbidium faberi, the pseudobulb must be completely covered.
8. Pay attention to post-planting care. After repotting, it should be placed in a semi-shaded and well-ventilated place, then use a watering can with a fine nozzle to water carefully over the surface soil layer. Note that the settling water must be watered thoroughly. After 10 to 15 days, normal care can be carried out.