Detailed Guide to Repotting Succulents and Precautions
Spring is here, and quite a few succulents that have outgrown their pots need repotting, while the empty pots left behind by the ones that died on you over winter need to be filled. I've often heard gardening friends say that their newly bought or freshly repotted succulents are in poor shape, all limp and dropping leaves, and they get terribly anxious. So let me clear up some basics here. If you already know how, no need to read on. First, let's talk about how to repot newly purchased succulents in general.
Just bought a succulent and want to give it a prettier pot? By repotting, you can move the plant into a completely new environment to grow, which benefits succulents. That's why some plants grow even better after repotting. But repotting carries risks, because any plant, once its roots are disturbed and the soil is changed, needs time to recover before it can grow again; after repotting, if external conditions are unsuitable, such as high heat or cold, it will affect the plant's growth, or even cause death directly, especially on snowy days.
Now let me tell you.
1. Removing from the pot
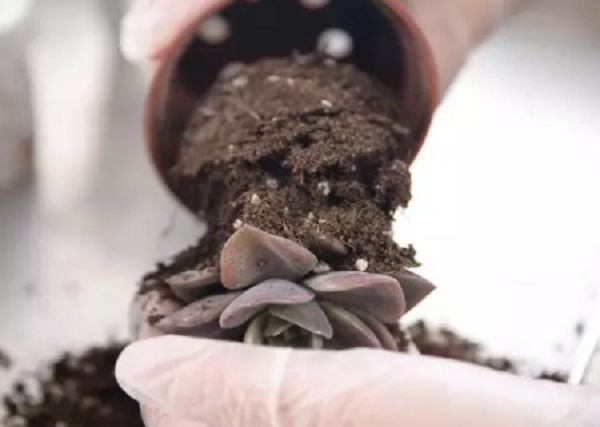
To take the plant out of the red plastic pot, you can first gently squeeze the outer pot to loosen the peat soil inside. When removing from the pot, it's best to do it when the soil is completely dry, for two reasons: when the soil is wet, it means the plant's roots are actively absorbing water, which makes them more prone to damage; plus, removing from the pot easily leaves some wet soil clinging to the pot and the plant, which isn't very attractive. Once the soil is slightly loosened, you can tip the soil out. There's no need to use too much force during the process! The plump, tender leaves break easily with too much force, so be gentle.
2. Tidying up the root system
After a succulent has grown for some time (about 1-2 years), some roots will die off, for many reasons: bacterial infection, soil compaction, and so on. That's why you need to repot to clean out these dead roots. Once roots die, they not only affect the plant's absorption, but if the wound gets infected, it will continue to spread and affect healthy roots, and finally spread to the plant itself.
Brush the soil away from around the roots, and at this point you'll smell a ginseng-like fragrance; this is the scent given off only by healthy roots! If you see pests or rotten roots at this point, then you would wash the roots or behead the plant to re-root it, but since this plant currently looks very healthy, we won't wash the roots! Once most of the peat soil is cleaned off, you can move on to the next step.
3. Preparing to plant - bottom layer
Most pots have holes. If the medium you bought is on the small side, it's recommended to use a permeable mesh or paper towel to partially cover the bottom hole, so that during planting, the stones won't quickly wash out through the hole each time you water or move the pot. (A little tip: a makeup cotton pad used by women works well as a substitute for the bottom mesh.)
Next, for the bottom layer we'll put in expanded clay pellets, about one-fifth of the pot's volume. Expanded clay pellets are made from a special clay mixed with water and fired at a high temperature of 1,100°C, forming a reddish-brown, loose, gravel-like product of varying coarseness; it's the best medium for hydroponics. It has countless independent air pores, and its surface can adsorb a large amount of water while the interior still retains air, a dual structure that gives it both water retention and breathability. It contains no organisms and is clean and sterile, has a smooth, attractive rounded shape, and is hard and not easily crushed. Even with long-term use, it won't deteriorate or break down.
4. Starting to plant
I'll show you with illustrations so it's clearer. Since the pot being used this time is relatively small, before replanting the succulent, first put in some mixed soil, not too much, just enough to cover the expanded clay pellets. The purpose is to plant the plant firmly and completely; if you put in too much mixed soil at the start, the plant won't have space and won't be planted deep enough, and will easily wobble.
Then place the succulent you just removed from its pot into the pot, and add mixed soil into the gaps between the pot and the plant. You can use tweezers to help, and press the medium down a little to make it more compact. Don't worry about filling it too full, because there will be gaps between the stones, and the roots won't easily get suffocated.
5. Lightly tap the pot
Finally, lightly tap the pot to reduce the gaps. Sometimes you can even add more soil. After repeating a few times, you're all done.
Benefits of repotting:
Precautions after repotting:
1. For plump, tender types of succulents, the best repotting season is October to March (30°C to 5°C).
2. Don't water for a week, because during the root separation process, the roots will inevitably be somewhat damaged, and the wounds need to heal and dry out.
3. Don't expose to direct sunlight for a week; place in a spot with diffused light by a window or balcony edge, so the roots can slowly adapt to the new environment.
4. For the first watering, water in the morning until water comes out through the hole. The plant will grow new roots after a week, and after that just water normally.
5. If grown outdoors in a ventilated spot, water once every 1-2 weeks; indoors, water once every 2-4 weeks.
Actually, all my methods here are the most conservative approach. Many succulent varieties are far tougher than you can imagine. Once you've been growing them for a while, you'll find these methods are all too cumbersome, and only the more delicate varieties need such a complicated process. Heh, but if you haven't been around succulents for long and don't yet have a full grasp of their habits, then just follow the conservative approach. If you're already an experienced grower, then just do as you always have.