The Best Time and Correct Method for Repotting Orchids
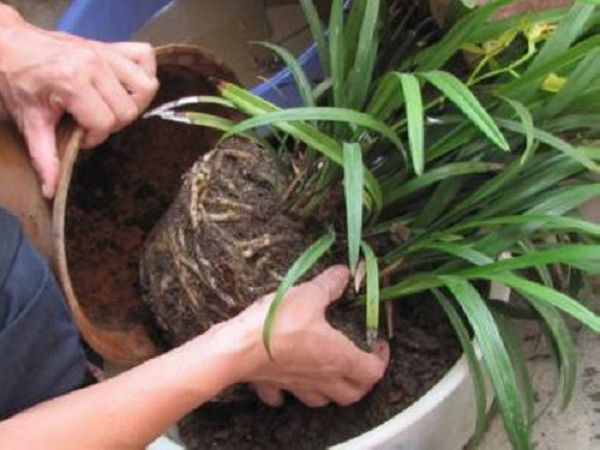
During the cultivation of orchids, there are always some phenomena that hinder orchid growth: after several years in a pot, the plants multiply, the root system becomes too dense, nutrients run short, the potting medium compacts, and pests and diseases appear. All of these affect the growth of orchids. The only solution when the above situations occur is to repot, divide, and replace the potting medium. A good repotting can promote active vegetative growth, improve the orchids' disease resistance and rejuvenation ability as well as their sprouting rate, and bring vigorous vitality to the orchids. If repotting is done poorly, it can also bring potential crisis to the orchids. Especially for some diseased and weak seedlings, it will accelerate their death.
Therefore, repotting is an important measure in orchid care, and a skill that every orchid grower must experience and master. At the same time, it should be reminded that orchids cannot be repotted frequently. Because orchid roots live in symbiosis with orchid fungi, absorbing nutrients through the orchid fungi, repotting and changing the potting medium too often will affect the orchid's nutrient absorption and normal development. Each repotting and each change of potting medium requires the orchid fungi to be regenerated and to adapt to the new environment, and the orchid seedlings will be in a suppressed state for a period of time, stopping growth. Especially old seedlings and weak seedlings may very likely be worn out to death. Therefore, those that need repotting must be repotted, and those that do not need it should be left alone as much as possible.
Potted orchids are limited by the pot. As orchids grow year after year, the soil nutrients are exhausted. The root system becomes too dense and the plants too many, making it hard for them to grow lush again, and it also spoils the appearance. To promote better growth and reproduction, they must be repotted with fresh medium or divided. Repotting can be done in the three seasons of spring, autumn, and winter throughout the year, as long as intense heat and freezing are avoided.
[Under What Circumstances Do Orchids Need Repotting]
Generally speaking, orchids need to be repotted once every 2 to 3 years of growing in the pot, mainly due to the following reasons:
1. The orchids have become crowded. After 2 to 3 years of propagation and growth, there are more and more orchid plants in the pot, which not only looks crowded but also lowers the orchid's sprouting rate and makes it prone to growing small weeds.
2. There are too many orchid roots. Modern orchid growing mostly uses granular potting media. The orchid root system in the pot becomes well developed, and after 2 to 3 years of growth, the roots become tangled and interlaced. Not only is there no room for new roots to grow, but old roots and hollow roots remain in the pot, occupying space and easily breeding pathogens.
3. The potting medium has become depleted. After several years of cultivation, the nutrients in the potting medium are exhausted and the medium becomes acidified, so not only are new seedlings thin and short, but the whole pot of orchids appears in a weakened state.
4. Problems have arisen. During cultivation, orchids in the pot develop various physiological diseases, or even suffer infection from pathogens and viruses, with diseased seedlings collapsing. To save the remaining orchid seedlings, repotting and replanting with fresh medium becomes unavoidable.
5. The plants are to be sold. Among modern orchid growers, few are purely growing orchids for their own enjoyment; generally there is buying, selling, or exchanging. Once an orchid friend comes to obtain stock or a friend comes to exchange, one has no choice but to take the plants out of the pot, divide the seedlings, and replant them.
[Preparation Work Before Repotting]
Once repotting is decided, the relevant preparation work should be done three days in advance, mainly in three aspects:
1. Soaking the potting medium. Modern orchid growing mostly uses a mix of various granular potting media, and these granular media all need to be soaked before use. For example, Sendai soil must be soaked for more than two days, and others such as Zhijinshi, Zhenjiang orchid soil, orchid fungus soil, and ceramsite also need to be soaked to varying degrees. When soaking the potting medium, generally it should first be sieved and divided into large, medium, and small granules, then soaked in a disinfectant solution to sterilize and kill pathogens in the medium. Disinfectants such as thiophanate-methyl, carbendazim, chlorothalonil, and potassium permanganate can be used.
2. Choosing and disinfecting pots. The choice of orchid pot size depends on the orchid variety and its growth vigor. Usually, for one variety of orchid, at least two pot sizes, large and small, should be prepared, so that large plants go in large pots and small plants in small pots; plants with many roots go in large pots and those with few roots in small pots. Newly fired orchid pots should be soaked in water for more than one day, then soaked in a diluted fungicide solution for more than two hours, and after removal rinsed clean with clear water.
3. Withholding water from the orchid seedlings. Stop watering three days before repotting, and do not let the potting soil stay moist. When the potting soil is dry, it helps the repotting work proceed smoothly: first, it is easier to remove the plant from the pot and the soil ball crumbles easily for cleaning; second, with less water in the orchid roots, they are less likely to break, making it easier to arrange the roots and divide the plants, and the operation goes much more smoothly.
[Steps for Repotting Orchids]
1. Removing from the pot and taking out the seedlings
Tip the orchid pot over, turn the pot with your left hand, and pat the pot wall with your right hand to loosen the potting medium, which will naturally keep coming out of the pot, and then the orchid seedlings can be taken out. In a few pots where the orchids are vigorous, the roots numerous, and the roots grow pressed tightly against the pot wall, even after repeated patting they are not easy to loosen; pat patiently, and you can also use a wooden stick to push up from the drainage hole at the bottom, and generally they can be taken out smoothly. If there is truly no other way, one has to break the pot to get the seedlings out.
2. Rinsing the orchid seedlings
After the orchids are taken out, if the roots are very clean, they need not be rinsed; just carefully remove the potting medium. If the soil is relatively wet and hard to pick off (such as mountain soil, which is harder to remove), they can be placed under a running tap to wash clean.
3. Hanging upside down to dry
After rinsing, the orchid roots are full of water and easy to break, so it is not suitable to arrange the roots, let alone divide the plants. To make the operation easier, after washing the seedlings, place them in a cool, ventilated spot to dry for a while, preferably hung upside down to prevent water from accumulating in the leaf hearts. Never place them in the sun to bake. Wait until the roots become soft and whitish before arranging the roots, trimming, and dividing the plants; otherwise the roots will break or fall off.
4. Careful trimming
The orchid seedlings that have been dried should be trimmed. Use sterilized scissors to cut off rotten roots, hollow roots, shriveled roots, and diseased roots. If there are not many orchid roots, the root core can be kept to support the orchid plant. At the same time, trim residual leaves, rotten basal leaves, diseased leaves, and hollow, shriveled old pseudobulbs.
5. Scientific division
If the orchid clump is relatively large and needs dividing, divide it appropriately. Division should be done scientifically, starting from what favors more sprouting and larger plants. Use sterilized scissors or a scalpel to divide.
6. Applying medicine for disinfection
The cuts from trimming and division should immediately be dusted with medicinal powder; generally thiophanate-methyl, carbendazim, chlorothalonil, and the like are better for dressing wounds. After a while, disinfect the divided orchids; generally soak for about 15 minutes to eliminate pathogens and viruses remaining on the orchid plants. After soaking, take them out and hang them upside down, dry them appropriately until there is no water between the leaf hearts and the root system is soft, and then they can be planted.
7. Mixing the potting medium
Mix the disinfected and soaked potting medium in proportion. Generally speaking, the ratio of Sendai soil, Zhijinshi, Zhenjiang soil, and orchid fungus soil is 4:3:2:1. If the old potting medium is disease-free and pathogen-free, it can also be sieved, divided into large, medium, and small grades, sterilized by sun exposure, then soaked in disinfectant solution for two days for sterilization, and after draining, mixed into the new potting medium for use, but the proportion of old potting medium should preferably not exceed one third.
8. Matching seedlings to pots
According to the condition of the seedlings, choose and match orchid pots of suitable size. Generally speaking, large seedlings use large pots, small seedlings use small pots; many seedlings use large pots, few seedlings use small pots; many roots use large pots, few roots use small pots.
9. Placing the drainage cover
First place a drainage cover at the bottom of the pot. Generally speaking, large pots use large drainage covers, and small pots use small drainage covers. Drainage covers can be homemade or bought from the market.
10. Laying the drainage layer
After the drainage cover is set in place, place loose, soft, and not easily crumbling charcoal, Zhijinshi, or other potting medium the size of a thumb around the drainage cover to ensure ventilation and air permeability at the bottom of the pot.