What to do if your Clivia has root rot? Teach you the correct rescue method
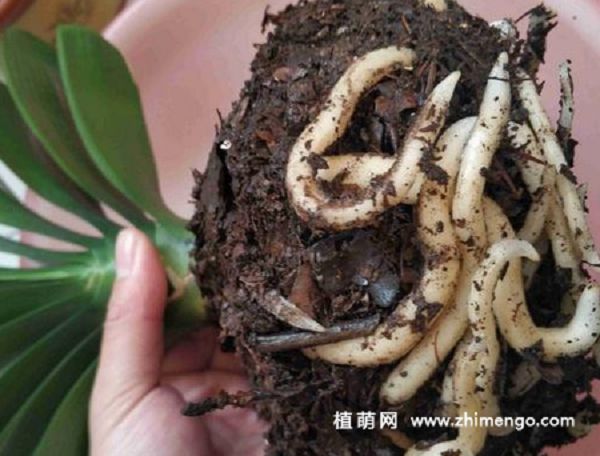
Clivia (Clivia miniata) is a common indoor potted flowering plant; with good care, its leaves are emerald green. If cared for improperly, Clivia is prone to root rot. For example, one flower grower had a Clivia at home that developed root rot due to regular overwatering combined with poor drainage of the potting soil.
This easily obstructs the root respiration of the Clivia, and over time, root rot occurs. Generally, when a Clivia has root rot, it can be rescued in this way, allowing the Clivia to grow new roots and regain vitality. The steps are as follows.
What to do if your Clivia has root rot. 1. Preparation work
First, move the Clivia with root rot to an open courtyard and prepare to perform "surgery" on it. First prepare the tools for the "surgery", such as a utility knife or scissors, a lighter or alcohol lamp to sterilize the knife, a carbendazim solution or potassium permanganate solution, a new flower pot and soil.
2. Removing the plant from the pot
First, take the Clivia with root rot out of its pot. Simply pat the sides and bottom of the pot, then dig away some of the soil around the Clivia plant. Next, hold the plant with one hand and the pot with the other, and pull the Clivia upward with force, so you can easily remove the Clivia from the pot.
3. Washing the roots
First use your hands to break up the soil clumps around the Clivia roots and shake the plant; this can remove some of the soil. If some soil still clings to the roots, which is not good for observing the rotted roots, you can rinse it with clean water. This way the fleshy roots of the Clivia will be exposed, making it very convenient to observe the rotted roots.
4. Pruning the rotted roots
First inspect the Clivia for rotted roots; generally you can observe directly, or feel with your hands, to identify the rotted roots. Light the alcohol lamp and hold the scissors over the flame to sterilize them. Next, hold a rotted root of the Clivia with one hand and the scissors with the other, and cut off the rotted roots one by one at the rotted areas.
5. Disinfecting and drying the roots
After cutting off the rotted roots of the Clivia, you can rinse it again with clean water. Next prepare a basin, fill it halfway with clean water, add an appropriate amount of potassium permanganate or carbendazim, and stir well. Then place the Clivia with pruned roots into the solution to soak for 5-10 minutes.
All pruned roots must be soaked. After soaking, take the Clivia out, apply some sulfur powder to the roots, and place it in a ventilated, shady spot to dry out the moisture and let the wounds heal; about 1-2 days is enough.
6. Preparing new potting soil
Since the Clivia's root rot was caused by overwatering and poor soil aeration, do not reuse the original soil. Mix new soil instead; the soil can be a blend of coarse river sand, leaf mold, and pine needle soil. When mixing new soil, give as much consideration as possible to aeration and drainage.
You can use the original flower pot. To avoid pathogens in the original pot, wash it clean and put it under the sun to bake, then use it again.
7. Repotting
Now place some small granular stones or tile pieces at the bottom of the original flower pot to increase aeration and drainage. Then spread the prepared soil over the granules to a thickness of 5-8 cm, then bring over the Clivia plant with dried wounds and place it on the soil surface. Arrange the Clivia's roots neatly,
do not let them pile up in a mess; spread the roots out. Then fill in soil around the Clivia plant, making sure the soil does not touch the leaf core, pressing down as you fill. Once the soil is filled in, water to settle the plant, and move it to a ventilated, shady spot to grow.
After 10-20 days, if the Clivia looks more spirited, it means it has survived and been rescued.
Generally, Clivia root rot is caused by problems in daily care, so to prevent Clivia from developing root rot, strengthen daily management to prevent it. You need to start from the following points.
How to prevent root rot. 1. Avoid rain exposure
In rainy seasons, pay more attention to the weather forecast, avoid letting the Clivia get rained on, and take drainage and rain protection measures in advance. If it gets rained on too much and the water is not drained away in time, the potting soil easily becomes waterlogged, and over time this causes root rot.
2. Water according to soil moisture
When watering Clivia, do not water on a fixed number of days; watering must be based on how dry the soil is. You can insert a longer bamboo stick into the Clivia's soil and pull it out every few days to check. If the bamboo stick is moist, you can delay watering. If the bamboo stick is dry or the soil clinging to it is dry, it means it is time to water.
3. Good pot aeration
The pot for potted Clivia should have good aeration. Generally, clay pots or earthen pots are fine. For better aeration, add some granular tile pieces or small stones to the bottom of the pot.
4. Reasonable fertilizing
If you apply fertilizer at too high a concentration to Clivia, it can also cause root rot. For Clivia fertilizer, it is recommended to use decomposed fertilizer. When fertilizing, do not pile it directly at the roots. It is recommended to spread it around the edge of the flower pot.