Detailed method and steps for dividing and separating Clivia miniata
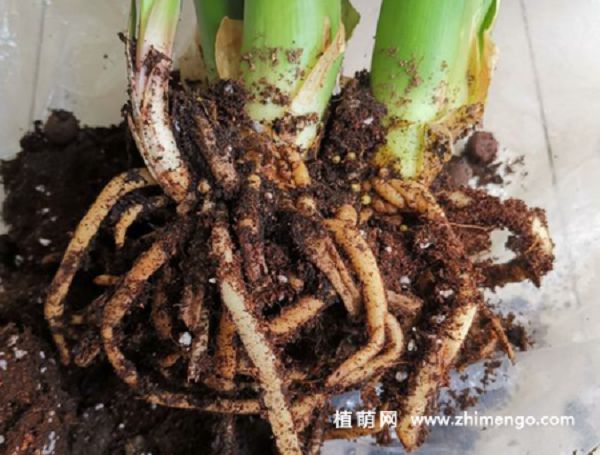
After growing a potted Clivia miniata for a year, it has grown very well, and several small offsets have also grown from the base of the roots. After a year of care, the small offsets at the sides have also grown quite a bit. Recently, I kept having a thought: every time I see this pot of Clivia miniata, I want to divide it up.
During the May 1 Labor Day holiday, I still could not resist, and divided this pot of Clivia miniata into separate plants. Below I will talk about the process of dividing the Clivia miniata.
Purpose of dividing Clivia miniata: 1. The original flower pot is too small and can no longer meet the needs for better growth of the clustered Clivia miniata, so a larger pot should be considered to let its root system spread out and grow better.
2. I hope to cultivate new plants by dividing the pot. As long as the divided Clivia miniata plants survive after planting, there will be 2 more pots of Clivia miniata. Why not do it?
Process of dividing Clivia miniata: 1. Preparation work
First move the potted Clivia miniata to an open courtyard and place it in a shady spot. Then prepare the tools to be used: a utility knife, new flower pots and soil, clean water, potassium permanganate solution, etc.
2. Removing the plant from the pot
Before preparing to remove the Clivia miniata from the pot and divide it, stop watering a few days in advance so the potting soil is a bit drier, which makes it easier to remove from the pot. First gently pat around the sides and bottom of the flower pot with your hand, then use a bamboo strip to gently slide along the inner wall of the pot so that the pot separates from the soil.
Next, use a small shovel to remove some of the surface soil from the flower pot, then tilt the pot to the side, gently hold the plant with one hand, and with the other hand grip the drainage hole of the pot and gently but firmly move it backward, so the Clivia miniata can be easily removed from the pot.
3. Washing the soil from the roots
After removing the Clivia miniata from the pot, first clear away the soil around the roots. You can gently crush the soil with your hands, then gently pat the root system. After most of the soil has been cleared, it can be washed clean with water.
4. Separating the roots
After the Clivia miniata root system has been washed clean, the roots can be arranged smoothly. Since there are three plants at the base, the root systems of the different plants can each be arranged a bit more smoothly. Next, prepare a utility knife, which must be sterilized,
and directly cut off the roots that are connected to each other. By the way, the dead roots and hollow roots of each plant can be cut off or pulled off.
5. Soaking for disinfection and air-drying
After trimming the root systems of the Clivia miniata plants separately, prepare a larger bucket, fill it halfway with water, add potassium permanganate solution, and stir evenly. Then place the Clivia miniata in the solution and soak briefly, about 10 minutes, not too long. The main purpose of soaking the roots is to disinfect and sterilize the root system, which helps the plants survive after planting.
After soaking, take the plants out to air-dry the roots and place them in a shady spot. Once the moisture has dried, they can be planted. Air-drying for about an hour is enough.
6. Preparing the pot and soil
The new pot and soil should be prepared in advance. Choose a breathable ceramic pot, and the soil can be made by mixing leaf mold, pine needle soil, plant ash soil and river sand, stirred evenly. Next, the soil can be put into the flower pot.
7. Planting each plant separately
First place some granular material at the bottom of the flower pot to improve air and water permeability, then spread soil over the granules; a soil thickness of 3-5 cm is enough. Next bring the Clivia miniata plant, place it in the flower pot, and set the plant's root system naturally on the soil.
Then evenly fill soil around the plant. While filling the soil, hold the plant steady and upright. After the soil is filled, press the soil firm along the edge of the pot. Since Clivia miniata plants have few roots, they can be planted somewhat deeper. In this way, one plant is potted, and the other plants can be done in the same way.
8. Care after potting
After potting the Clivia miniata plants separately, water once to settle the roots. After that, do not water too frequently. After all, the root systems have been trimmed and need some time to recover. If watered too frequently and water accumulates, root rot is likely.
After potting, keep the Clivia miniata in a shady place. After about a week, it can gradually be moved to a place with bright, indirect light.
The above is how I repotted and divided the Clivia miniata that had been grown for a year. The whole process went fairly smoothly. I hope it is helpful to flower lovers. Thank you for sharing.