How to raise quail efficiently? Key techniques with low investment and quick results
Raising quail requires low investment and gives quick results, but scientific rearing methods are essential.
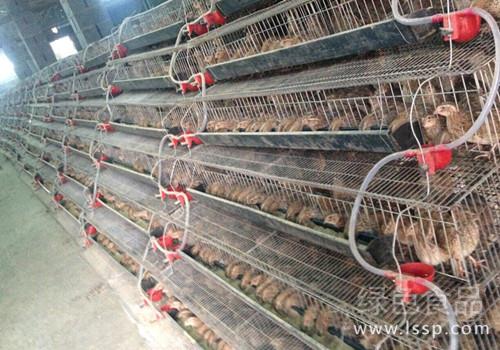
Quail farming
1. Building cages and housing:
Raising quail in cages gives better results. You can build a bamboo and wood structure, with cages 80 cm long, 50 cm wide and 30 cm high, arranged on racks in tiers. Set up the cages in a quiet, ventilated, sunny room with good light and good insulation, regulate the temperature carefully, keep it warm in winter and cool in summer, and strictly control the entry of livestock and poultry (dogs, cats, chickens, etc.) or human disturbance. The stocking density is calculated per single tier of the cage housing: about 100-150 chicks or about 60 adult quail per sq m. The quail cages must be equipped with feed troughs and drinkers; lighting equipment must be installed, and there must be light at night to increase the egg-laying rate of the quail.
2. Mixing good feed:
For quail feed, use foods with as little fiber as possible and rich nutrition, and the varieties should be diversified. Maintain a certain protein level and good palatability, and do not change the feed arbitrarily, to prevent reduced feeding and lower production. A general feed formula: corn 50%, soybean cake 8%, rapeseed cake 3.7%, wheat bran 29%, fish meal 6%, coarse bran 1.5%, bone meal 1.5%, salt 0.3%, plus some multivitamins, antibiotics, trace elements, etc.
3. Daily care and management:
(1) Clean the cages frequently and remove droppings (once a day, at least once every two days) to prevent dampness and contamination, and often scrub the troughs and utensils to keep them dry and clean. (2) Quail aged 0-4 days show a wild tendency to dart around, so be careful when adding feed and water, prevent feed from being scratched out and spilled, and prevent drinking water from wetting the down. (3) At 40 days of rearing, quail can be put into the laying cages to adapt to the laying environment; in summer maintain good ventilation to prevent heat stress and lower the temperature; in winter use a stove and keep the temperature above 16°C. (4) During the laying period there must be sufficient light, and after dark about 4 hours of supplemental lighting can be given. Quail usually lay eggs from 2-4 p.m. and finish by 6 p.m. Collect eggs promptly to prevent trampling and pecking. (5) Frequently check and adjust the indoor temperature, humidity, ventilation and light, and guard against various stresses, feather pecking, rat damage, animal damage and gas poisoning. (6) Regularly weigh the quail and check feather growth, and keep good records of everything.
4. Mating and breeding:
Spring mating is in March-May, and autumn mating in September-November, with a male-to-female quail ratio of 1:4; generally one male quail mates with one female quail per day, and too much mating will affect the fertilization rate of breeding eggs. When mating, put the male quail into the female quail's cage to mate on their own, and after mating take the male quail out again.
Quail brooding
5. Grasp the brooding stage well:
Quail eggs hatch in only 17 days. Newly hatched quail chicks adapt poorly to the environment, so keep them warm. From 1-2 days after hatching, keep the cage temperature at 35-38°C to speed up absorption of the yolk in the abdomen and ensure good navel closure. After that, lower it by 0.5°C each day until about 25°C, then keep it constant, and also start feeding the quail at the right time. One day after hatching, feed some steamed egg yolk and crushed corn. After one week, feed a mixed diet, 5-6 times a day (including 2 times at night). The feed should be mixed wet, squeezed into a ball by hand yet crumbly, which is ideal, and also frequently give boiled cool water. They generally mature after 50 days of rearing and begin laying eggs.
6. Forced molting:
If you want to use the second laying period, forced molting is needed. Method: stop feed for 4-7 days and keep it dark, forcing the laying quail to stop laying quickly, then they shed feathers, and then gradually increase feed so the quail quickly resume laying. From stopping feeding to resuming laying takes 20 days. Sick and weak individuals must be culled, and drinking water must not be interrupted.
7. Disease prevention and treatment:
(1) Gastroenteritis. Caused by moldy feed or improper rearing, it leads to diarrhea, weakness, coma, etc. You can mix charcoal powder into the feed, feed it for 3 days, stop for 2 days, then feed it 1-2 more times, or mix oxytetracycline into the feed and feed for 5 days. You can also mix sulfaguanazole or sulfadiazine into the feed, feeding twice a day for 5-6 days.
(2) Pullorum disease. Caused by Salmonella, it leads to loss of appetite and white, foul-smelling loose droppings, etc. You can add oxytetracycline to the feed and feed for 6 days, or mix sulfadiazine into the feed at a ratio of 0.5%, feed for 3 days, stop for 2 days, then feed for another 3 days.
(3) Prolapse of the cloaca and difficult laying. Caused by premature laying or poor nutrition during the laying period. Prevention and treatment: keep the feed nutritionally complete, and prevent female quail from becoming too fat and from oviduct diseases. For difficult laying, gently press the abdomen with your hand to help them lay. For prolapse of the cloaca, wash the anus and rectum with a 0.1% potassium permanganate solution, then gently push them back inside the body.