Illustrated Guide to Dividing Orchids: Detailed Steps You'll Understand at a Glance
Dividing orchids is actually not difficult, as long as you are careful; the key is to get the timing of orchid division right. In this article, we will first talk about the timing, and then refer to other growers' division illustrations for your reference.
1. Timing for dividing orchids:
When the potting medium in an orchid pot has been used too long and become degraded, or when there are too many shoots with no room to grow, you must divide or repot. Generally speaking, spring and autumn are the most suitable times for division; at these times the orchid plants are in their mature stage, so the damage rate can be reduced to a minimum. In the first half of the year, the best time is from the Spring Equinox to Grain Rain, when the flowering period has ended and the leaf buds have not yet sprouted, so they are less likely to suffer cold damage and can be repotted at the right time. In the second half of the year, the best time is from the Autumn Equinox to Frost's Descent, when orchids are about to enter dormancy, so repotting at this time will have less impact on orchid growth. After resting and recuperating through winter and accumulating nutrients, they will be able to flower and sprout well in spring. Mastering the right timing for orchid division is also an important part of good orchid care.
2. Orchid division illustrations (from: Anji Menghu):
1. Unpotting (a rare Cymbidium goeringii orchid grown for many years in one pot)
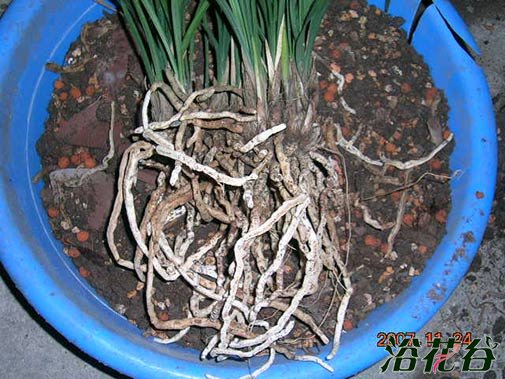
2. Tool preparation (medical surgical scissors/surgical scalpel/alcohol lamp for disinfection). If conditions do not allow, other sharp tools can also be used, such as blades.
3. Inspection (look carefully at the structure of the shoots and find the best division point.)
4. Root sorting (after choosing the division point, first sort out the roots and separate the intertwined and tangled roots, being careful and slow to reduce root breakage)
5. Twisting (hold the roots with both hands and twist gently to find the connection point; do not rudely pull the pseudobulbs apart with your hands, as this easily damages new buds and leaves)
6. Cutting (cut decisively at the position you have identified. Note: each time you make a cut, an orchid plant has definitely separated; before you see it split into two, absolutely do not make a second cut; careless cutting will leave the orchid plants fragmented.)
7. Trimming (cut off the withered yellow sheath remnants, where dirt and grime collect)
8. Rinsing (rinse clean with running water)
9. Further division (for orchid plants that need further division, look again for suitable connection points; generally 3-4 shoots per plant, so there is less damage and it is easier to restore vigor)
10. Separating cuts (use a surgical scalpel to cut carefully, so the wound is small and easy to heal. Note: the surgical blade should be changed for each pot to prevent virus transmission.)
11. Applying medicine (treat all separated wounds with a fungicide; I use "Baituo" original powder directly on the wounds, which can effectively prevent summer stem rot)
End (after the orchid plants are separated, they should be left to dry for 1 day; after the roots become soft and the wounds shrink slightly, then pot them up. Note: do not water within 3 days after potting, which helps wound healing and prevents diseases caused by division.)