Detailed Introduction to Alternative Orchid Cultivation Methods
Introduction: Whenever I talk about hydroponic orchids, I think these orchids are about to be sent to the chopping block~! I have grown hydroponic orchids many times and used many kinds of medicine, but in the end it always ended in failure~! But then one time, I succeeded by accident. In the first half of this year, right during the season for collecting mountain orchids, I discarded an ordinary grass orchid by the edge of a ditch, but after a few months
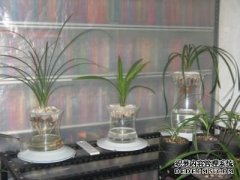
Whenever I talk about hydroponic orchids, I think these orchids are about to be sent to the chopping block~! I have grown hydroponic orchids many times and used many kinds of medicine, but in the end it always ended in failure~! But then one time, I succeeded by accident
In the first half of this year, right during the season for collecting mountain orchids, I discarded an ordinary grass orchid by the edge of a ditch, but after a few months I found that this orchid had not died; instead, it had grown new roots and put out new shoots. Thinking it over carefully, this is what we call air culture, because where it fell by the ditch edge it basically could not see light, the moisture by the ditch was especially high, and a lot of moss had grown on the soil, but this orchid happened to land on the moss, and with sufficient humidity it survived~! Later I took it home, but found that its roots were covered with green things, possibly small moss. Because this grass orchid was collected from the mountain in the first half of this year, its roots were generally cut, but at the cut parts it grew new roots again that extended into the water. Not only did the roots not rot, but the new roots grew very well. My previous orchid roots would rot after being placed in water for only one or two weeks. I think the main reason is that the green thing was protecting it. After a few days I planted that grass orchid in a fish basin, and until now it not only has not died but has even put out flower buds. Because this grass orchid is an ordinary flower, I did not manage it and only gave it a little water. Many spots grew on the leaf surface, but today I accidentally knocked over the orchid pot, so I took a photo to show everyone~!! Whether I am bragging, everyone only needs to look at the roots to know.
The hydroponic orchid method does not use soil or other cultivation media, but instead directly soaks orchid roots in water containing a nutrient solution for growth. It is a new type of cultivation method that changes the traditional orchid growing that relies on soil planting, and rewrites the claim that orchids avoid moisture. Because the root system absorbs nutrients more evenly in water than in a medium, the plants grow more robustly, produce more shoots, and have better quality. The specific operation method of hydroponic orchid cultivation is introduced as follows:
Hydroponic orchid cultivation is simple and easy to learn, and easy to master. It is mainly divided into six steps:
1. Choose a dedicated hydroponic flowerpot. Hydroponic orchid growing uses a dedicated hydroponic flowerpot with no hole in the bottom and a double-layer inner and outer mesh nested pot design (water capacity between 1.5 kg and 6 kg). The outer pot holds the nutrient solution, and the inner pot is a square grid mesh with a mesh opening size of 2cm×2cm. The ribs between the mesh openings support the pseudobulbs and hold the orchid plant in place, such as with stones or sponge.
2. Transplant the orchid plant. Pull up the orchid plant grown in soil, remove rotten roots and old roots. If there are too many roots and it is inconvenient to insert them into the inner mesh, use scissors to cut off some roots close to the pseudobulb, then rinse the roots clean with clear water to remove mud and dirt.
3. Disinfect. Before planting into the hydroponic pot, it is best to disinfect once. Use potassium permanganate at 100PPm, immerse the whole plant in the potassium permanganate solution for 10-15 minutes, then take it out and rinse off the potassium permanganate solution with clear water.
4. Plant into the hydroponic pot. Divide the roots into two to three groups, insert them into two to three mesh holes, and use your hand to gently pull the roots that have passed through the mesh holes, so that the pseudobulb fits closely against the central cross-shaped ribs between the mesh holes.
5. Fix the orchid in place. Use one hand to hold the orchid plant upright, and with the other hand place cleaned 3cm×5cm stones (used for pouring cement floors) around the plant to fill the inner mesh, shaking it slightly, and the orchid plant will be fixed in the center of the inner mesh (sponge can also be used as a fixing material for the orchid plant).
6. Add the nutrient solution. Rinse the fixing stones once more with clear water, fill the outer pot with clear water (drinking water can be used as planting water), and add orchid nutrient solution to the water (Meihui brand hydroponic orchid nutrient solution). In this way, the transplanting work is completed.
Hello everyone! This is hardly scientific orchid growing, let us learn together. Actually, hydroponic orchid growing is very simple. This pot is sold in flower and bird markets, and I do not use any special nutrient solution either; I just add a little when fertilizing the orchids, generally 1000 times compound fertilizer or 1000 times monopotassium phosphate. There is just one point: you cannot soak all the orchid roots in water; as long as there is water at the bottom of the pot, that is enough.
For more professional agricultural science and technology information, please scan the QR code to follow WeChat: NongXunNET

Please indicate the source when reprinting.