Detailed Explanation of the Specific Steps for Rice Seed Preservation and Breeding (Part 2)
Editor's note: This article introduces the seed-saving movements in India and Thailand, and provides a detailed account of the rice seed saving and breeding steps of Thailand's Rice God Foundation, which is well worth the reference of farmers. Because this article is rather long, it is published in two parts; to read part one (Part 1), please click here.
─────────────────────────────────────────────────────────────
Thailand's Number One Rice Breeding Technique
KKF has developed what may be Thailand's number one rice breeding technique, which not only minimizes investment from outside the farm but also reduces the expenses required. This technique requires only simple tools, patience, and persistent determination. The following are the specific steps for rice seed saving and breeding.
About Rice Seed Saving
Step One: Selecting Seeds
Method One: Selecting Seeds from Rice Panicles
1. Harvest the rice you want and in the quantity you want
2. Dry the harvested rice in the sun for 2-3 days
3. After drying, select from these rice stalks the large, long panicles whose grains have not been bitten by insects or infected with disease
4. Then remove these grains from the panicles, select the good rice seeds and store them in ziplock bags for use in the next season
Method Two: Selecting Seeds from the Rice Field
1. Select an area in the rice field as a designated seed selection plot, to make sure other varieties do not enter this area where you will carry out your planting
2. While the rice is growing, pay special attention to whether there are other varieties in this designated plot, such as some that grow longer than the other rice, that differ from the growth condition of the other rice, etc.; if there are, remember to remove them
3. When harvesting the rice in the designated plot, make sure it is more than one meter away from neighboring rice fields, to prevent other varieties from being present in this rice field
4. Each time, make sure the rice mill and the drying yard have been cleaned, to prevent other varieties from being mixed in
Method Three: Selecting Seeds from Brown Rice
1. Select half a kilogram of the rice variety you want
2. Clean these grains to prevent rice of other varieties from being present
3. Remove the husks by hand, to avoid damaging the core of the rice
4. From these brown rice grains, select about 100 grains with the following characteristics: smooth and shiny in appearance, not diseased and without chalkiness (only husks with no rice inside)
5. Then these selected seeds can be planted.
Step Two: Milling Rice with a Machine
Steps:
1. Prepare the unmilled paddy in the quantity you want, about one to two kilograms
2. Winnow the rice with a sieve until it is clean
3. Put the rice into the milling machine to mill it
4. Winnow the milled rice once more
5. From these grains, according to the quantity you want, select rice with the following characteristics: smooth and shiny in appearance, not diseased and without chalkiness
6. Plant these selected brown rice grains
Step Three: Growing Seedlings
There are the following two methods for growing rice with husks into seedlings
Method One: Growing Seedlings in Plastic Ziplock Bags
1. Put the selected seeds into a plastic bag that can be sealed
2. Fill 23 of the bag with clean
3. After two days of soaking, you will find the rice beginning to sprout
4. Change the water every two days; after a week of soaking, you will find the rice beginning to sprout and grow roots
5. Transplant these sprouted rice grains into a growing tray
Method Two: Growing Seedlings in a Bowl-Shaped Container
1. Fill 3/4 of the container with rice that has husks, and place the rice at the same depth
2. Finally, plant the selected rice separately
3. Cover the other rice with a layer of rice wrapped in husks or sand about one to two centimeters deep
4. Water the bowl-shaped container to make sure every grain of rice is moist
5. Then, place a plate under the bowl-shaped container and add water to the plate to prevent ants from crawling in
6. After 10-12 days, following the principles of the System of Rice Intensification (SRI), (SRI: that is, planting only one seedling or one seed at a time), plant the already sprouted seedlings in the rice field
Step Four: Planting Seedlings in the Rice Field
1. Just as when preparing a seedling growing tray as usual, level the soil to the same height, creating the same growing environment for every grain of rice
2. Spread out the rice with husks, and plant these grains in the designated area of the rice field, planting each grain as much as possible about 1 centimeter deep in the soil
3. Then scatter the selected rice over the area prepared for planting
4. Once again spread out the rice with husks, planting each grain as much as possible about 1 centimeter deep in the soil
5. Water this area until all the soil is moist
6. Make a trench/earth wall to prevent damage by ants
7. After about 25 days, the seedlings can be transplanted into the field outside the designated area
1. Preparing the Parent Rice Plants
●Evaluating the Variety
Before breeding, the characteristics of the parent plants, such as the yield of this variety, disease, and resistance to pests and diseases, must first be understood, as preliminary work for breeding
●Setting the Breeding Goal
That is, the goal to be achieved by breeding must first be set, so that the new variety can match your dream. And the goal set must also be within the range of the variety's characteristics, such as adapting to the place where it is grown, having good eating quality, being resistant to pests and diseases, and so on
●Selecting the Parent Plants
After selecting the paternal and maternal plants, the seeds of the plants must be planted in the rice field or in a large clay jar. When planting these plants, they must be two weeks apart, to prevent them from flowering at the same time.
2. Rice Breeding
This step requires preparing the following tools for breeding. After preparing the tools, remove the rice stamens, cross the pollen of the maternal plant with the stamens, and then a new variety can be obtained
a. Please prepare the following tools: 1. scissors, 2. tweezers, 3. cellophane, 4. paper clips, 5. plastic labels for recording, 6. black pencil, 7. magnifying glass
b. Removing the stamens: Because rice is self-pollinating, the rice plant must be trimmed before crossing with other varieties. When the rice stalk reaches the stage of putting out the flag leaf, the step of removing the stamens can be carried out. The rice panicle from which the stamens are removed is called the maternal plant. The method of crossing is to cut off about 1/3 of the rice panicle with scissors, then use tweezers to remove the six stamens in the rice plant and clean them off; select 20 to 30 panicles per rice stalk, and after removing the stamens cleanly, wrap the rice stalk with cellophane, you can use paper clips as an aid, and use a bamboo stick to secure the rice stalk.
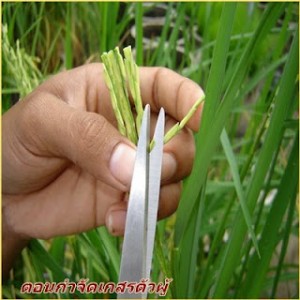
After 15 days of pollen transfer, the sprouts of the new rice variety have emerged
c. In a day, the rice flowers bloom only from 8:00-12:00, so you must seize the time to prepare the stamens of the paternal plant. When the rice flowers bloom, you will see six stamens with a yellow powdery substance on them; that is the pollen, so you must seize this time to sprinkle the pollen on the pistils; because the space in the rice plant is very small, you can do it several times to ensure the quality of breeding. Because rice mating takes place when closed, after completing the action of transferring the pollen, you must still wrap the maternal plant with cellophane, and remember to label this plant with the name of this variety, the time of breeding, and the place of breeding. If there are not enough stamens in the paternal plant, you can continue the crossing action over one to two days. One week after breeding, the seeds will begin to grow, and the seedlings of the new variety will take shape within 25-30 days.
d. Before harvesting, please confirm the names of the paternal and maternal plants; after harvesting the successfully bred rice, first put the rice in a paper bag and dry it in the sun for 1-2 days.
3. Breeding Must Go Through 8 Generations (Selecting a Rice Variety Through 8 Generations)
a. First generation (F1): the seeds can be planted together, but it is recommended not to plant them directly in the field at first; planting in a small area, such as a large clay jar or a planting pot, is preferable
b. Second generation (F2): starting from the second generation, they can be planted in the field. Plant the seedlings of the first generation in the field at intervals
c. Third generation (F3): select good seeds from the seeds of the second generation, grow them into seedlings, and then plant them in the field at intervals
d. Fourth to sixth generation (F4-6): select good seeds from the seeds of the third to fifth generations, grow them into seedlings, and then plant them at intervals; depending on the number of seedlings, they can be planted in several rows
e. Seventh generation (F7): select good seeds from the seeds of the sixth generation, and divide these seeds into different groups such as A, B, C, D, etc., in order to observe which group's characteristics match the goal you originally set for breeding
f. Eighth generation (F8): select the seventh-generation seeds you want; after 8 generations of planting, these characteristics have become stable and large-scale planting can be carried out.
g. The variety produced afterward is then called T1
Regarding the part of KKF's rice seed saving, Suksan, who is in charge of rice-related work, stated that part of the seeds of each rice variety are kept in the granary for one year, and part are kept in the refrigerator for three years. Although keeping them in the refrigerator may pose a risk to planting the seeds in the future, in order to prevent this variety from disappearing in the future, KKF's approach is to give priority to preserving this variety first.
Trying to Make Direct Contact with Consumers
Traditional Thai rice varieties basically are mostly harvested once a year. The new varieties bred by Thai government units are cultivated in an environment that belongs to conventional farming (that is, using pesticides and chemical fertilizers when planting); although the yield is high and they can be harvested multiple times a year, they do not taste good. The purpose of the Rice God Foundation is to promote organic agriculture, so it hopes to cultivate organic rice varieties in an organic environment.
Last November, KKF selected 30 of about 80 new varieties bred from six pairs of parent plants; these 30 were rice varieties that tasted good in tasting tests, after removing about 50 varieties of rice that did not taste good, and these 30 T1 varieties were planted in the rice fields of farmers in U-tang Province, allowing trained farmers to make selections; the farmers selected from the 30 the 15 varieties they hoped to plant.
Daycha stated: "This time, having the farmers select varieties is mainly in the hope that in the future, after the rice is harvested, consumers can taste it and see which variety of rice consumers like, so that farmers can understand consumers' needs." The Rice God Foundation's breeding has been carried out for years, but directly feeding market reaction back to farmers is also a first.
About the Seeds of Vegetables, Fruits and Flowers
According to the different seasons, two KKF employees in charge of caring for vegetables take turns planting different vegetables, fruits and flowers in the garden. When harvesting the same kind of vegetable or fruit, the staff will observe the growth condition of this vegetable or fruit each time, and take photos and keep records.
As for the seed saving of vegetables and fruits, after taking out the seeds, the seeds are put into a bag with a label recording: 1. the name of the variety, 2. the number of times planted, 3. the flowering time, 4. the harvest time; after the recording is completed, the seeds of the vegetables and fruits are stored in two ways: one is stored in the refrigerator, to prevent this variety from disappearing in the future so that KKF still preserves this variety, and the other is divided into small packets and sold to farmers who need them, or used for the next planting.
The vegetables and fruits in this garden include: watermelon, pumpkin, sunflower, winged bean (Wind Been), chili pepper, Thai long bean, corn, cotton, tomato, passion fruit, okra, angled loofah (Angled looah), guava, gourd, baby jackfruit (Baby Jackfruit), etc., about 250 items. In addition to native Thai varieties, KKF also buys foreign vegetable and fruit varieties from outside markets, in order to acclimatize them into organic seeds and make them targets for future breeding. The Rice God Foundation has not yet begun breeding vegetables and fruits.
The Seed Defense War (Part One): From Dr. Shiva to Thailand's Rice God Seed Saving
※Notes:
Note 1: Monsanto Company is a multinational agricultural biotechnology company. Its flagship product, Roundup, is a world-renowned glyphosate herbicide. The company is currently also a leading producer of genetically engineered (GE) seeds, occupying 70%-100% of the market for seeds of many crops.
Note 2: Cargill of the United States is the world's largest privately held company and the largest manufacturer of animal nutrition products and agricultural products.
Note 3: A unit of measurement for Thai rice fields; one rai is equivalent to one fen and six li of Taiwanese rice fields
※References:
1. "The Global Green Trend and Taiwan - Summary of Dr. Shiva's Lecture in Taiwan (Part One)", translated and compiled by Huang Shude, Green Sprout No. 39
2. "Returning to Mother Rice", Story by VasanaChinvarakorn, Outlook Column, 30.June.2008, Bangkok Post
3. "Techniques for Improving and Developing Rice Varieties", by the Rice God Foundation of Thailand, English version of the Rice God Foundation of Thailand Farmer School training manual
4. "What on Earth Should We Eat", Michael Pollan, Jiuzhou Culture Publishing House, 2008.6