A planting diary that records the entire growth process of crops
Introduction: ▲This miniature Chinese juniper (Juniperus chinensis) material was purchased in 2005. The trunk of the starter seedling had already been bent into shape, and the shari (deadwood) on the trunk had already been designed. ▲It grows vigorously, with lush branches and leaves, and its emerald green color is truly delightful. ▲As a bonsai, this small Chinese juniper is clearly top-heavy. The slender trunk, paired with such a large canopy, gives a very unstable
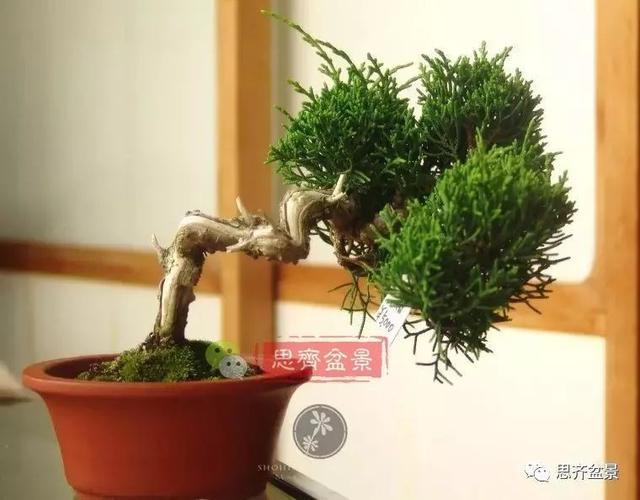
▲This miniature Chinese juniper material was purchased in 2005. The trunk of the starter seedling had already been bent into shape, and the shari on the trunk had already been designed.
▲It grows vigorously, with lush branches and leaves, and its emerald green color is truly delightful.
▲As a bonsai, this small Chinese juniper is clearly top-heavy. The slender trunk, paired with such a large canopy, gives a very unstable feeling. So the next work is mainly to reduce the canopy through selection and removal, and to make the foliage more compact by forcing back budding. Only when the canopy is lighter can it harmonize with the trunk.
▲First, selection and removal: cut off the redundant branches.
▲After thinning the branches and foliage, light can enter the interior, which helps force budding back.
▲Close-up of the shari. The original shari was made very crudely, simply by peeling the bark, with no treatment of the xylem, so it lacks a sense of weathering and age.
▲Pinching to force budding. Strive to bring the foliage pads closer to the trunk.
▲Begin working on the shari.
▲The torn texture is more primitive and natural.
▲The branches removed in the selection are made into jin (dead branches). After the styling is complete, the canopy is greatly reduced.
▲2008, three years since the last styling. Compared with three years ago, the branches and foliage are much more luxuriant.
▲2009.
▲2010.
▲2011.
▲2016, after routine thinning.
▲2017, on a whim: the sparse branches and foliage and the twisted, aged trunk are very suited to a cascade style. Moreover, the cascade style can also weaken the shortcoming of the trunk having no transition in thickness.
▲Remove it from the pot and take out the root ball, carefully not letting the soil ball fall apart.
▲First prepare the drainage mesh and fixing aluminum wire for the bottom of the pot. Here the installation direction of the fixing aluminum wire is opposite to our usual direction, in order to make the soil surface neater and more attractive. Because the pot is small, the lumps of aluminum wire on the pot surface would be very unsightly. With this method, it can be tightened and fixed at the bottom of the pot, striving for simplicity and beauty.
▲Find a suitable angle. Try to leave a certain gap between the trunk and the pot edge. This shows the stump hanging by its own strength, rather than relying on the pot edge. In this way, the strength of the root and trunk is expressed.
▲This angle is not quite suitable. It is like a man in his prime always leaning on a pillar, giving a listless feeling.
▲Tighten the fixing aluminum wire from the bottom of the pot.
▲Fixing completed.
▲The pot surface is relatively neater and more attractive.
▲Carefully fill in soil and lay moss.
▲Final result photo.
▲On display.
▲The tree itself has not changed at all; just the planting angle is different, and yet it can produce such a big difference. One cannot help but marvel at the subtlety in it!
If you like practical articles like this, please share them to your WeChat Moments!
For more professional agricultural science and technology information, please scan the QR code to follow WeChat: NongXunNET

Please indicate the source when reprinting.