Don't repot your flowers carelessly in spring; if you don't get the basics straight, you'll only damage the roots and the plants!
Some of the flowers and plants we keep at home grow very fast, and many flower lovers think about repotting them so they'll grow even faster. But somehow, after repotting, the plant just dies as you care for it. Actually, this isn't a problem with the flower itself; it's caused by our incorrect repotting methods. So today let's talk about what we need to pay attention to when repotting flowers.
Some of the flowers and plants we keep at home grow very fast, and many flower lovers think about repotting them so they'll grow even faster. But somehow, after repotting, the plant just dies as you care for it. Actually, this isn't a problem with the flower itself; it's caused by our incorrect repotting methods. So today let's talk about what we need to pay attention to when repotting flowers.
Why do potted plants need repotting and soil changing in spring?
Because the old soil has fewer nutrients and has become compacted and impermeable, and the old pot lacks space, and so on, this will seriously affect the plant's rapid growth in spring and its accumulation of nutrients to produce flower buds!
Repotting. Changing soil. Potting up
Repotting: the timing should vary according to the different types of flowers. Perennial flowers such as chrysanthemums, daylilies, Japanese evergreen (Rohdea japonica), and clivia (Clivia miniata) should be repotted in late autumn or early winter, after the plant stops growing, that is, during the dormant period; while evergreen flowers can be repotted in early summer or the rainy season, or after the flowering period. Absolutely avoid: repotting flowers right when they are forming flower buds or blooming.
Specific method: first stop watering so the pot soil dries out and is only slightly moist, then tip the pot over and gently pour out the soil. If the soil is hard to separate from the pot wall, insert a wooden stick of appropriate thickness into the drainage hole and gently push out the plant and pot soil, so the plant comes out of the pot with its original soil. Then cut off old roots, rotten roots, and dead roots, and thin out part of the overly dense roots. Note that the cuts should be smooth and slanted downward, to help the wounds heal and new roots sprout.
But for large potted perennial woody flowers or plants with an overly large crown, you can change the soil without changing the pot, that is, dig out the ring of soil around the pot wall and fill in new growing medium. But try not to damage the root system, so as not to affect growth and flowering.
Changing soil: growing medium is made by mixing loam (usually garden soil), organic matter (commonly leaf mold, peat soil; leaf mold can be made by collecting fallen leaves, garbage, weeds, and other organic waste and piling it up to compost), and additives (coarse sand, vermiculite, charcoal crumbs, chaff ash, etc.).
If you're growing fleshy, succulent flowers, such as gemstone plant (Graptopetalum paraguayense), cactus, aloe, and snake plant (Sansevieria), which require loose, airy, well-draining soil, you can use 1 part loam, 6 parts organic matter, 2 parts sand or vermiculite, 0.5 part charcoal crumbs, 0.5 part plant ash, plus an appropriate amount of bone meal, mixed together. For growing flowers that like acidic soil, such as camellia, gardenia, and Aglaia odorata, you can use 2 parts loam, 6 parts organic matter, 2 parts sand, or 4 parts peat soil and 1 part sawdust, mixed for use.
Potting up: for potting up flowers, choose a suitable clay pot, earthen pot, or plastic flower pot according to the size of the plant. If using a new clay pot or earthen pot, it's best to soak it in water for 1~2 days first to remove the firing heat and alkali; if using an old flower pot, it's best to scrape and wash it clean. Fill in the prepared growing medium, with a filling thickness equal to about 1/4 of the pot depth, then press down slightly. Then plant the plant in the center of the pot, until it is 3cm from the pot rim, to allow for watering. After adding the soil, shake the pot a few times so the pot soil settles firmly.
Then water thoroughly and deeply, until water seeps out from the drainage hole. Finally, place the potted flower in a windless, semi-shaded spot or under a shade frame for care. Afterward, depending on the pot soil moisture and weather conditions, water once a day or every other day, and also spray water mist on the branches and leaves until the plant survives, then it can be moved to a sunny, ventilated place.
Notes on repotting
1. During the making of flower pots, the bottom of the pot often has a large upward rim; if this rim is not removed, it will affect drainage in the rainy season, so it should be knocked off when repotting. When potting up, a piece of plastic window screen can be used as a base liner, which can prevent pests very well.
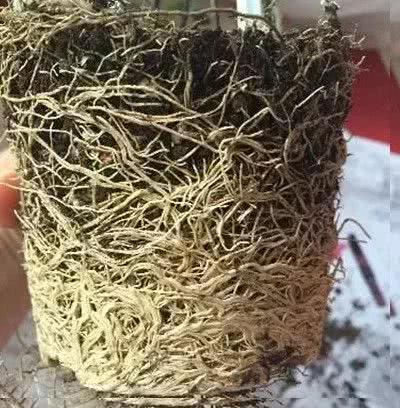
2. The root ball and soil clump taken out when repotting must have the outer layer of old roots cut away with a sharp flower shovel, and the surface of the root fibers should also be loosened with the shovel. Otherwise, the root system will curl up crookedly around the pot wall without extending, and will easily be affected by drought, waterlogging, cold, and heat changes, so the plant will not develop well.
3. When repotting with new soil, the pot soil must be pressed firm, to avoid holes appearing in the pot soil after watering, which would affect the root system's absorption of water. And you must leave a rim for watering; you can't have no place to stop the water because the pot soil is completely full.
4. Watering must be thorough; this is a very important point when growing flowers. The first watering after repotting is best done by the soaking method: put the potted flower into a basin of water, and then water again when the pot soil dries until the surface turns white, following the principle of "don't water if it's not dry."
For more professional agricultural science and technology information, please scan the QR code to follow WeChat: NongXunNET

Please indicate the source when reprinting.