Steps for repotting and changing the soil of potted flowers and how to revive them after the soil change
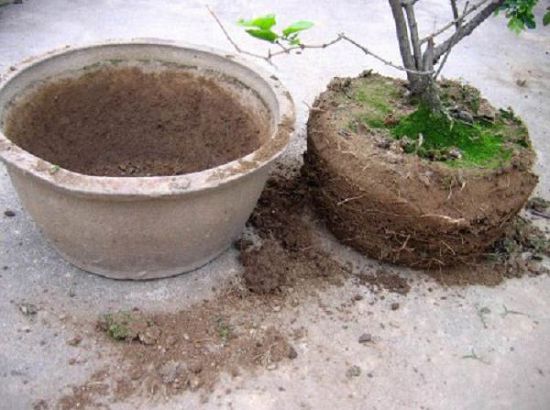
As potted flowers develop and grow continuously, the plants become vigorous and tall, and the root system also keeps growing toward the sides of the pot, making the original pot seem increasingly small. After one to two years, the nutrients in the pot are also nearly exhausted, the plant's root system shows signs of aging, and the leaves gradually turn yellow and thin due to insufficient nutrient supply. At this point, you should consider repotting and changing the soil.
Repotting and changing the soil can generally be done in February to March (in the south) or March to April (in the north). Do not water for a few days before repotting and changing the soil; wait until the potting soil is half dry before proceeding. If the potting soil is too wet, the stickiness between the pot wall and the soil will be too great, which is not conducive to the root ball coming out; if too dry, the plant lacks water and growth is affected.
Repotting and changing the soil is generally done on cloudy days or in the evening (continuous cloudy days after repotting and changing the soil are best). You can first scratch a circle in the soil beside the pot wall with an iron nail to help the root ball come out.
The root ball that comes out shows that the root system has already filled the area around the pot wall, and the nutrients originally stored in the potting soil have also been nearly exhausted by the plant's continuous growth.
After the root ball comes out, you can gently break it apart and slowly and completely remove the old soil ball; or you can rinse it thoroughly with water so that all the roots are exposed; then carefully check the condition of the roots and cut away the old roots and bad roots.
While cutting away the old roots and bad roots, you can also cut away the inward-facing horizontal branches, weak branches and overlapping branches of the plant. The purpose of pruning is: first, to reduce leaf transpiration so as to help the plant's root system recover; second, the crown of a plant that has grown for many years needs to be reshaped.
If it is potted directly without pruning, the plant may shed leaves naturally to adapt to the damaged root system from being divided (or may not sprout new branches for a very long time). This is called the settling-in period.
Before potting, two tile pieces can be stacked in a herringbone shape over the drainage hole at the bottom of the pot. The advantages of doing this are: first, it keeps the drainage hole unobstructed and can prevent root rot from waterlogging to the greatest extent; second, this drainage hole is also the air inlet at the bottom of the pot, which can increase air exchange in the potting soil, make it easier for the roots to breathe, and keep the plant in the best growing state.
After stacking the tiles in a herringbone shape over the drainage hole, you can spread a layer of about 2-3 cm (adjust the thickness of the soil flexibly according to the size of the pot) of pre-composted organic fertilizer soil (or nutrient soil) on the bottom of the pot, place the plant whose roots and leaves have been pruned in the center of the pot, and leave a gap of 2-3 cm around the edge of the pot.
Fill the reserved 2-3 cm gap with pre-composted organic fertilizer soil (or nutrient soil), and clear away the moss and weeds on the surface of the pot before filling with soil. Do not fill the soil all the way to the top; at least leave 2-3 cm to make watering and water storage convenient.
After repotting and changing the soil, it is filled with organic-rich fertile soil.
After completing the above steps, water thoroughly once to settle the roots, and the work of repotting and changing the soil is complete.