What to Do When Orchid Leaves Turn Yellow? Master These Little Tips for Growing Orchids Well
Michelia alba (white champaca) has fairly high ornamental value, with pure white and elegant flowers and graceful, emerald-green branches. But if improper care causes its leaves to turn yellow, its ornamental value is greatly reduced. So what should you do when orchid leaves turn yellow?
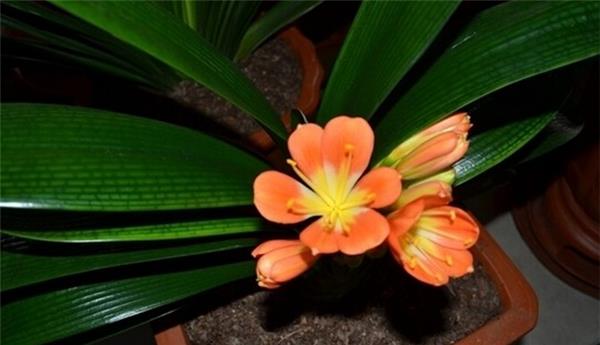
I. Causes of Yellowing Orchid Leaves
1. If the pot is too dry, or the air humidity is too low and the pot surface is too dry, in this case the orchid leaves generally cannot show stunted tips right away. The first sign is that the leaves appear dehydrated. After watering restores them, decline tends to start from the old shoots. The leaves yellow from the top downward. If there is water damage in the pot, the leaves yellow from the bottom upward, and decline progresses more slowly.
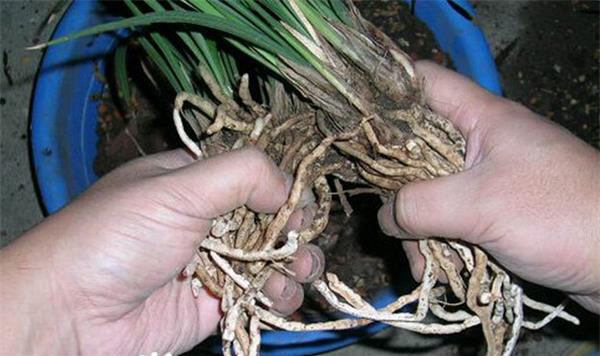
2. Fungal damage to orchid roots or waterlogging of the root crystal tips works much the same way. Waterlogging is the process, crystal tip rot is the result, and scorched leaf tips are the outward symptom. Such scorched tips, as Feixiang says, show black at the tip. After the pot is treated, the scorched tips generally stop extending.
3. Scorched tips caused by fertilizer damage are brown or black. The boundary with the unaffected leaf area is very distinct, and the normal leaf tissue is also prone to fertilizer-damage spots. Such irregular round spots have a brown center, and where they meet normal tissue there is a ring of unevenly thick black spots, also with a very distinct boundary.
4. Fungal damage to orchid plants is often shown through scorched tips. For example, with tip blight, the scorched tip is white-brown, and the junction with normal leaf tissue is dark brown; the white-brown area is dead, dried tissue, and the dark brown area is where the fungus is active. With leaf blight, the pale brown leaf tip is the dead, dried area and the dark brown part is where the fungus is active; the contact area with normal leaf tissue is mostly yellow-green, and this yellow-green area is where normal leaf tissue is infected, which differs from tip blight. Anthracnose also easily shows scorched tips: the leaf tip appears as one section dark brown and one section pale brown, alternating as it develops downward along the leaf, and independent or connected dark brown patches also appear in the leaf blade, with pale yellow margins around the patches.
Solution: When orchids suffer freeze damage or late frost damage, the leaf tips also easily dry out or change color. Therefore, in areas where the winter temperature is below 0°C, orchids should be moved indoors before winter to a ventilated spot with sunlight. When moving them outdoors in spring, take care to avoid late frost damage. The traditional saying "no wind in spring, no sun in summer, no drought in autumn, no dampness in winter" is very helpful for preventing orchid leaf drying.
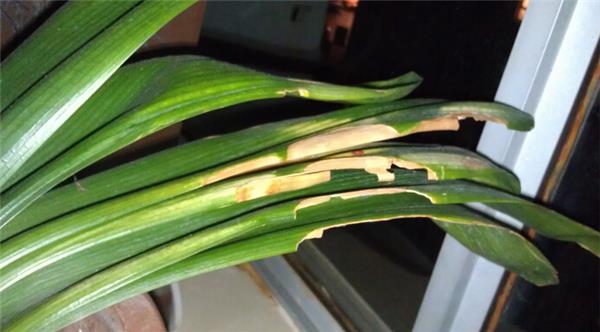
For orchid leaves whose tips have already dried out, if the condition is not too serious, manual cutting can be used. Use scissors, preferably disinfected with alcohol. Cut about 10 mm below the dried part, so the pot can still remain full of green. It is even better to spray a fungicide after trimming.
II. What to Do When Orchid Leaves Turn Yellow
1. Water-yellow. Caused by watering too frequently. Its feature is that the old leaves show no obvious change while the young leaves turn yellow; water should be controlled immediately.
2. Drought-yellow. Caused by lack of water and drought. Its feature is that the old leaves yellow first from the bottom upward. If the water shortage lasts a little longer, the whole plant's leaves will yellow and it may even die, so water promptly.
3. Fertilizer-yellow. Caused by fertilizing too frequently or with too high a concentration. Its feature is that the young leaves are thick and glossy, with an uneven surface; fertilizer should be controlled, the soil should be cultivated, and water should be applied.
4. Starvation-yellow. Caused by insufficient fertilizer, too low a fertilizer concentration, and too long intervals between fertilizing. Its feature is that the young leaves and tender stems yellow first. If fertilizer is not applied promptly after this appears, the whole plant's leaves may also yellow and it may even die. For flowers lacking fertilizer, never apply a large amount of strong fertilizer at one time, to avoid burning the roots.
5. Iron-deficiency yellow leaves. In greenhouses, woody flowers and others often show yellow leaves because soil fertility conditions vary greatly. The feature is that young leaves are obviously affected while old leaves are less so, the leaf tissue is yellow, the veins are green, and a typical network forms. This can be solved by applying ferrous sulfate aqueous solution. The method is: mix 7 parts cake fertilizer, 5 parts ferrous sulfate, and 200 parts water into a diluted solution and water with it.
6. Chlorosis due to lack of elements. If the potting soil lacks iron, the leaf tips turn yellow first. If it lacks nitrogen, the new leaves appear yellow-white.
7. Sunscald. Strong direct sunlight, especially after summer, causes yellow patches on the leaves, called sunscald. When it is dry and the high temperature is above 30°C, the leaves also easily become yellow and wilted.
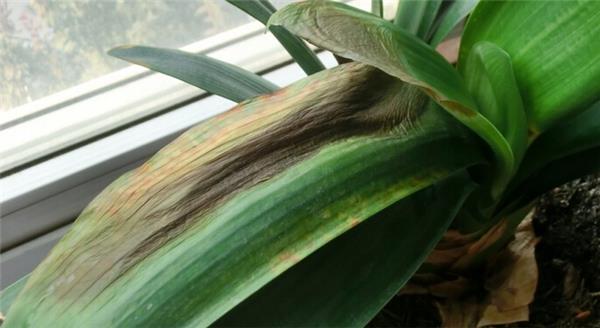
8. Pollution. Orchid leaves should be kept clean. If dirty things splash onto them, the polluted spots may turn yellow.
9. Freeze damage. Orchids suffer freeze damage below 0°C, and the symptom is still yellow leaves.
10. Sunburn. Clivia miniata is a shade-loving plant. When exposed to blazing sun, its leaves will dry up, and even in a high-temperature room it is easily damaged. The solution is to avoid direct sun exposure and regularly wipe the leaves with a cloth dipped in beer. Clivia wiped with beer not only looks good but also does not easily lose moisture from the leaves.
11. Leaf spot disease. It is caused by bacterial infection. The main causes are changing to unrotted raw soil, applying fertilizer that has not fermented well, not changing the potting soil for a long time, an imbalance of nitrogen, phosphorus and potassium in the fertilizer applied, and applying too much fertilizer. In the early stage, small yellow-brown spots appear on the leaf surface; afterward the spot color gradually deepens, the spotted area continuously expands, ulceration occurs, and the whole plant may rot away.
Solution: The flowers should be placed in a ventilated spot and protected from direct sunlight. Orchids often develop dried leaf tips and may even have whole leaves wither. Beginner orchid growers do not know what to do. Orchid leaf tip drying is mainly caused by orchid anthracnose and round spot disease, and when orchids suffer freeze damage or late frost damage, the leaf tips also easily dry out or change color. Below are the specific solutions.
It is caused by orchid anthracnose and round spot disease. This disease occurs in large amounts during the plum rain season or at the turn of summer and autumn when it is hot and rainy. The solution is to spray 50% carbendazim 1000x solution or 50% captan 500x solution during the susceptible period, once every 10 days, for 3-4 consecutive sprays.
Orchids are often seen in parks and squares, with pure white and elegant flowers and graceful, emerald-green branches. But if care is improper, white champaca leaves will turn yellow, greatly reducing their ornamental value. So in spring and summer, how should we deal with yellowing orchid leaves?
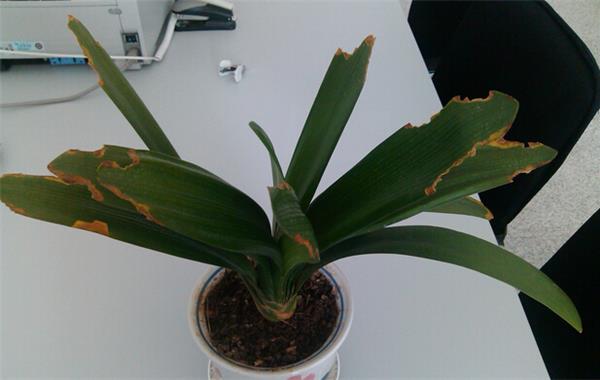
Solutions for Clivia leaves turning yellow in spring:
After winter, Clivia leaves have turned yellow and withered. In spring it will still revive, so repot it: remove the dead leaves and the hollow roots, use special Clivia soil mixed with large pieces of orchid stone, with soil: orchid stone = 3:2. After repotting, water thoroughly once, place it in a spot with diffused light and ventilation to recover for 1 month, then gradually expose it to light over one week and care for it normally. Do not expose it to blazing sun.
How to solve Clivia leaf yellowing in summer:
Check whether it is usually watered too much. Too much watering easily causes root rot, leaf rot and core rot, and water should be poured into the potting soil, not onto the leaves, especially not into the central leaves. If the potting soil is often too wet, water can flow backward, and then, as you said, blackening and rot gradually appear starting from the leaf tips. Therefore, Clivia potting soil should preferably be on the dry side. In addition, summer temperatures are relatively high. If the temperature in its growing environment drops below 25°C, in summer you can also apply dilute liquid fertilizer at 1:20 or weaker, once every half month. This can promote the growth of Clivia and shorten or eliminate its dormant period. There is also another situation: the light is too strong. Clivia likes soft light. If exposed to strong direct light, the leaf surface becomes rough, the leaf color turns yellow and dark and loses its emerald green, and it is also prone to sunscald.
Orchids are commonly propagated by layering and grafting.
(1) Layering propagation: aerial layering is also commonly used. During the growing season (June-July), choose vigorous 2-year-old branches, use a knife to remove a ring of bark from the branch (length 1.5 cm), or use a knife to score the bark, then wrap the wound with nutrient soil and moss, cover it tightly with plastic film and tie it firmly, and keep the rooting area moist. Roots can form after 60 days. When the roots are fairly well developed, cut below the roots to separate from the mother plant, remove the tying material and soil ball, and plant it.
(2) Grafting propagation: choose 2-3-year-old Magnolia as the rootstock, and propagate by approach grafting in June-July. Select a vigorous white champaca branch of the same thickness as the rootstock as the scion, cut away the bark and part of the xylem of both the rootstock and the scion to a length of 6 cm (the cut surfaces should be smooth), then align the cambium of the two cut surfaces and join them tightly together, and tie firmly with plastic tape. After two months, when the two cut surfaces have completely healed, cut off the rootstock above the scion and cut the lower part of the scion to separate it from the mother plant. Place it in a semi-shaded, windless spot and manage it carefully. When the cut area looks intact and growth and development are normal, remove the plastic tape and the grafting is successful.
The above is what the editor has introduced about the causes of orchid leaves turning yellow and the solutions. I hope it can help everyone.
In the early stage, small yellow-brown spots appear on the leaf surface; afterward the spot color gradually deepens, the spotted area continuously expands, ulceration occurs, and the whole plant may rot away.Solution: The flowers should be placed in a ventilated spot and protected from direct sunlight. Orchids often develop dried leaf tips and may even have whole leaves wither. Beginner orchid growers do not know what to do. Orchid leaf tip drying is mainly caused by orchid anthracnose and round spot disease, and when orchids suffer freeze damage or late frost damage, the leaf tips also easily dry out or change color. Below are the specific solutions.
It is caused by orchid anthracnose and round spot disease. This disease occurs in large amounts during the plum rain season or at the turn of summer and autumn when it is hot and rainy. The solution is to spray 50% carbendazim 1000x solution or 50% captan 500x solution during the susceptible period, once every 10 days, for 3-4 consecutive sprays.
Orchids are often seen in parks and squares, with pure white and elegant flowers and graceful, emerald-green branches. But if care is improper, white champaca leaves will turn yellow, greatly reducing their ornamental value. So in spring and summer, how should we deal with yellowing orchid leaves?
Solutions for Clivia leaves turning yellow in spring:
After winter, Clivia leaves have turned yellow and withered. In spring it will still revive, so repot it: remove the dead leaves and the hollow roots, use special Clivia soil mixed with large pieces of orchid stone, with soil: orchid stone = 3:2. After repotting, water thoroughly once, place it in a spot with diffused light and ventilation to recover for 1 month, then gradually expose it to light over one week and care for it normally. Do not expose it to blazing sun.
How to solve Clivia leaf yellowing in summer:
Check whether it is usually watered too much. Too much watering easily causes root rot, leaf rot and core rot, and water should be poured into the potting soil, not onto the leaves, especially not into the central leaves. If the potting soil is often too wet, water can flow backward, and then, as you said, blackening and rot gradually appear starting from the leaf tips. Therefore, Clivia potting soil should preferably be on the dry side. In addition, summer temperatures are relatively high. If the temperature in its growing environment drops below 25°C, in summer you can also apply dilute liquid fertilizer at 1:20 or weaker, once every half month. This can promote the growth of Clivia and shorten or eliminate its dormant period. There is also another situation: the light is too strong. Clivia likes soft light. If exposed to strong direct light, the leaf surface becomes rough, the leaf color turns yellow and dark and loses its emerald green, and it is also prone to sunscald.
Orchids are commonly propagated by layering and grafting.
(1) Layering propagation: aerial layering is also commonly used. During the growing season (June-July), choose vigorous 2-year-old branches, use a knife to remove a ring of bark from the branch (length 1.5 cm), or use a knife to score the bark, then wrap the wound with nutrient soil and moss, cover it tightly with plastic film and tie it firmly, and keep the rooting area moist. Roots can form after 60 days. When the roots are fairly well developed, cut below the roots to separate from the mother plant, remove the tying material and soil ball, and plant it.
(2) Grafting propagation: choose 2-3-year-old Magnolia as the rootstock, and propagate by approach grafting in June-July. Select a vigorous white champaca branch of the same thickness as the rootstock as the scion, cut away the bark and part of the xylem of both the rootstock and the scion to a length of 6 cm (the cut surfaces should be smooth), then align the cambium of the two cut surfaces and join them tightly together, and tie firmly with plastic tape. After two months, when the two cut surfaces have completely healed, cut off the rootstock above the scion and cut the lower part of the scion to separate it from the mother plant. Place it in a semi-shaded, windless spot and manage it carefully. When the cut area looks intact and growth and development are normal, remove the plastic tape and the grafting is successful.
The above is what the editor has introduced about the causes of orchid leaves turning yellow and the solutions. I hope it can help everyone.