Detailed Guide to Fruit Tree Cultivation Techniques: Planting Key Points and Management Methods
During the spring planting period for fruit trees, although the temperature is relatively warm, there is more rain and high humidity, the survival rate after planting is high, and new roots and shoots grow easily, but if the methods are improper, it can also result in a low survival rate after planting. The methods and techniques for spring planting of fruit trees are introduced below. There are also two specific examples for everyone to refer to.
Spring Planting Methods and Techniques for Fruit Trees
1. Select good seedlings. Choose high-quality seedlings that are free of pests and diseases, grow vigorously, have well-developed root systems, short and thick internodes, and show no signs of water loss. The leaves on the main trunk and branches of the seedlings should be dark green, complete, and glossy.
2. Apply sufficient root-setting fertilizer. From 7 to 15 days before planting, for mountain orchards, after deep plowing and soil improvement of the planting holes, and for flatland orchards, beneath the surface soil of the fruit mound, apply 0.5 kg of decomposed soybean bran or peanut bran per plant, or 10 to 15 kg of pig or cattle manure. The fertilizer must be thoroughly mixed with the soil and must not come into direct contact with the root mass to prevent burning the roots. That is, apply the fertilizer 30 to 35 cm away from the planting point, or apply it below the planting point, 35 to 40 cm from the surface soil, and break up the clods of soil at the planting point. Then, 3 to 5 days before planting, pour on a small amount of fully decomposed manure water so that it mixes with the soil and is absorbed.
3. Seedling preparation. After the seedlings are transported back, they should first be placed in a cool, wind-sheltered place to keep the root mass moist. If the number of seedlings is relatively large, they should be graded by size, and while grading, appropriately prune the root mass and branches. Before planting, cut off rotten roots, dried roots, and broken roots. Cut rotten roots until the white interior is exposed; even healthy roots should have a small portion trimmed off. Part of the branches that are too weak or improperly positioned should also be cut off. If they have been transported over a long distance or if the weather is too dry at planting time, part of the leaves should also be appropriately removed to reduce water evaporation.
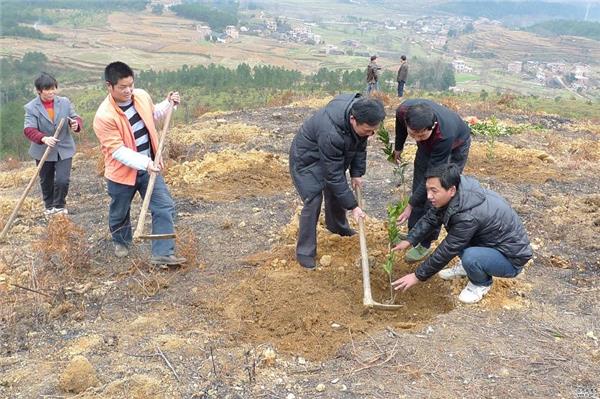
4. Planting. When planting, each root should be straightened and arranged smoothly, distributed evenly in all directions within the planting hole and angled slightly downward. If reversed roots develop in several layers from the taproot, the roots should be arranged layer by layer from bottom to top, filling in fine soil layer by layer and pressing it down with the hands, but not with too much force, to prevent breaking the root system. When the soil has been filled to halfway, gently lift the seedling upward to straighten the roots, set the plant upright, then continue filling with soil and firm it with the feet. The covering soil must not rise above the graft union. Support stakes should also be set up to prevent movement from damaging the roots.
5. Water promptly. After the sapling is planted in the soil, immediately water thoroughly to set the roots and cover with grass to retain moisture. Within 5 days after planting, water once a day; after 5 days, water once every other day; after 20 to 30 days, the surface soil can be gently pushed aside for inspection. If new roots are sprouting, one application of dilute decomposed manure water can be given.
Mulberry Seedling Planting Method
1. On sloping land and semi-dry paddy fields, plant in flat furrows; in paddy fields, plant in raised beds. Before planting, dig planting trenches: mark and stake out lines according to the predetermined spacing between plants and rows, then dig the planting trenches deeply, with a trench width of 30-50 cm and a depth of 50 cm. First dig 35 cm deep, keeping the surface soil and subsoil separate in piles, then dig a further 15 cm deep within the trench to loosen the subsoil so that mulberry roots can penetrate deeply. The planting trenches should connect with the drainage ditches around the mulberry field so that water can be drained promptly after rain.
2. Apply base fertilizer: Apply base fertilizer at planting time. Organic fertilizers such as garbage, barnyard manure, and miscellaneous manure are best, applied at 1500-2000 kg per mu, and 50 kg of superphosphate can also be mixed in. After the base fertilizer is applied, mix it thoroughly with the loosened lower-layer soil.
3. Trim the seedling roots: Before planting mulberry seedlings, prune off overly long and damaged mulberry roots, leaving roots about 15 cm long. Remove diseased and pest-infested seedlings, plant large and small seedlings separately. Before planting, first coat the roots with a slurry of phosphate fertilizer and yellow mud water to improve the survival rate.
4. Planting: Fill part of the surface soil into the planting trench to cover the base fertilizer, about 7-10 cm thick. When planting, first stretch the planting rope marked with the plant and row spacing, place the mulberry seedlings into the planting trench, spread out the seedling roots so that the seedlings are upright and the roots are extended, then fill surface soil over the roots, hold the seedling stem, and gently lift it upward once so that soil particles fully fill the gaps around the roots. Pour on a ladle of clear water and human or livestock manure, crush all the subsoil finely and fill it into the trench, then firm it. Generally, a planting depth that buries the root crown 5-6 cm is suitable. Then, according to the requirements for tree form development, prune the seedling trunk.
5. Watering and drainage: During drought after planting, water promptly; if waterlogged, drain promptly. If missing plants are found, replant them promptly.
How to Grow Ginseng Fruit
1. Planting site
Generally, choose a plot with sufficient sunlight, sandy and relatively fertile soil, and convenient irrigation and drainage. In mountainous areas, ridge fields have few pathogens and are also very good for planting. For single-row beds, the bed width is 60 cm; for double-row beds, 100 cm; plant spacing is 40 cm. Dig holes and break the soil fine, planting about 1500 plants per mu. Before applying base fertilizer, it is best to scatter some pest- and disease-prevention chemicals in the holes.
2. Pruning
Ginseng fruit has extremely strong branching and sprouting ability. Keep 3-4 branches per plant between 10 and 20 cm as fruit-bearing branches, and cut off all the remaining branches for seedling propagation by cuttings or as livestock and poultry feed. After flowering and fruiting, only 1-2 fruits may be kept per flower cluster, so that the fruits are large, of good quality, and sell at a high price.
3. Watering
Ginseng fruit is neither drought-tolerant nor waterlogging-tolerant. Potted ginseng fruit should keep the soil moist, and water supply should be sufficient during the fruit enlargement period. Generally, water once a day in summer, preferably in the morning or evening; in spring and autumn, water every other day, either in the morning, evening, or at noon; in winter, water once every 3-4 days, preferably at noon.
4. Pest and disease control
In high-temperature seasons and rainy seasons, ginseng fruit is prone to diseases. The main diseases are gray mold and viral disease. When disease is found, spray early with 800-fold dilutions of Nongliling, or 800-fold dilutions of Shijiale, or 600-fold dilutions of Virus A and Virus K. The main pests are aphids, whiteflies, red spiders, and tea yellow mites. Pesticides such as 800-fold dilutions of imidacloprid, or 1500-fold dilutions of insecticidal compound, can be sprayed promptly.
5. Trellising and shaping
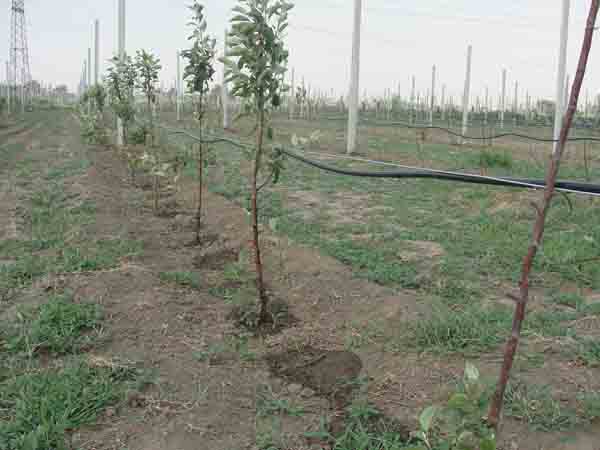
The stems of ginseng fruit are relatively soft, so special attention should be paid to trellising and shaping when growing it in pots. Generally, for each pot, use four smooth small bamboo poles or small branches about 60 cm long inserted around the pot (10 cm into the soil), with the upper part made into a circle, square, or oval with wire, comparable in size to the pot opening, and tied firmly with rope or thin wire. Then use plastic skin, hemp skin, etc. to tie the stems to the support. The stems should be upright, and the tightness should be moderate. Note that on each inflorescence, only 4-6 robust flowers should be retained, and all the remaining flowers should be removed. When the fruits grow to the size of beans, set the fruit, retaining 2-4 fruits per side branch. At the same time, select and retain flowers and fruits distributed around the sides and top of the pot, with even distribution, uniform size, and attractive fruit shape, to improve their ornamental value.
It is advisable to water at noon.4. Pest and disease control
In high-temperature seasons and rainy seasons, ginseng fruit is prone to diseases. The main diseases are gray mold and viral disease. When disease is found, spray early with 800-fold dilutions of Nongliling, or 800-fold dilutions of Shijiale, or 600-fold dilutions of Virus A and Virus K. The main pests are aphids, whiteflies, red spiders, and tea yellow mites. Pesticides such as 800-fold dilutions of imidacloprid, or 1500-fold dilutions of insecticidal compound, can be sprayed promptly.
5. Trellising and shaping
The stems of ginseng fruit are relatively soft, so special attention should be paid to trellising and shaping when growing it in pots. Generally, for each pot, use four smooth small bamboo poles or small branches about 60 cm long inserted around the pot (10 cm into the soil), with the upper part made into a circle, square, or oval with wire, comparable in size to the pot opening, and tied firmly with rope or thin wire. Then use plastic skin, hemp skin, etc. to tie the stems to the support. The stems should be upright, and the tightness should be moderate. Note that on each inflorescence, only 4-6 robust flowers should be retained, and all the remaining flowers should be removed. When the fruits grow to the size of beans, set the fruit, retaining 2-4 fruits per side branch. At the same time, select and retain flowers and fruits distributed around the sides and top of the pot, with even distribution, uniform size, and attractive fruit shape, to improve their ornamental value.