How to grow Melocactus azureus? Care tips and propagation key points
When people hear "Melocactus azureus," those unfamiliar with it may think it refers to a weather phenomenon, but today we are looking at a plant that is a type of cactus. Its shape is very cute, somewhat like a lazy sheep, with a dorky charm. Next, let us learn about how to grow Melocactus azureus and the points to note in its care. Let us take a look together.
How to grow Melocactus azureus (basic knowledge):
Best propagation time: Melocactus azureus can be propagated in all four seasons;
Best growing soil: The growing medium can be a mix of leaf mold, garden soil, coarse sand, dried cow manure chunks, rice-husk charcoal, etc.;
Best growing temperature: The suitable growing temperature for Melocactus azureus is 15-25°C, and it can tolerate a brief lower temperature of 5°C;
Best growing light: Melocactus azureus likes sunlight, and in midsummer it should be shaded appropriately, but excessive shading will cause it not to bloom; during the growing season, it needs full light and good ventilation.
How to grow Melocactus azureus
Points to note when growing Melocactus azureus:
Applying fertilizer:
Potted Melocactus azureus can also be fertilized appropriately during the growing season, especially those grafted onto Hylocereus undatus, for which fertilization should be taken even more seriously. A fully rotted, dilute liquid fertilizer can be used, applied once every 10-15 days. After autumn begins, pay attention to controlling fertilizer and water; generally applying once a month is enough, and stop fertilizing in early October. If fertilizer is not controlled and Melocactus azureus is allowed to keep growing, the tender globe is prone to cold damage when overwintering.
When fertilizing, be careful not to get it on the globe; if any gets on it, rinse it off immediately with water.
Base fertilizer should be mixed into the growing medium in an appropriate amount before potting or repotting, such as fully rotted oil cake meal, bone meal, chicken and pigeon manure, etc., and left to sit for a period so the fertilizer and soil fully blend. Topdressing should be based on the plant's growth; during the vigorous growth periods in spring and autumn, apply a fully rotted fertilizer solution of feathers, hooves and horns, or oil cake, once every two weeks. It can also be applied alternately with a mixed solution of 0.1% urea and 0.2% monopotassium phosphate, with the amount of fertilizer water applied just enough to cover the soil surface in the pot. For home cultivation, if the potting soil has high organic matter content, chemical fertilizer alone can be applied to keep the environment clean. No fertilizer during high heat and the low-temperature dormant period.
Key points for watering:
In summer, the best time to water is early morning; in winter, it should be done before noon on a clear day; in spring and autumn, either morning or evening is fine. Generally, do not pour water from the top, otherwise over time the globe will develop unsightly spots. Under normal circumstances, watering must be thorough, and for this reason the soil must be loosened regularly so the potting soil can evenly absorb enough water.
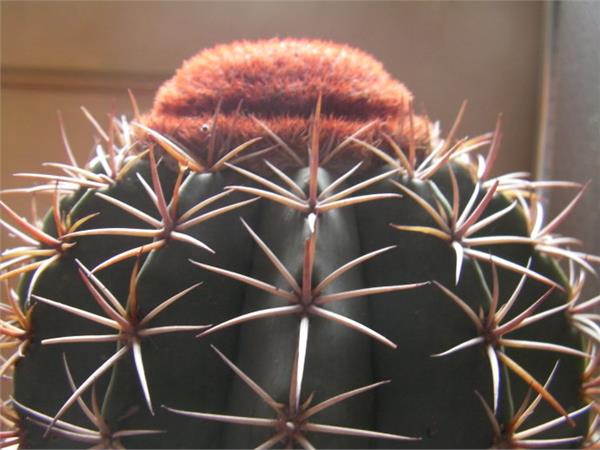
Detailed image of Melocactus azureus
Summer is the growing season for Melocactus azureus; temperatures are high and water demand is great. It must be watered thoroughly, preferably in the early morning or evening when temperatures are low; at noon when it is hot, watering can easily cause burns to the globe. During the hot, plum-rain season, watering should also be appropriately restricted. For those cactus globes with a sunken top, be careful not to let water get into the depression, to avoid causing rot, and take even more care when watering in the evening.
During the winter dormant period, watering should be restricted, just enough to keep the potting soil from becoming overly dry; the lower the temperature, the more the potting soil should be kept dry. Mature large globes are more drought-tolerant than small seedlings. In winter, watering should be done on a clear morning. As the temperature rises, the plant will gradually come out of dormancy, and only then can the frequency and amount of watering gradually increase. Except in winter, it should be watered thoroughly.
Replacing potting soil:
For potted Melocactus azureus, it is best to use a highly breathable clay pot, with broken brick pieces placed at the bottom as a drainage layer. The root cluster of cactus types is relatively small, so the pot should not be too large; the pot diameter should be close to the diameter of the plant body, for a beautiful and harmonious look. When repotting, part of the old roots should be trimmed off, left to dry for 4-5 days, and then potted; plant it not too deep, with the root crown of the globe level with the soil surface. To avoid causing root rot, newly planted Melocactus azureus should not be watered; simply mist it 2-3 times a day, and after half a month a small amount of water can be given; only after new roots grow out a month later can watering be gradually increased.
Key points for propagation:
Melocactus azureus can be propagated by sowing seeds. Species in the genus Melocactus are all fertilized by white flowers. Melocactus azureus can be harvested for seeds several times a year, and the seed germination rate is quite high. Under suitable temperatures it grows quickly; for example, if grafted onto Hylocereus undatus, it can develop a cephalium within just a few years. The steps are as follows:
1. Potting the soil: Put the mixed soil into the flower pot until level with the rim, then tap the bottom of the pot a few times with your hand, and the soil will naturally settle to 1 cm below the rim; this depth is suitable for covering with film and for later watering and care. There is no need to consider the previously mentioned "coarse particles at the bottom of the pot, fine particles on the surface."
2. Soaking the pot: Place the flower pot in water to soak, with the water depth at half the height of the pot; in half a minute the soil is basically fully saturated, then take out the pot and set it aside. The soil does not need to be disinfected with potassium permanganate solution or high-temperature microwave treatment.
3. Sowing:
1) After soaking the pot, you can sow immediately, scattering the seeds evenly over the surface soil. Use your thumb and index finger to gently pinch the seeds and sow them; you can first practice the feel on a piece of white paper.
2) You can also sow them individually, using a toothpick with a tiny bit of water on the tip, then picking up a seed and lightly placing it on the seedbed.
3) It is best to use a separate pot for sowing each variety. I sow 50-100 seeds in a 10×10 cm square pot.
4) After sowing cactus seeds (including most succulent plant seeds), covering with soil is strictly forbidden; once the seeds are covered with soil, they basically have no chance of emerging.
5) The seeds also do not need to be soaked in advance; it is too troublesome and does not necessarily improve the germination rate. What I am introducing here is the simplest method, though I would not object if you insist on soaking the seeds.
4. After sowing, insert a pvc label, and write the seed name (including the Latin name), quantity, time and other information on the label with a pencil. The label plays a big role; only when the varieties you collect become more and more numerous will you deeply appreciate that a good memory is no match for a clear label.
5. Disinfection: After sowing, spray with a carbendazim solution (diluted according to the instructions), so that the surface soil and flower pot are evenly sprayed with the medicine. For beginners, disinfection work is still indispensable. In my greenhouse sowing process, because the sowing quantity is large, I simplify wherever possible, and I have already omitted this disinfection step.
6. Covering with film: After disinfection, cover with transparent cling film, or other transparent plastic film. This step is very important; after covering with film, the air humidity of the seedbed can reach above 95%, and the seed embryo needs to absorb enough water to break through the shell and germinate.
7. Shading: Use the standard procedure of "3, 2, Light." If your sowing environment gets 1-2 hours of sunlight in the morning and evening, no shading is needed; a north-facing windowsill is very suitable.
8. Germination time: After sowing, quietly wait for the seeds to germinate; there is no need to open the film for ventilation, as frequently lifting the film will allow bacteria to invade. Due to different varieties, germination times vary greatly; the fast ones germinate in 2-3 days, and the slow ones only germinate in 10-15 days.
Pest and disease control:
In high-temperature, poorly ventilated environments, pests and diseases are likely to occur. For diseases, spray carbendazim or thiophanate-methyl; for pests, spray dimethoate to kill them. No matter which medicinal solution is sprayed, it must be done outdoors.
The above is the relevant introduction in this article; I believe after reading it you now have a simple understanding of this. If needed, you can continue to follow No. 1 Home Network to learn more information.
7. Shading: Use the standard procedure of "3, 2, Light." If your sowing environment gets 1-2 hours of sunlight in the morning and evening, no shading is needed; a north-facing windowsill is very suitable.
8. Germination time: After sowing, quietly wait for the seeds to germinate; there is no need to open the film for ventilation, as frequently lifting the film will allow bacteria to invade. Due to different varieties, germination times vary greatly; the fast ones germinate in 2-3 days, and the slow ones only germinate in 10-15 days.
Pest and disease control:
In high-temperature, poorly ventilated environments, pests and diseases are likely to occur. For diseases, spray carbendazim or thiophanate-methyl; for pests, spray dimethoate to kill them. No matter which medicinal solution is sprayed, it must be done outdoors.
The above is the relevant introduction in this article; I believe after reading it you now have a simple understanding of this. If needed, you can continue to follow No. 1 Home Network to learn more information.