There are tricks to growing strong roots on a clivia: add a little crushed debris to the soil, and the roots will fill the pot
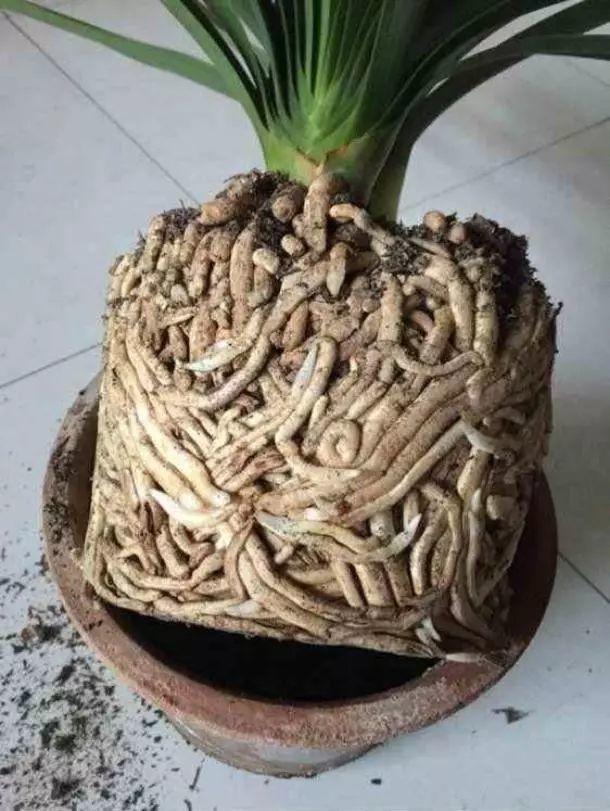
Recently, a flower lover accidentally knocked over a clivia that had been grown at home for 10 years, and a casual glance gave them goosebumps, a whole clump of bugs! But on closer look, it turned out these were clivia roots, because the pot had never been changed, the roots had already filled the whole pot, and the soil was gone! How exactly do you grow a clivia with such well-developed roots? Take a look!
How do you grow strong roots on a clivia?
1. Clivia likes fertilizer. When fertilizer is used well, the roots become especially strong, especially oil-bearing crops such as peanuts, sunflower seeds, and castor beans, which not only nourish the roots but also make the leaves glossy and shiny.
2. You can stir-fry peanuts, sunflower seeds, and castor beans until cooked, then scatter them into the bottom of the pot (peanuts need to be crushed) or dig holes in the pot surface and bury them in.
3. In addition, during our usual care of clivia, we should also frequently give it liquid fertilizer topdressing, especially in spring and autumn. Apply decomposed soybean cake fertilizer once every half month; before flowering, apply rice water or fishy water.
4. Besides fertilizing, the soil mix for clivia is also crucial for root growth. The principle for mixing soil is loose and breathable. You can mix leaf mold, pine needles, coarse sand, and charcoal granules in a ratio of 6:2:1.5:0.5.
5. Clivia has fleshy roots and is drought tolerant. Normally, do not water unless the soil is dry. Insert a chopstick one third of the way into the potting soil, and if it comes out dry, water thoroughly; if not dry, do not water.
How do you encourage root growth on a clivia?
If your clivia is in even worse shape and all its roots have rotted away, is there still hope? Yes! We can encourage it to grow roots!
1. After cutting off the rotten roots of a rotting clivia, soak it in potassium permanganate or carbendazim solution for 20-30 minutes, then take it out and let it dry in a ventilated place.
2. Prepare clean fine river sand, preferably rinsed several times in advance and disinfected with carbendazim.
3. Bury the dried clivia in moist river sand and place it in a spot with bright, indirect light and good ventilation. Spray water when the sand surface dries, and very soon the clivia will grow plump white roots!
4. Besides sand, you can also use sphagnum moss to wrap the base of the clivia and keep the moss slightly moist, and it will also grow thick white roots.
5. Besides sand and sphagnum moss, we can also set the clivia on a hydroponic bottle so its roots just barely touch the water surface, and it will also grow water roots!
How do you trim clivia roots?
Although having many roots is a good thing for clivia, if the roots fill the entire pot with no soil left for it to keep absorbing nutrients, that is also no good. Moreover, when roots are too dense and there is no ventilation, they are prone to black rot and root rot, so we should change the pot, change the soil, and trim the roots for clivia every year.
1. Before changing the pot and trimming the roots, we should not water the clivia for at least 1 week. When the soil is relatively dry, it is easier to remove from the pot.
2. Turn the clivia, roots and soil together, upside down out of the flower pot, gently break apart the root ball of soil with your fingers, and gently rinse the soil off the roots with clean water.
3. First step: pull off the rotten roots of the clivia entirely, whole roots at a time. Note that rotten roots must be cleaned out thoroughly, otherwise it can easily cause large areas of root rot and stem rot, with endless trouble!
4. Second step: we need to deal with aged hollow roots. Hollow roots are roots whose centers have already become empty. Hollow roots have lost the ability to absorb water and nutrients, and can be pulled off whole from where they connect to the bulb.
5. Third step: soak the trimmed clivia roots in a solution of carbendazim (or potassium permanganate) to clean water at 1:1000 for half an hour, then take them out to dry.
6. Note 1: For clivia rotten roots and hollow roots, even if only a part is affected, do not cut from the middle. Instead, pull the whole root off, because if clivia's fleshy roots are cut in the middle, they rot very easily.
7. Note 2: When trimming clivia roots, be sure to protect the roots with white tips. These roots are vigorous and have strong absorptive capacity. If damaged, they can easily cause yellow leaves, root rot, and other problems in clivia.
As the saying goes: to grow flowers, first grow the roots; to cultivate a person, first cultivate the heart.
If a flower's roots are grown well, filling the pot with blooms is no problem;
but if a flower's roots are not grown well, then yellow leaves and root rot crop up endlessly,
Flower lovers, hurry up and learn and share these clivia root-growing tips!
?