How to Cultivate a Dwarf Champion Bonsai? A Detailed Guide to the Air Layering Method
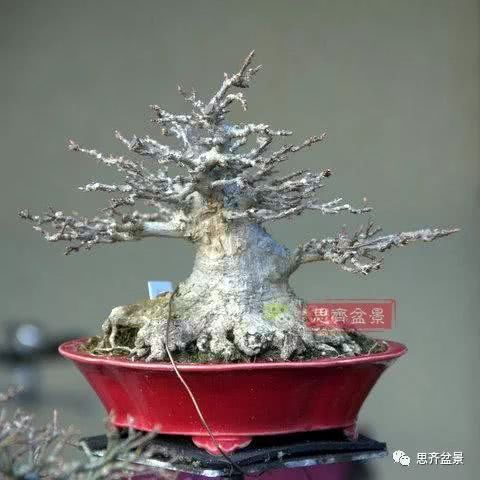
Nowadays, dwarf champion bonsai are highly favored by bonsai enthusiasts. Though small in stature, they lose none of a king's commanding presence. Their exaggerated taper and imposing root flare are the highlights, with a stable root flare being especially important. Today we will discuss how to cultivate the imposing root flare of a dwarf champion bonsai.
The image above shows a dwarf champion trident maple (Acer buergerianum). How was its root flare cultivated? First, years of patient development go without saying, but there is another important point: the root flare foundation of the initial material. The original root system of the initial material should ideally be on the same horizontal plane and evenly distributed, so that as the surrounding roots grow and pull, a trumpet-shaped root flare like the one in the image above will naturally form.
How can the original root system be kept on the same horizontal plane and evenly distributed? The best method is, of course: air layering. The trident maple in the image above was first given new roots through air layering, and only then was it cultivated into the form shown above. With a good root flare foundation, later cultivation will yield twice the result with half the effort.
▲A trident maple prepared for air layering to replace its roots
For example, the trident maple in the image above has a poor root foundation. If cultivated as is, it might never amount to anything remarkable. Moreover, there is a swollen knob on the lower trunk that makes the taper less than smooth. So the plan is to improve the root flare and taper through air layering, while also reducing the height - achieving three goals at once.
▲Choose spring for air layering
The best season for air layering is spring, specifically when the new buds have already opened but the leaves have not yet matured. At this time, the tree's growth rate accelerates, sap flow is vigorous, and rooting is easy.
Air layering can also be done in summer, but due to the higher temperatures, management is relatively more difficult. If done in autumn, tree growth slows down, rooting results are unsatisfactory, and moreover the new roots, not yet lignified, will have to endure the test of harsh winter - the success rate of air layering is not high. Overall, spring is still the most suitable time for air layering.
▲Girdling
Perform air layering at the swollen knob, girdling about 3 cm. The "zigzag" treatment on the upper edge of the bark is to increase the length of callus tissue, thereby improving the likelihood of rooting.
After girdling, mound soil around it. Initially, moderate shading is needed, then gradually increase light exposure according to growth conditions. The soil must not be too dry - too dry will damage the roots; nor should it be too wet - too wet will result in weak fibrous roots. In short, watering still follows the principle of "water when dry, stop when wet." Signs of rooting can be seen in 1-2 months.
▲The following spring
After nearly a year, the rooting condition is quite ideal. The root system is abundant and evenly distributed.
▲Remove from pot and clear soil
▲Separate from the mother plant
After a year of growth, the new roots have lignified and gained a certain flexibility. Lift the new roots upward and saw along the rooting point. After separation, the cut surface can be properly treated with spherical knob cutters. Try to accomplish it all in one step.
▲After separation
Spending one year to achieve such a root flare is well worth it.
Fix a wooden board at the bottom of the root flare to force the roots to grow outward in all directions.
▲Planting in position
Secure the wooden board with aluminum wire.
Planting in position is complete.
What comes next is up to time.
If you enjoy practical articles like this, please share them to your social media!