Poke a hole in an oil drum to grow vegetables, and in 10 days it becomes a small vegetable garden, so you won't spend a penny on vegetables for a year
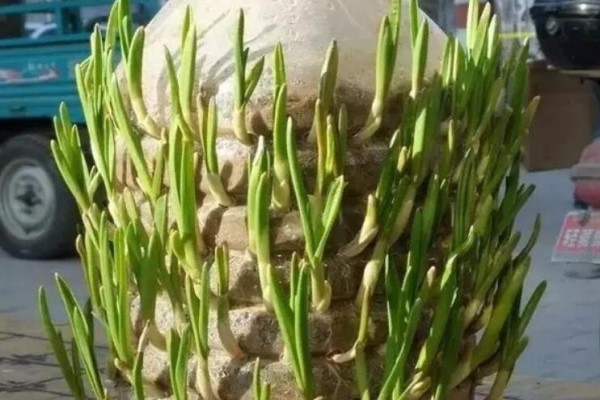
Grow some garlic in an oil drum, and in 10 days it grows into a column of garlic sprouts!
If there is one indispensable seasoning at home, it is naturally garlic! Autumn is exactly the time to plant garlic; with just 1 large oil drum, you can grow a column of garlic sprouts right away, so come and try it!
Planting steps:
1. First, clean the oil drum you no longer use at home. Grab a handful of sand, rinse it clean with water, then put it into the oil drum, add 1/3 clean water, screw on the lid and shake hard a few times, then pour out the sand, rinse with clean water several times, and the oil drum will be clean!
2. Prepare a pair of pliers and a screw. Hold the screw with the pliers and use a red-hot screw to poke holes in the oil drum. But be careful not to make the holes too dense; about 3cm of spacing between each row is enough.
3. For planting garlic, it is best to choose plump garlic heads, break the cloves into individual pieces for later use. Basically, 1 large 5-liter oil drum can plant 1 jin of garlic.
4. Prepare loose, breathable nutrient soil. First add soil to the bottom of the oil drum, then place the garlic in one by one, paying attention that the direction of the garlic's top bud faces the holes of the oil drum. Then add a layer of garlic and cover it with a layer of soil, and finally fill the whole oil drum. If you find it troublesome, you can fill the oil drum with soil and press the garlic cloves in one by one.
5. After planting the garlic, water it thoroughly once and place it in a cool, ventilated place, keeping the soil moist. In about 5-7 days, you will see the garlic sprouting small green shoots.
6. Wait a few more days, and when the garlic sprouts have grown, you can cut them directly. Whether adding a handful when making soup or directly using them to scramble eggs, the taste is simply too delicious!
7. After cutting one round of garlic sprouts, they can keep growing for you to continue eating, so you can eat fresh garlic sprouts throughout autumn and winter, with no need to spend extra money at the vegetable market!
Throw leftover ginger into a pot, and it immediately becomes a ginger mountain!
A couple of days ago, Huahua bought a few pieces of ginger and forgot to put them in the fridge, and unexpectedly they sprouted directly! For sprouted ginger, Huahua can't bear to throw it away, and directly plans to plant it in a flowerpot. After all, with vegetable prices so expensive now, growing some yourself saves money!
How to plant?
1. If you want to grow more ginger, Huahua still recommends buying fresh ginger from the vegetable market. Take it home and put it in sand, or soak it in aspirin water for a while, which makes it easier to root.
2. Prepare loose, breathable nutrient soil to plant ginger. You can wash eggshells clean, dry them in the sun, crush them, and mix them with nutrient soil at a 2:1 ratio to make loose, breathable soil.
3. If you want ginger to grow a lot, it is best to choose a wider and deeper flowerpot, and directly bury the sprouted ginger in it. The burial depth should be about 3-5cm, and note that the ginger's sprouting point should face up, and definitely don't put it in the wrong way.
4. After watering thoroughly once, place the flowerpot in a place with plenty of scattered light. In about 2-3 weeks, you will see the ginger sprouting long shoots.
5. Move the flowerpot to a place with good light to get more sun, and usually water only after the soil surface turns white. Definitely do not water too much, because once water accumulates, the ginger tubers will rot, and then the whole ginger plant won't grow!
6. During the ginger's growth period, you can supplement it with some fertilizer. For example, cooked soybeans from home, or compound fertilizer, can both be buried in a hole dug along the edge of the pot. Use it about 1 time per month, which can make the ginger grow more vigorously.
7. After 2-3 months, when you see the ginger leaves begin to turn yellow and fall, this proves the ginger is mature! At this time, dig the ginger out of the flowerpot, and you can harvest a full large pot of ginger all at once!
Throw leftover sweet potatoes into a pot, and they immediately become a waterfall!
These past few days after work, Huahua saw people selling roasted sweet potatoes by the roadside, and only then felt that autumn had truly arrived. Sweet, fragrant roasted sweet potatoes and autumn are simply a perfect match. Sweet potatoes are not only delicious, but growing a pot at home can even look better than a pothos!
How to plant?
1. When going to the vegetable market, pick a few healthy sweet potatoes. When choosing, it is best to select sweet potatoes with clean skin and no scars at all.
2. After buying them and bringing them home, wash the sweet potato skins, then find a bottle and put the sweet potatoes in it. Let the lower end slightly touch the water surface, and basically in 10 days they can take root!
3. If you want to enjoy a sweet potato potted plant, just keep it in the bottle for hydroponics. You can not only see the sweet potato's white roots, but also see more and more leaves. If the vines are long enough, you can even let them climb the wall directly!
4. If you think there are too many sweet potato leaves, you can also pick them directly to cook. Whether stir-fried plainly or used as a seasoning when cooking rice or making soup, the taste makes your mouth water just thinking about it!
5. If grown well, sweet potatoes can even bloom! The flowers that sweet potatoes produce look like petunias from afar. Aren't they especially small and cute?
6. If you want the sweet potatoes to produce small sweet potatoes, then transfer the hydroponic sweet potatoes to a flowerpot for soil culture. Be sure to choose a large pot, pay attention to giving more sun and fertilizing frequently, and then they can grow sweet potatoes!
Throw a yam stick into the soil, and next year it immediately fills the pot!
Eating more yam in autumn and winter can help protect the spleen and stomach, so why not take a section of yam stick and directly grow a pot of yam at home? Then you won't ever have to spend money buying it again!
How to plant?
1. To grow yam at home, you only need a section of yam stick. If you want the yam to sprout as soon as possible, it is best to choose the top part of the yam.
2. Clean the cut yam stick and directly put it in a hydroponic bottle or a plate with water to root. Generally, just let one side of the yam touch the water surface; there is no need to throw it all into the water.
3. After it roots in water, transfer the yam to a flowerpot. Be sure to choose a larger and deeper flowerpot to ensure the yam has enough room to grow. Prepare nutrient soil and place the yam horizontally into the flowerpot.
4. Water thoroughly once and place the yam in a place with good scattered light, so the yam can sprout and grow leaves. During the yam's growth process, the vines will gradually climb, so it is best to place it by a windowsill or beside a railing, letting the vines climb up.
5. During the yam's growth process, keep the potting soil moist and apply thin fertilizer frequently. After the yam matures, it will produce tiny flowers and grow small yam beans.
6. After the yam leaves gradually wither, it proves the yam is gradually maturing. At that time, dig it directly out of the soil, and you can get a large pot of yam! Because yams can grow very deep, but the flowerpot has limited space, they are prone to growing crooked.