No soil needed for cuttings now, a single sponge does the trick
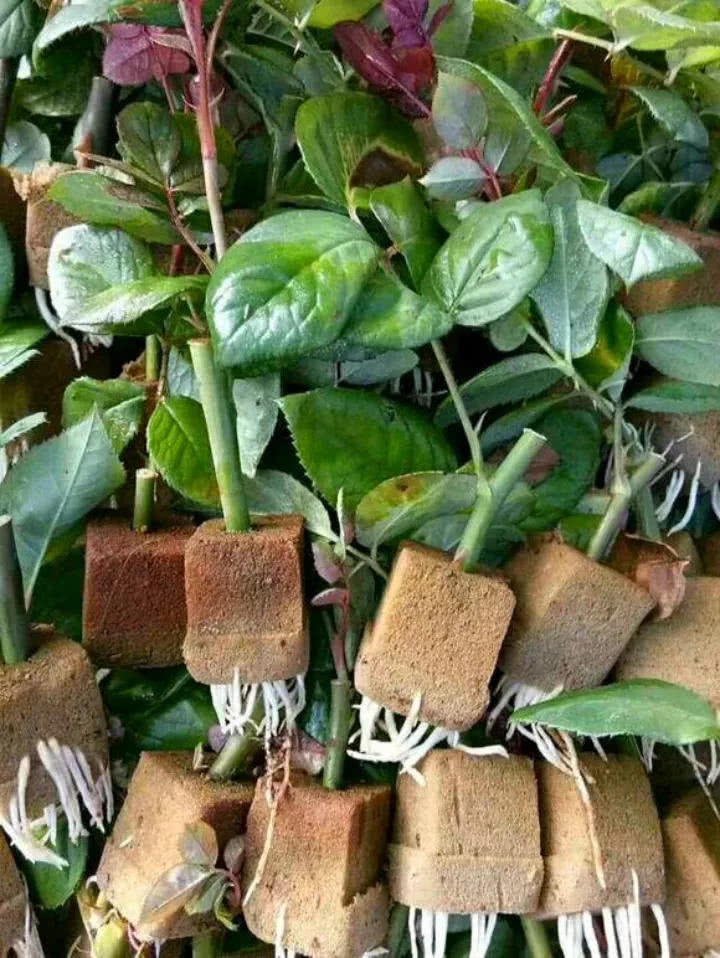
Once the weather turns cool, it's a great time for cuttings again, so gardeners, don't miss out. And so, today Huahua is quick to share a new-style cutting method that only needs a few pieces of sponge, with dense white roots and tiny sprouts. You really must save this great trick well!
The "Hit-the-Wall 3.0" sponge cutting method
Suitable range: Sponge cuttings suit Chinese roses, jasmine, bougainvillea, pomegranate, clematis, honeysuckle and so on. Most flowers that tolerate moisture are suitable, but ones prone to rot, like kalanchoe and succulents, are not.
How to do it:
1. Prepare sponges and cut them into small pieces
Old sofa sponge, dish sponge or shoe-polishing sponge from home all work, but wash them clean beforehand. It's no good if they carry grease or shoe polish. Once prepared, cut them into pieces the size of a mahjong tile and set aside.
2. Cut a slit in the sponge
What's shown here is a new sponge, still quite springy. Cut one slit from the middle, but don't cut too deep; it's fine as long as the sponge's elasticity can close it back up.
3. Insert the flower stem
Push the flower stem you want to root into the slit of the sponge.
4. Put it into a small tray
Most homes don't have small trays for cuttings, so mooncake trays or snack trays can be used instead. After pushing the flower stem and sponge in, wet the sponge, put it in a ventilated, shady place and quietly wait for roots to form.
You can also use a bottle, but then the sponge has to be cut a bit larger so it stays more stable.
5. Keep the sponge moist
While waiting for roots, keep the sponge moist. In about a week you'll see roots popping out. With sponge cuttings you can lift it up to take a look, which is a very handy advantage.
6. Once roots reach 2-3 cm, you can pot them temporarily
About half a month after cutting, dense white roots will sprout on the sponge, and then it's time to plant them into pots. Small pieces of sponge don't need to be removed; for large sponges just trim off the excess, and plant them into the soil together with the sponge.
7. After temporary potting, help them settle in like this
After temporary potting, the flowers need more than a week to adapt. Once planted, water thoroughly to settle the roots, then keep them in a ventilated spot at home. No need to water every day; water again after about 3 days.
8. After they settle in, gradually give them sun
Once settled in, the flowers slowly perk up and can take some sun. Morning sunlight is the most precious; flowers that get it grow fast. Gradually increase the daily sun exposure, and in about ten days they can be cared for normally.
Sponges aren't just for cuttings, they work for water culture too
Since sponge cuttings root so well, we can also use them for water culture. For plants like pothos, arrowroot and peace lily, growing them with sponge means fast rooting and strong resistance!
How to do it:
1. Cut the sponge into a circle the same size as the vase opening, and cut out a "Y" shape as shown below.
When opened it looks like this: only one gap can be opened, and the other two cuts should not be cut through.
2. Fit the flower into the sponge
Insert the flower stem you want to grow in water into the sponge, leaving about 2 cm exposed at the bottom.
3. Put in the water-blocking net
Water-culture bottles usually come with a matching water-blocking net; put the sponge with the flower inserted into it.
4. Put it into the water-culture container
Fill the water-culture container with water, preferably not too full, and don't let it cover the sponge. Change the water every 3-5 days, and change the sponge every 1-2 months.
The sponge cutting method for growing flowers
Have you learned it?
Save it now
You must give it a try someday
?