Detailed Explanation of Cultivation Techniques for Beigua Xiaomi
Cultivation Techniques for Beigua Xiaomi
I. Variety Introduction
Beigua Xiaomi is a new generation of edible vegetable squash that originated in Hokkaido, Japan. Each fruit weighs about 500g. The fruit is flat-round, with dark green skin and deep yellow flesh; the texture is highly mealy, the taste is sweet, and it is rich in nutrients. Because the sugars it contains are mainly xylose, it is an ideal health food for diabetics.
Preparation: wrap in plastic wrap, put in a microwave and heat for 5-8 minutes before eating; the quality is outstanding.
With the improvement of people's living standards, it has become familiar to people and has also become one of the main vegetable varieties favored by urban residents, with good prospects for development. It is recommended to raise seedlings in a solar greenhouse and cultivate in a cold shed.
II. Selection of Cultivation Plot
Loam and sandy loam are the best soils. This variety has a well-developed root system, and its vertical roots can reach 2 m. The soil layer should be deep and fertile. It prefers slightly acidic or neutral soil, with a pH value of 5.5-6.8 being suitable.
III. Land Preparation and Fertilization
Make the beds 7 days before transplanting. For base fertilizer, use 1 bag of compound fertilizer per mu, 100 kg of slaked lime (Beigua likes calcium), and 1000 jin of decomposed chicken manure. For a north-south oriented plastic greenhouse, make ridges and beds in a north-south direction. The bed width including the ditch is 2.2—2.4 m. Level the bed surface finely and cover it well with plastic film to raise the ground temperature.
IV. Seedling Raising
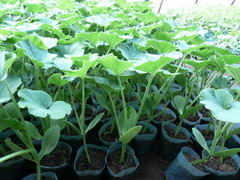
1. Use the method of sowing dry seeds, with the sowing date being February 25. Sow the seeds directly by dibbling them into nutrient pots filled with enough bottom water.
2. Seedling stage management ①Temperature management: from sowing to emergence, control the temperature at 25-30°C. After emergence, gradually lower the temperature to 23-24°C during the day and 16-18°C at night. While preventing leggy growth, promote flower bud differentiation. ②Water management: water when the surface soil of the nutrient pots turns white. ③When the seedlings show signs of fertilizer deficiency, spray a 0.2% potassium dihydrogen phosphate aqueous solution.
3. Begin temperature control 10 days before transplanting (daytime: 18°C; nighttime: 9-10°C), and carry out low-temperature hardening of the seedlings and take water-control measures. During the seedling stage, do a good job of pest and disease control, maintain insulation and ventilation, reduce humidity in the shed, and carry out timely chemical control. The entire seedling raising period is about 30 days.