Have you ever seen an aquascape shaped like a tree? After watching, you'll be amazed.
Recently everyone has been asking, how do you create a moss aquascape in a small tank? Is moss easy to keep alive? What benefits does it offer to fish keepers? Today the editor will teach you all the tricks of moss balls, moss walls, moss trees, and even using MOSS to create backgrounds in a planted tank, let's take a look!
Advantages of moss
As everyone knows, the main use of aquatic moss (MOSS) is to create a natural aquarium landscape by attaching it to driftwood or rocks. Growing moss in an aquarium is not very difficult. They can tolerate low light, grow well without supplemental carbon dioxide, and survive on very small amounts of nutrients. As epiphytes, the rhizoids of MOSS can attach it to mesh, wood and rocks for all kinds of aquascaping. Not only that, MOSS is also very important for fish breeding, because aquatic MOSS can be widely used as a spawning bed, and MOSS can also absorb excess waste produced by fry.
Making a moss ball
When setting up a driftwood aquascape tank, there was some moss left over, and it seemed a shame to throw it away. I tried making a few moss balls, and they turned out pretty well.
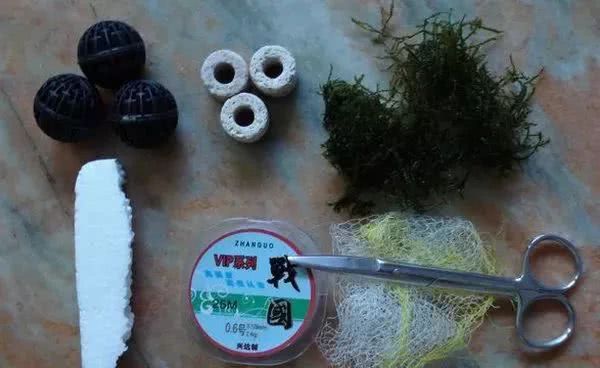
1. Prepare materials: moss, bio ball, bath loofah, glass ring, fishing line, foam, scissors.
2. Open the bio ball, take out the bio cotton inside, then take a small piece of foam (the purpose is to make the finished moss ball float in the water; because the internal space of the bio ball is small, the foam should not be too big) and put it into the bio ball, then snap the bio ball shut.
3. Take a small amount of moss and spread it evenly over the surface of the bio ball; do not spread it too thickly, a thin layer is enough. For this step you can use "moss instant glue" to help fix the moss more firmly to the surface of the bio ball. Note: the glue turns white after it sets, so please be careful with the amount used; for attaching moss you only need a tiny bit, and if you use too much, white glue marks will be visible on the front, which will affect the appearance.
4. Take a small piece of bath loofah and carefully wrap it around the bio ball covered with moss; do not wrap it too tightly, so as to help new moss shoots sprout.
5. Use fishing line to tie up the opening of the bath loofah wrapped around the moss, then cut off the excess loofah, leaving about 30CM of fishing line as reserve.
6. According to the height at which the moss ball floats in the tank, tie a glass ring to the end of the fishing line (this serves to anchor the moss ball).
7. Place the moss ball in a suitable position in the tank according to personal preference, and bury the glass ring in the substrate.
Making a moss wall
Preparation: 1. Triangle moss or any kind of moss. 2. 2mm mesh stainless steel net (1 chi X 3 chi). 3. Small suction cups. 4. Dark cotton thread/fry thread. 5. Pointed tweezers, small wire cutters.
Triangle moss, no need for too much, even broken pieces can be used. To form a triangular shape, it is best to tie it onto an object; the water temperature should not exceed 28 degrees, because above 28 degrees it will easily grow long and thin and turn yellow and withered. Light and CO2 requirements are the same as for stem plants; too dim and it actually grows poorly.
After buying the stainless steel net, cut it to the required size with small wire cutters, and remember to clean the steel net with hot water and dish soap afterwards, because it has a lot of oil on it.
First tear the triangle moss into strips to make arranging easier. Then use tweezers to lay the strip-shaped moss onto the net one strip at a time, placing a few more strips of moss horizontally across the net. The moss does not need to be laid too thickly, because after tying, the lower part will not receive light and will grow poorly; moreover, moss can grow new shoots from any position, and the more gaps there are, the denser it will grow afterwards.
After arranging the moss, you can wrap and tie it with cotton thread: first tie a knot at one corner of the steel net to secure it, then wrap diagonally along the steel net to the other side, then wrap diagonally back from the other side, and tie a knot to secure it again, so the cotton thread will form a grid on the net, and the moss will cling to the net and not fall off.
Basically the moss sheet is now complete, and it can be placed on the tank bottom; after it grows dense it will have a carpet effect. However, if you use triangle moss, because it grows in layers, if placed at the bottom, it is better to use ordinary/Java/willow moss.
If using triangle moss, it can be attached to the tank wall, forming a row of moss wall on the tank wall. On the completed triangle moss sheet, cut a small notch, insert the small suction cup into it, and it can be stuck to the tank wall.
Six ways to make a moss tree
Method 1: Fixing with a steel wool ball
First prepare a steel wool ball; they are sold in supermarkets.
Tie the azalea root to a stone so it does not float up
Fix the steel wool ball
Tie on the moss
Method 2: Bio cotton method
Black bio cotton method: the same as the steel wool ball method, except the substrate used is the coarse-pored black bio cotton used in filtration. Cut it into a hemisphere shape and then follow the same steps as the steel wool ball method.
Method 3: Fixing with a metal mesh sheet and screws
Mesh sheet fixing: you can choose rustproof stainless steel mesh sheet or aluminum mesh sheet.
Method 4: Fixing with a shaped mesh sheet
On the basis of the third step, shape the mesh sheet, bending out angles.
Method 5: Fixing with plastic sheets
Method 6: Tie directly
The prerequisite is that the driftwood or azalea root should have a tree-crown shape; you can use moss instant glue to strengthen the fixing and replace the hassle of tying thread.
There is also a surprise here