Detailed Explanation of the Key Management Techniques for Soilless Tomato Cultivation
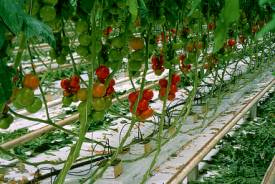
Install a soilless cultivation system in the greenhouse, including cultivation troughs, irrigation facilities, and cultivation substrate.
1. Cultivation troughs: Leave 80 cm on the north side and 30 cm on the south side inside the greenhouse, and build north-south oriented cultivation troughs with bricks. The inner diameter width is 48 cm, and the trough frame height is 24 cm. The bricks should be laid flat, with a trough spacing of 72 cm. Lay a 0.1 mm thick plastic film at the base of the trough, press the film edges tightly with the top layer of bricks, spread 3 cm thick clean river sand on the film, lay a layer of woven bags on the sand, and fill the bags with cultivation substrate.
2. Irrigation facilities: Use a tap water system or build a reservoir with a water level difference of 1.5 m. Build an independent irrigation system for a single greenhouse. Plastic pipes can be used for both the main pipeline in the greenhouse and the drip irrigation belts in the cultivation troughs. Place 1 to 2 drip irrigation belts in the trough and cover them with a 0.1 mm thick narrow plastic film.
3. Cultivation substrate: Organic substrates can use corn stalks, mushroom residue, sawdust, etc., and inorganic substrates can use sand or furnace slag, etc. If coal gangue, sawdust, and corn stalks are used, their mixing ratio is 1:2:2. Fifteen days before use, pile the substrate 25 cm thick, spray it wet, cover with film, and sterilize. Then add 2 kg of special fertilizer for organic soilless cultivation and 10 kg of disinfected chicken manure per square meter of substrate. After mixing evenly, it can be filled into the troughs. The substrate must be disinfected after each crop harvest.
II. Soilless Seedling Raising
Select the tomato variety Maofen 802, which is tolerant to low temperature and weak light, high-yielding, and highly disease-resistant. Soak and germinate the seeds at the end of September. After most seeds have sprouted, artificial soilless plug tray seedling raising can be used. Prepare the substrate at a ratio of peat : vermiculite = 3:1. Add 5 kg of chicken manure and 0.5 kg of vermiculite compound fertilizer per square meter of substrate. After mixing evenly, fill it into 72-cell plastic trays, sow 1 seed per cell, cover with 1 cm of vermiculite, and separate the plug trays from the soil with plastic film underneath. Keep the temperature at 25-30°C before emergence. After emergence, keep the temperature at 20-25°C during the day and 10-15°C at night. Keep the seedling trays moist. When the seedlings grow 3-4 true leaves, they can be removed from the trays for transplanting. The seedling age is about 30 days.
III. Transplanting
Before transplanting, turn and level the substrate, and irrigate the cultivation troughs so that the substrate absorbs water fully. When water seeps out of the cultivation troughs, transplant in 2 rows per trough, with the substrate slightly higher than the seedling block, a plant spacing of 30 cm, and 3000 plants per mu. Water lightly after planting.
IV. Cultivation Management
1. Fertilizer and water management: Start topdressing 20 days after transplanting, then topdress once every 10 days, applying 10-15 g of special fertilizer per plant each time. After fruiting, topdress once every 7 days, applying 25 g of special fertilizer per plant each time. The fertilizer should be evenly scattered 5 cm away from the roots so that it infiltrates into the substrate with water. In addition, carbon dioxide gas fertilizer can also be applied inside the greenhouse. Generally, water once every 5 days after transplanting.
2. Temperature and light management: After transplanting, keep the indoor temperature at 22-25°C during the day and 10-15°C at night. After fruit set, keep it at 25-28°C during the day and about 12°C at night.
3. Vine hanging and pruning: When the seedlings have 6-7 leaves, hang the vines with polypropylene plastic twine. Fix the upper part of the twine to the iron wire on the greenhouse frame and tie the lower part to the stem base. The stems and vines intertwine with the hanging twine and maintain upright growth. During pruning, keep only the main axis for growth and fruiting, and remove all lateral branches in the leaf axils. Remove lateral branches when they grow 10-15 cm long.
4. Flower and fruit preservation and fruit thinning: From 7 to 9 in the morning, dip flowers in a 10-15 mg/kg 2,4-D solution to increase the fruit-setting rate. To ensure large fruit and good quality, keep 3-4 fruits per plant, and promptly thin all remaining flowers and fruits.