How to incubate Chinese francolin eggs? A detailed explanation of the key incubation techniques
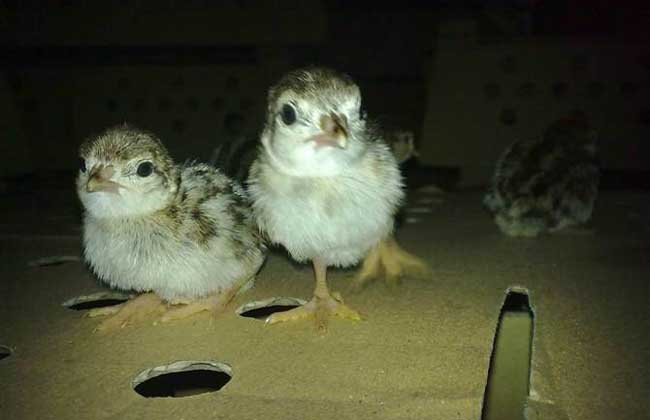
The Chinese francolin is also known as the Chinese partridge, Yue pheasant, Huainan, and so on. It lives in dry valleys among low mountains and on the rocky and sandy slopes of hills, mostly in environments such as scrub, grassland and barren hills, and sometimes also appears in small patches of jungle and bamboo forest near farmland. It often forages in the valleys at dawn and dusk, and spends the night in grass or scrub. Now let us take a look at Chinese francolin incubation techniques!
Egg selection
The breeding period of the Chinese francolin is from March to June. Courtship and mating begin between March and April. Each clutch contains 3 to 6 eggs, sometimes as many as 8. The eggs are oval or pear-shaped, and their color ranges from pale buff to yellowish brown. For artificial incubation of Chinese francolin eggs, use eggs no more than two weeks old as far as possible, and strictly select out double-yolked eggs and deformed eggs. After selecting them, soak the eggs for 3 minutes in 30°C warm water with 0.1% potassium permanganate, then take them out, let them dry, and they are ready for incubation.
Setting eggs in the incubator
After pre-warming, the Chinese francolin eggs can be placed in trays and set for incubation. Place the selected, disinfected and pre-warmed eggs in the egg trays with the large end up and the small end down, tilted slightly (place the eggs in the middle of the tray as far as possible), and then put the trays into the incubator to begin incubation. When loading the egg trays into the machine, be sure to secure them properly, to prevent the trays from slipping down or coming out on their own when the eggs are turned.
Temperature
In general, a smaller embryo age (the early incubation stage) requires a higher incubation temperature, and as the embryo age increases, the incubation temperature should be lowered accordingly. Incubation in winter and early spring requires a higher incubation temperature, and later, as the air temperature gradually rises, the incubation temperature can be slightly lower. The incubation temperature for francolin eggs is slightly lower than that for domestic chickens. The incubation temperature should be controlled according to embryo age, season and specific conditions, so that the incubation temperature is most suitable for embryo incubation, with an upper and lower deviation within ±0.2°C. For eggs set in the incubator as a whole batch, a variable-temperature incubation method can also be used: (1 to 7 days) at 38°C, the middle stage (7 to 16 days) at 37.8°C, and the late stage (17 to 24 days) at 37.7°C.
Humidity
The incubation humidity for Chinese francolin eggs is slightly higher than that for domestic chickens. In the early incubation stage (1 to 7 days), the relative humidity inside the incubator should be kept at 65 to 70%; in the middle stage (8th to 20th day), the humidity should be lowered to 55 to 60%; and in the late stage (from the 21st day to hatching), the humidity should be increased to 60 to 70%. Usually, adding water trays in the incubator with an area equal to 2/3 or 3/4 of the incubator's bottom area basically meets the humidity requirement. The incubation room should preferably maintain a relative humidity of 55 to 60%. During incubation, ventilation should be increased appropriately as the embryo's oxygen demand increases with development. Ventilate at fixed times during the first 8 days of incubation, and ventilate frequently after 8 days.
Turning eggs
The main purpose of turning eggs is to prevent the embryos from sticking together. In the early incubation stage, the yolk floats upward, and if the eggs are not turned, the blastoderm can easily adhere to the shell membrane. Failure to turn eggs in the middle incubation stage can cause the allantois to adhere to the yolk sac, leading to embryo death and reducing the hatch rate. Fully automatic incubators have automatic egg-turning devices, and the turning time can be set; otherwise, the eggs must be turned manually. The upper and lower eggs must be swapped, and the eggs around the edge of the tray must be swapped with those in the center. From setting the eggs until 20 days of incubation, turn the eggs once every 2 to 4 hours. After 20 days of incubation, the embryos have developed into francolin chicks, and egg turning should be stopped.
Cooling eggs
When embryos reach the middle and late incubation stages, material metabolism is vigorous and a large amount of body heat is produced. Cooling the eggs is a heat-dissipation and temperature-lowering measure taken during the middle and late incubation stages. After 2 weeks of incubation, cool the eggs once a day, and stop cooling when the temperature drops to 34 to 35°C. For machine incubation, the machine can be shut off to stop heating, and the door opened to let the fan run and cool the eggs through ventilation. In summer, when the room temperature is high, the surface temperature of eggs in the late incubation stage can exceed 39°C, and ventilation cooling alone cannot solve the problem; water should be sprayed to cool them, that is, spray 25 to 30°C water onto the egg surface so that dew drops appear on the surface. The most reliable way to judge the cooling time is still to check the egg temperature. Generally, let the egg temperature gradually decrease; when testing the temperature with the eyelid (placing the egg against the eyelid) feels slightly cool (about 33°C or so), that is enough. Egg cooling can be combined with egg turning.
Candling eggs
Candling eggs means using lamplight or natural light to see through the inside of the egg, in order to understand the progress of embryo development and other conditions, and on that basis to control and adjust the incubation conditions. Candle the eggs 3 times during the whole incubation period, once each on the 7th, 12th and 22nd days after setting, to learn about embryo development. In the first candling, remove infertile eggs and dead embryo eggs. In normally developing fertilized eggs, the blood vessels are distributed in a radial pattern and are bright and red; dead embryo eggs are lighter in color, with irregular blood rings and blood arcs inside, and no radial blood vessels. Infertile eggs are bright with no vascular network, and only the shadow of the yolk can be seen. In the second and third candlings, remove dead embryo eggs. Live embryo eggs are dark red, with a tilted air cell, a curved boundary, and thick blood vessels around it. In dead embryo eggs, no dark red blood vessels can be seen around the air cell, the edges are blurred, and some eggs are lighter in color with a bright small end.
Transferring to the hatcher
After candling the francolin eggs on the 22nd day of incubation, transfer the normally developing eggs to the hatching trays in the hatcher (the main difference between a hatcher and an incubator is that the hatcher has no egg-turning device) and continue incubating until they hatch. This process is called transferring to the hatcher. Before transferring, the hatcher and hatching trays must be thoroughly cleaned and disinfected, free of contamination, and dried. Spread clean, highly absorbent paper on the bottom of the hatching trays, which helps keep the francolin chicks clean. After transferring, control the temperature and humidity according to the temperature and humidity requirements for Chinese francolin egg incubation; that is, compared with the previous incubation stage, lower the temperature appropriately, generally 0.5 to 1°C lower than in the incubator, and increase the humidity appropriately to facilitate hatching. To ensure sufficient humidity, appropriately increase the number of water trays and keep the water trays clean to facilitate water evaporation.
Picking up chicks
After francolin chicks hatch, let them stay until their down is dry, then take them out promptly and place them in a brooding room or box at 24 to 28°C. Spread bedding straw or soft paper in the box. In a box measuring 30 cm × 50 cm, 30 to 50 francolin chicks can be placed. If chicks are picked up too early, their down is not yet dry and their adaptability to the environment is poor. If chicks are picked up late, their down is already dry and they can move about. During the hatching period, turn on the lighting as little as possible, and generally pick up the francolin chicks once every 2 hours. While picking up chicks, remove the empty eggshells, to prevent the empty shells from covering the chicks' heads and suffocating them. Each day when picking up chicks, count and record the number of hatched chicks and the number of unhatched eggs.
Checking chicks
Among the picked-up chicks, healthy and weak ones should be separated. Healthy francolins are generally large in build, weighing 13 to 14 grams, with large, spirited eyes, strong and lively, moving agilely, standing steadily, with clear calls, clean down, well-healed navels, and fully absorbed yolk. Weak francolins, by contrast, are weak and powerless, unable to stand steadily, with cloudy eyes, poorly healed navels, incompletely absorbed yolk, and a big belly. Raise them separately, and cull deformed, splayed-leg and small, weak chicks. After hatching is finished, dispose of the eggshells, unhatched eggs and dead chicks, and record them, thoroughly clean and rinse the hatching room, hatcher and hatching trays, and soak and disinfect the hatching trays and hatcher with 1% benzalkonium bromide solution. Finally, organize the various implements, close the brooding room door and the incubator, and carry out formaldehyde fumigation disinfection.