How to Grow Sedum adolphii Well? Detailed Guide to Care Methods and Tips
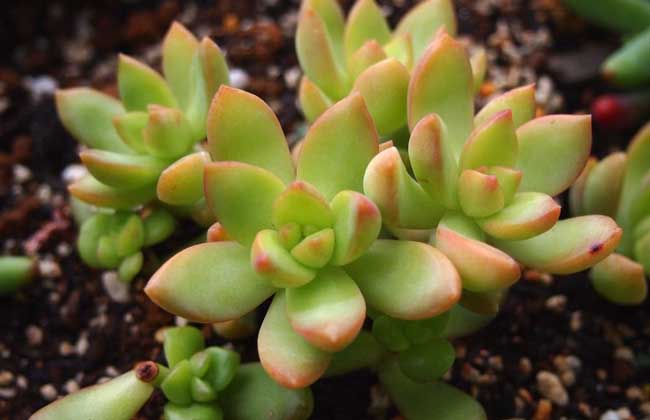
Sedum adolphii is a perennial succulent plant of the genus Sedum in the family Crassulaceae. The plant has short stems and fleshy leaves arranged tightly in a rosette shape. It is often chosen for cultivation as a small potted plant or used as an accompanying material planted together with other plants in a pot, decorating indoor living rooms, studies, windowsills and other places, and can make people feel cheerful. Let's take a look below at how to grow Sedum adolphii well!
Growth Habits of Sedum adolphii
Sedum adolphii is a succulent that goes dormant in summer, but the dormant period is not obvious. It likes light and is not tolerant of shade. Under insufficient light, the plant easily becomes loose in shape, the leaves elongate, the internode spacing increases, and the color is not yellow, showing a leggy state. Under sufficient light, the plant shape is compact, and the color also takes on a jelly-like yellow, a truly yellow beauty. Sedum adolphii readily produces side shoots; side buds easily sprout from the leaf axils at the top of the plant to form multiple heads, and side buds also easily sprout on the semi-lignified stems where leaves have fallen off.
Propagation Methods of Sedum adolphii
Propagation of Sedum adolphii mainly relies on side shoots of the plant, leaf cuttings and beheading. After beheading, new buds grow from the remaining stem base to continue the offspring, and it very easily grows side shoots, with a relatively high survival rate. Leaf cuttings are the first choice for greenhouse propagation and can obtain a large number of seedlings. Spring is the season when side shoots burst forth, and at this time propagation and growth are fastest. Sedum adolphii can be propagated in all four seasons; a small leaf dropped on the soil surface or inserted into the soil can grow into an independent plant.
How to Grow Sedum adolphii Well?
1. Soil: It requires loose soil with good air permeability and water permeability. A mixed soil of peat soil, culture soil and coarse sand can be chosen for cultivation. The soil for Sedum adolphii can use peat mixed with coal cinders in a ratio of 3:7.
2. Light: Sedum adolphii likes light and is not tolerant of shade; it is slightly tolerant of semi-shade, but in semi-shade for a longer time it easily becomes leggy and the leaves become loose. Spring and autumn are the growing seasons, and full sun is acceptable. It goes into slight dormancy in summer. However, shading measures should be taken in summer.
3. Temperature: The suitable growth temperature is around 15-28°C. Above 30°C in summer or below 5°C in winter, the plant slowly enters dormancy. The overwintering temperature should be kept above 5°C, and maintaining good ventilation is beneficial to growth.
4. Watering: Water only when the soil is completely dry, and water thoroughly; if not dry, do not water. It is afraid of long-term rain and continuous watering that causes waterlogging. In the hot summer, water 4 to 5 times a month, without watering thoroughly. Just maintaining the normal growth of the plant is enough; too much water in summer easily causes rot. When the temperature is below 5 degrees in winter, watering should be gradually stopped; below 3 degrees, keep the potting soil dry, and try to keep it no lower than minus 3 degrees.
5. Fertilizing: Fertilizing is relatively little; generally a commercially available diluted cactus liquid fertilizer is chosen. Be careful not to let the fertilizer water contact the fleshy leaves.
Causes of Root Rot in Sedum adolphii
1. Overwatering: If too much water is given, it will to a certain extent cause oxygen deficiency in the plant roots leading to rot. Also, poor ventilation after watering is one of the reasons.
2. Improper fertilizing: Sedum adolphii does not need much fertilizer; the nutrients in the soil are basically sufficient. If fertilized frequently, whether you apply foliar fertilizer or root-drenching fertilizer, it will cause certain damage to the plant, causing poor root growth and thus rot.
3. Soil clayiness: A single soil texture can also cause rot. If the soil is air-permeable, then excess water will flow down and will not cause waterlogging. But if the soil is rather clayey and not air-permeable, plus overwatering, it very easily causes root rot. If the soil has not been loosened or the pot has not been changed for a long time, the soil hardens, which can also cause root rot.
What to Do About Root Rot in Sedum adolphii?
1. Generally, when root rot occurs, take the plant out, cut off all the rotten parts until fresh fleshy tissue is seen. Then spray with carbendazim and let it dry in a cool place for a few days. After the wound dries, replant it in new soil, or plant it after rooting in water. Note not to expose it to the sun before rooting, otherwise it easily withers.
2. For plants whose roots have completely rotted and whose leaves have also turned yellow and withered, there is no way to save them. Severe root rot mentioned here refers to plants with intact leaves. In this case, beheading or leaf removal can be carried out.
Causes of Yellowing Leaves in Sedum adolphii
1. Too much water: The thick leaves of Sedum adolphii store a large amount of water and can support it for a period without watering. If watered too much, it will cause poor root growth and lead to leaf wilting and rot.
2. Black rot: The leaves fall off at a light touch. If this happens, check the roots in time and see whether the stem near the soil is abnormal. If the stem is found to turn red or black, behead it in time. Black rot mainly shows several phenomena: internal rot of the plant, and lodging of the plant. Stem rot, with black spots appearing at the base of the stem and gradually expanding and spreading. Fungal rot, with brown and water-soaked spots appearing on both the stems and leaves of the plant.
What to Do About Yellowing Leaves in Sedum adolphii?
1. Disinfection: The disinfection mentioned here must be comprehensive, including all items the plant comes into contact with, from as small as a grain of sand to as large as flower pots and flower shovels. Before operating, wash hands carefully and wear gloves.
2. Excision: Use a sharp knife to cut away the infected parts, then stuff crushed charcoal and sulfur into the wound, and place it in a cool place to dry. Replant according to the different rotten parts. If the stem is rotten, the entire stem should be cut off, then stem cuttings should be taken. To avoid fungal disease, fungicide should be sprayed after excision to prevent recurrence.