How to Grow Peace Lilies? Detailed Guide to Cultivation Methods and Precautions
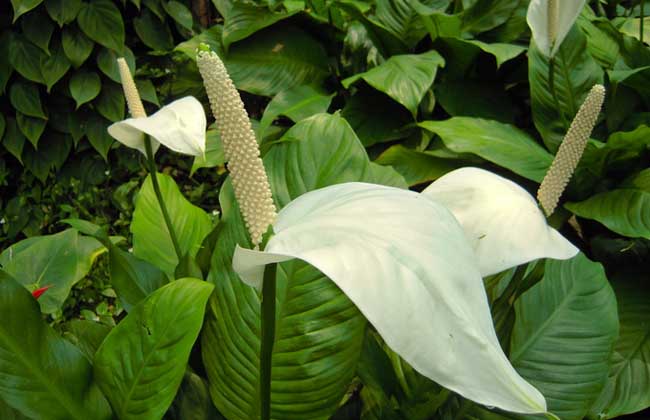
The peace lily is an important ornamental flower worldwide, also known as Spathiphyllum, white sail, smooth sailing, and Lily of Intent, among other names. It is a perennial herbaceous plant of the genus Spathiphyllum in the Araceae family, with emerald green leaves and pure white spathes, very fresh and elegant. It began to be used as a potted ornamental plant in the early 20th century, and by the 1980s it had become very popular in Europe. Let us take a look at the cultivation methods and precautions for peace lilies!
Growth Habits of Peace Lilies
Peace lilies prefer high temperatures, high humidity, and semi-shaded environments. They are relatively sensitive to humidity and afraid of strong light and sun exposure. In summer, 60-70% shading is needed, but long-term insufficient light makes it difficult for them to bloom. The soil should be fertile loam rich in humus. The optimal growth temperature is 22-28°C, from March to September it is 24-30°C, and from September to the following March it is 18-21°C. In winter, the temperature should not be lower than 14°C. When the temperature is below 10°C, plant growth is hindered and leaves are prone to frost damage. During storage and transportation of potted peace lilies, the temperature should be controlled at 13-16°C with relative humidity of 80-90%, and they can tolerate dark environments for 30 days.
Propagation Techniques for Peace Lilies
1. Division: Division propagation of peace lilies is best done in May-June. Remove the entire plant from the pot, cut the rhizome apart from the base of the clump, ensuring each division has at least 4 leaves. After replanting, place in a semi-shaded area to recover.
2. Seeding: After peace lilies bloom, seeds can be obtained through artificial pollination. Seeds must be sown immediately after collection. The germination temperature is 30°C, and germination occurs 10-15 days after sowing. If the temperature is too low during germination, the seeds are prone to rotting. After disinfection, they are inoculated on supplemented culture medium, and callus tissue and adventitious buds grow after 45 days.
3. Tissue culture: Using young inflorescences and lateral buds of peace lilies as explants, after disinfection they are inoculated on MS medium supplemented with 10 mg/L 6-benzylaminopurine and 2 mg/L indoleacetic acid. After 40-45 days, callus tissue and adventitious buds grow. The adventitious buds are then transferred to MS medium supplemented with 2 mg/L indoleacetic acid, and roots are induced in 30-40 days, becoming complete plants.
Cultivation Methods for Peace Lilies
1. Soil: Potted peace lilies require loose soil with good drainage and aeration. Heavy clay soil should not be used. Generally, a mixture of leaf mold, peat soil, and a small amount of perlite can be used as the substrate. Add a small amount of organic fertilizer as base fertilizer when planting.
2. Division: Division of peace lilies is usually carried out in spring from March to May when repotting, or in autumn. Select robust two-year-old plants for division propagation. Remove the entire peace lily from the pot, cut the rhizome apart from the base of the clump, ensuring each division has at least 3-4 leaves.
3. Potting: Reinsert the divided plants into pots. After planting, place in a semi-shaded area to recover and take root. Note that when cutting, a portion of the stem should be included, and then wood charcoal ash should be applied to the wound to prevent rot. Once the root system returns to normal, proceed with regular care.
4. Light: Light is very important for plant growth. Peace lilies need good light in winter and early spring, but as light intensity increases, shading should be gradually applied. If displayed in a shaded area, they should not be placed directly in the sun for exposure, as this is very detrimental to the growth of peace lilies.
5. Temperature: Peace lilies are a heat-loving species and should be cultivated in high-temperature greenhouses. In winter, the minimum nighttime temperature should be 14-16°C, and daytime should be around 25°C.
6. Watering: During the growing period, peace lilies should keep the potting soil moist at all times, but should not be over-watered. Excessive watering will cause the potting soil to remain wet for extended periods, easily causing root rot and yellowing of the plant.
7. Fertilizing: Do not apply concentrated or raw fertilizer to peace lilies. After applying solid fertilizer, water once with clean water. It is best to use dilute liquid fertilizer instead of clean water for irrigation. This generally will not cause fertilizer burn, and the peace lily will grow very luxuriantly.
8. Pests: During the growing period, peace lilies are very susceptible to pests. Regularly spray acaricides specifically for mite control, such as dicofol, hexythiazox, and pyridaben.
9. Repotting: Repot peace lilies every 1-2 years. When repotting, prune the root system, remove some old roots and excessively long roots, remove old soil, and replace with fresh potting soil to promote flowering of peace lilies.
Cultivation Tips for Peace Lilies
1. Peace lilies are easy to grow, but their magnesium requirement is much higher than many other foliage plants. When magnesium supply is insufficient, the edges of older leaves of peace lilies turn yellow and withered. Growers should supplement magnesium to plants by applying liquid or solid fertilizer, or regularly spray plants with magnesium sulfate, magnesium nitrate, or magnesium chelate.
2. Generally, the shade level required for growing peace lilies is at least 73%. In summer, 80% shade is better. If light levels are too low, the leaf color of peace lilies will fade and growth will be hindered.
3. If a plant is infected with root rot, its root system will turn black and cause older leaves to wither and die. In severe cases, it can lead to plant death. There are currently no peace lily varieties on the market with good resistance to root rot, so the best approach is prevention first. Spraying fungicides can prevent root rot but cannot cure the disease.
4. Spraying gibberellic acid artificially induces plants to bloom. Different varieties have different flowering times. Generally speaking, small varieties respond more quickly to gibberellic acid and can bloom 7 to 9 weeks after spraying, medium varieties need 10 to 11 weeks, and large varieties need 12 to 13 weeks. Note that excessive concentration of gibberellic acid can cause deformation of plant flowers.
5. Peace lilies should be planted in containers of appropriate size according to variety. Some small varieties are suitable for 4-inch containers, while some large varieties are suitable for 21-inch containers. Growers should choose according to actual conditions.
What to Do If Peace Lilies Wilt?
1. Improper light: Peace lilies need good light in winter and early spring and should not be shaded. As light intensity increases, shading should be gradually applied. If displayed in a shaded area, they should not be placed directly in the sun for exposure, otherwise the sudden environmental change will cause discomfort, manifested as wilting, yellow leaves, and even death.
2. Improper humidity: Peace lilies need relatively high growing humidity. If the air is too dry, it will cause leaf wilting. This can be solved by increasing water spraying or sprinkling water on the ground surface. Covering with a transparent plastic bag is also an option, but when light is good, it should be slightly ventilated or a hole should be opened at the top of the plastic bag for ventilation, otherwise the temperature inside the bag will rise sharply.
3. Improper fertilizing: Fertilizer should be applied in dilute amounts. Do not apply concentrated or raw fertilizer. After applying solid fertilizer, water once with clean water. It is best to use dilute liquid fertilizer instead of clean water for irrigation. This generally will not cause fertilizer burn, and the plant will grow luxuriantly.
4. Improper temperature: This situation generally does not occur at this time. It mostly occurs when the temperature is below 5°C or above 35°C.
5. Pest causes: If harmful mites are present, the leaves will show wilting, faded luster, yellowing and withering, and other adverse symptoms. Acaricides specifically for mite control can be sprayed for prevention and treatment, such as dicofol, hexythiazox, and pyridaben.
Precautions for Growing Peace Lilies
January: Place potted peace lilies on a sunny windowsill or balcony. Keep room temperature at 15-18°C and they can continue to bloom as usual. Water immediately when the potting soil is slightly dry, once every ten days, keeping the soil moist. Avoid indoor temperatures that fluctuate between high and low and low-temperature dampness, which can cause brown spots and mold spots on the edges of spathes.
February: Keep the flower plant in the same position. Keep room temperature at 15-18°C, and flower stems will continue to emerge from the leaf clusters and bloom. If room temperature is around 10°C, they can safely overwinter, but it is difficult for flower stems to emerge and continue blooming. Keep the potting soil moist. If the indoor air is dry, spray water on the ground or the pot surface to increase air humidity. Keep flower plants away from air conditioning vents and radiators to prevent spathes from wilting prematurely.
March: Daily care of peace lily flower plants is the same as the previous month. Keep flower plants away from air conditioning vents or radiators to avoid premature wilting of spathes. During flowering, use a soft brush for artificial pollination to improve seed-setting rate.
April: As temperatures rise, peace lilies gradually bloom more. Water 2-3 times per week to keep the potting soil slightly moist. Fertilize once a month, but nitrogen fertilizer should not be excessive, otherwise it will affect flowering. Prevent root rot and stem rot.
May: Entering the peak flowering period. Potted flower plants are still placed on a sunny windowsill or balcony. Keep room temperature at 18-20°C. Water 3 times per week and fertilize once a month. For seed propagation, use indoor pot sowing with peat soil as the sowing medium. After sowing, cover with a thin layer of soil. The optimal germination temperature is 23-27°C. Germination occurs 10-15 days after sowing. If room temperature is too low, seeds are prone to rot from moisture.
June: Flowering gradually decreases. Combine division with repotting. Remove the entire plant from the pot, remove old soil, cut off excessively long fibrous roots, and cut the rhizome apart from the base of the clump, ensuring each division has 3-4 buds. Use a mix of garden soil, leaf mold, and river sand as potting soil. After potting, place in a semi-shaded area for care.
July: Continue division and repotting as in the previous month. After divided seedlings recover and grow, keep the potting soil slightly moist. When exposed to direct sunlight, provide appropriate shading. Apply dilute fertilizer once a month. Prevent scale insect damage.
August: In the high-temperature season, besides keeping the potting soil moist, spray more water on the leaves to maintain relatively high air humidity, which is very beneficial for leaf growth. Provide shading during strong light, but long-term insufficient light makes it difficult to form flower buds and bloom.
September: As temperatures gradually cool, plants continue to send up flower stems from the leaf clusters and bloom. Water 2-3 times per week to keep the potting soil slightly moist. Fertilize once a month. Prevent leaf spot and brown spot diseases.
October: At room temperature of 15-18°C, plants continue to bloom. Water 2-3 times per week, gradually reduce watering amount, and stop fertilizing to avoid excessive plant growth and reduced cold resistance.
November: Place potted plants on a sunny windowsill or balcony. Keep room temperature at 15-18°C. Water once every ten days, keeping the potting soil slightly moist.
December: Keep potted plants in the same position. Keep room temperature at 15-18°C. Water once every ten days. Prune yellow and withered leaves on the outer part of the plant, and gently wipe dust off the leaves with a slightly damp soft cloth to keep the leaves clean and shiny.