How to Grow Osmanthus in Pots? A Detailed Guide to Planting Techniques
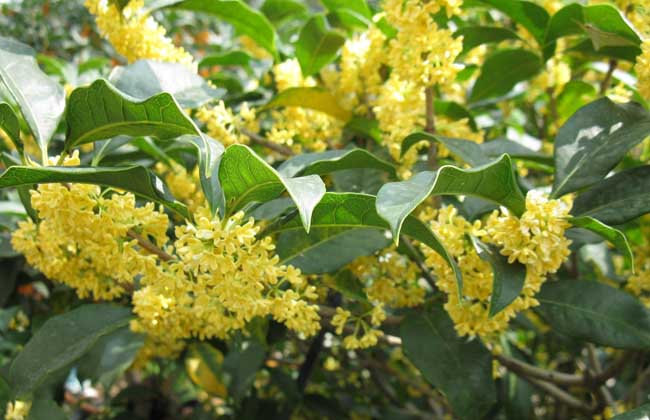
Osmanthus is the collective name for many trees in the genus Osmanthus (Osmanthus spp.) in China, and it is widely used in landscaping. The main cultivated varieties include Jinguì (Golden Osmanthus), Yínguì (Silver Osmanthus), Dānguì (Orange Osmanthus) and Yuèguì (Laurel), among others. Its cultivation history in China spans over 2,500 years, and it has been deeply loved by Chinese people since ancient times, regarded as a traditional famous flower. Let us now take a look at the pot cultivation techniques for osmanthus trees!
Growing Environment for Osmanthus Trees
1. Temperature: Osmanthus trees prefer warmth. The average temperature in growing regions is 14-28°C, the average July temperature is 24-28°C, and the average January temperature is above 0°C. They can withstand a minimum temperature of -13°C, and the optimal growing temperature is 15-28°C. In areas of China south of the Qinling Mountains and the Huaihe River, they can overwinter outdoors. They are not very cold-hardy, but compared with other evergreen broadleaf species, they are still a relatively cold-tolerant tree species.
2. Water: Osmanthus trees prefer moisture. Humidity is extremely important for the growth and development of osmanthus, requiring an annual average humidity of 75-85% and annual precipitation of around 1,000 mm. Especially during the young stage and when mature trees are flowering, they need more water; if drought occurs, it will affect flowering. Waterlogging must be strictly avoided, but they also have a certain tolerance to drought.
3. Light: Osmanthus prefers sunlight but can also tolerate shade. Under full sunlight, its branches and leaves grow luxuriantly and it blooms profusely; in shady areas, the branches and leaves are sparse and flowers are few. If grown indoors in pots in the north, special attention must be paid to providing sufficient light to promote growth and flower bud formation. Strong sunlight and deep shade are both unfavorable to its growth; generally, 6-8 hours of light per day is required.
4. Soil: Osmanthus is not very demanding about soil. Except for alkaline soil, low-lying areas, or soil that is too clayey and poorly drained, it can generally grow. However, deep, loose, fertile, well-drained slightly acidic sandy loam is most suitable.
5. Air: Osmanthus has a certain resistance to harmful gases such as chlorine, sulfur dioxide and hydrogen fluoride, and also has a strong ability to absorb and retain dust. It is suitable for planting in well-ventilated and well-lit places, prefers a clean and airy environment, and is not tolerant of smoke and dust damage; after being affected, it often fails to bloom.
Propagation Techniques for Osmanthus Trees
1. Sowing: Osmanthus fruit usually ripens in April-May. When the fruit skin turns from green to purplish-black, it can be harvested. Osmanthus seeds have after-ripening; they need at least half a year of sand storage. After harvest, sprinkle water and pile them to ferment, remove the flesh, place them in a cool place to let the seeds air-dry naturally, and store them mixed with sand. After sand storage, they can be sown in autumn or spring. Before sowing, prepare the land well and apply sufficient base fertilizer; they can also be sown in indoor seedbeds. When sowing, place the seed hilum facing sideways to prevent the radicle and young stem from bending, which would affect seedling growth later.
2. Grafting: For osmanthus grafting, the rootstock is often privet (Ligustrum), small-leaf privet, Chinese privet, or water privet, etc. When propagating seedlings in large quantities, small-leaf privet is mostly used. Before spring sprouting, cut the rootstock at 5 cm above the ground. Cut 1-2-year-old strong osmanthus branches 10-12 cm long, shave one side of the base into a 2-3 cm cut surface, and cut the opposite side into a small 45-degree bevel. Make a vertical cut about 1/3 of the way into one side of the rootstock, about 2-3 cm deep. Insert the scion into the cut, align the cambium, tie tightly with a plastic bag, then cover with soil for cultivation.
3. Cuttings: Osmanthus cuttings are usually taken before spring sprouting using one-year-old well-developed branches, cut into 5-10 cm lengths, with the lower leaves removed and 2-3 green leaves retained at the top. Insert them into river sand or loess seedbeds at a spacing of 3*20 cm. After inserting, water or spray promptly, and shade them, maintaining a temperature of 20-25°C and relative humidity of 85-90%. After 2 months, they can root and be transplanted.
4. Layering: Osmanthus can be propagated by two methods: low layering and air layering. The low layering method involves selecting relatively thick, low-growing mother trees in spring to early summer, choosing 1-2-year-old branches on the lower part, selecting easily bendable sections, cutting with a sharp knife or ring-barking, pressing them into a 3-5 cm deep trench, and fixing the pressed branch with a wooden stick. The air layering method involves selecting 1-2-year-old thick branches from the mother tree in spring, cutting a ring or ring-barking in the same way as low layering, then applying a culture medium to the wound, tying tightly above and below with plastic bags, and after roots develop in autumn, cutting away from the mother plant for maintenance.
Cultivation Techniques for Osmanthus Trees
1. Pot selection: Osmanthus has green leaves and yellow flowers, and remains evergreen throughout the four seasons. It is best to choose a relatively deep round or square pot, and the diameter of the pot opening should be roughly equivalent to the spread of the osmanthus branches and leaves, which benefits root development and growth. For the pot material, purple clay pottery or glazed pottery is preferable. In color, purple or ochre is better, as it can create a striking contrast with the flowers and leaves, enhancing the ornamental effect.
2. Soil: Osmanthus prefers fertilizer, so fertile, loose, well-drained sandy loam should be used. The culture soil for potted osmanthus is usually prepared by mixing garden soil, composted manure and river sand in a 1:1:1 ratio. Attention must be paid to disinfection treatment so as not to be infected by pests and diseases.
3. Planting: Osmanthus is best planted in early spring or autumn. Before potting, place a layer of river sand or vermiculite at the bottom of the pot to facilitate ventilation and drainage, then spread a layer of peat soil or fine soil about 2-3 cm thick on top, reaching 1/3 of the pot depth. Then, place the osmanthus seedling with its root ball into the pot, fill with culture soil, press firmly with fingers, and fill soil until close to the pot rim. The soil surface should be 2-3 cm lower than the pot rim to facilitate watering and fertilizing. After planting, water thoroughly, then move to a shaded place for about 10 days to let it “adapt to the pot” and gradually resume growth.
4. Watering: For potted osmanthus, the principle is not to water when the soil is not dry, and to water thoroughly when watering. Generally, in spring and autumn, water once every 3-4 days; in summer when temperatures are high, water once a day; in winter, water once every 7-10 days. In summer, water in the morning and evening; in winter, water around noon, so that the water temperature is close to the soil temperature and does not cause sudden cold or heat that damages the roots. In autumn, watering should be moderate. During the plum rain season, prevent the pot soil from becoming too wet or waterlogged.
5. Fertilizing: Potted osmanthus is mainly for flower viewing, so it should be supplied with sufficient fertilizer. When new shoots emerge, apply nitrogen fertilizer 1-2 times to promote branch and leaf growth. Before flower bud differentiation and flowering, mainly apply phosphorus fertilizer. Before fertilizing, the pot soil should be slightly dry, and it is best to loosen the soil first to facilitate fertilizer absorption. The day after fertilizing, water once. If using compost or manure, it must be completely decomposed before use. If using the chemical fertilizer superphosphate, its concentration must not exceed 2%.
6. Pruning: Shaping and pruning of osmanthus trees is best done after autumn, cutting off overly strong upper branches to balance the tree's vigor. Dense branches should be thinned out, and diseased and weak branches removed, so that nutrients are concentrated and flowering is promoted. Shaping and pruning combined with water and fertilizer management can improve the healthy growth of potted osmanthus and maintain a beautiful form.
7. Repotting: Potted osmanthus can be repotted and have its soil changed once every 2-3 years. The new pot should be slightly larger to facilitate root growth. Along with repotting, cut off some old roots and dead roots, remove some old soil with a bamboo stick, replace with loose, fertile new culture soil, and place decomposed cake fertilizer at the bottom of the pot as base fertilizer. The soil must be firmly compacted when filling, which can promote abundant flowers and lush leaves in osmanthus.
8. Diseases: Common diseases of osmanthus include leaf spot, sooty mold, algal leaf spot, root rot, iron deficiency, etc., and prevention and control should be carried out according to the disease situation. Leaf spot, sooty mold and algal leaf spot can be controlled by spraying 0.5 Bordeaux mixture or 5% carbendazim 500-1,000 times solution. For root rot, attention should be paid to keeping the soil loose and breathable, avoiding waterlogging. If root rot is caused by fungi, the roots can be irrigated with 200-300 times solution of amobam.
9. Pests: Common pests of osmanthus include sawflies, whiteflies, mites, white peach scale, and yellow nettle caterpillars, etc. Sawflies, whiteflies and mites can be killed by spraying 100% dimethoate 1,500-3,000 times solution. For white peach scale, besides manual brushing off, during the first and second instar nymph stages, it can be killed by spraying 400% omethoate 1,000 times solution or 40% fenitrothion 500 times solution.