Cultivation methods and precautions for Kenilworth ivy (Cymbalaria muralis)
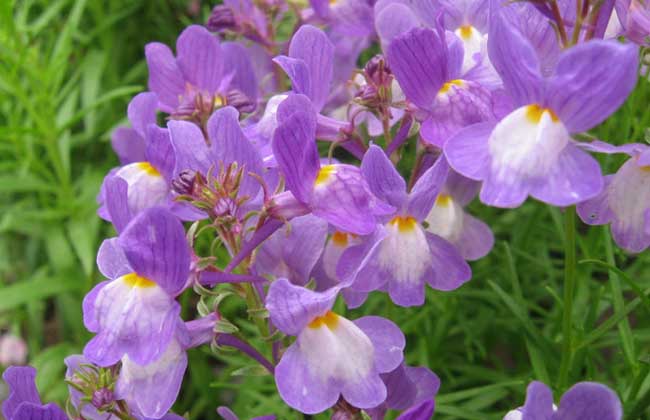
Kenilworth ivy (Cymbalaria muralis) is a biennial herbaceous plant of the genus Cymbalaria in the family Scrophulariaceae, order Lamiales, also known as ivy-leaved toadflax, small snapdragon, Moroccan toadflax, etc. The plant grows about 30 cm tall, with flowers in red, yellow, white, snow-blue, blue-purple and other colors. The flowering period is from April to June. It tolerates cold but not intense heat, and requires relatively fertile soil with good drainage. It self-seeds and can be used as edging material for flower beds and flower borders, or grown as a potted plant for ornamental purposes.
Propagation methods for Kenilworth ivy
1. Seed propagation: Sow seeds from late September to early October. Level and finely rake the seedbed, mix the seeds with fine sand and sow them evenly into the seedbed, then cover with reed curtains for shade. Before the seeds emerge, spray water evenly to keep the soil moist. Cotyledons germinate after two weeks. During the seedling period, thin the seedlings to help them grow sturdy. When 5 to 8 true leaves have grown, pinch off the growing tips promptly. It has many lateral roots and transplants easily; when 2 to 3 branches have formed, transplant once.
2. Cuttings propagation: Cuttings propagation is usually done in combination with pinching. Use the thick, pest- and disease-free top shoots that have been pinched off as cuttings, and insert the top shoots directly. The optimal temperature for cutting roots is 18°C to 25°C. Below 18°C, the cuttings root with difficulty and slowly; above 25°C, the cut ends of the cuttings are easily infected by pathogens and rot, and the higher the temperature, the greater the proportion that rot. When low temperatures occur after cutting, the main measure for keeping warm is to wrap the flower pot or container used for cuttings with plastic film.
Potted management of Kenilworth ivy
1. Potting: When potting young seedlings, first place a 2 to 2 cm thick layer of coarse granular substrate or ceramsite at the bottom of the pot as a drainage layer, then sprinkle a layer of fully decomposed organic fertilizer on top as base fertilizer, about 1 to 2 cm thick, then cover with another layer of substrate about 1 to 2 cm thick, and then place the plant in, so as to separate the fertilizer from the roots and avoid burning the roots. For the potting substrate, one of the following can be chosen: garden soil : cinder = 3:1, or garden soil : medium-coarse river sand : sawdust (mushroom residue) = 4:1:2, or one of paddy soil, pond mud, or leaf mold.
2. Watering: After potting, water once thoroughly and keep it in a lightly shaded environment for one week of care. When transplanting young seedlings, first dig the planting hole, sprinkle a layer of organic fertilizer at the bottom of the planting hole as bottom fertilizer (base fertilizer), about 4 to 6 cm thick, then cover with a layer of soil and place the seedling in, so as to separate the fertilizer from the roots and avoid burning the roots. After placing the seedling in, backfill the soil to cover the roots, press the soil firm with your foot, and water once thoroughly.
3. Pruning: During the flowering process, cut off the spent flowers together with three leaves to extend the flowering period.
4. Pinching: Before flowering, generally pinch twice to encourage more flowering branches to grow. One to two weeks after potting, or when the seedlings are 6 to 10 cm tall and have six or more leaves, pinch off the top shoots while keeping the lower 3 to 4 leaves to encourage branching. Three to five weeks after the first pinching, or when the lateral branches have grown to 6 to 8 cm long, carry out the second pinching, that is, pinch off the top shoots of the lateral branches while keeping the lower 4 leaves of the lateral branches. After two pinchings, the plant shape will be more ideal and the number of flowers will also be greater.
Cultivation management of Kenilworth ivy
1. Humidity: It prefers a relatively dry air environment. Prolonged rainy days make it susceptible to pathogen infection. It fears being rained on, and the leaves should be kept dry at night. The optimal relative air humidity is 40 to 60%.
2. Temperature: It prefers a cool climate, dislikes intense heat, and tolerates frost and cold. It is not very demanding about winter temperatures; as long as it is not exposed to frost, it can overwinter safely. It dies when temperatures rise above 30°C in late spring and early summer. The most suitable growing temperature is 15 to 25°C. Try to sow in autumn or winter to avoid high summer temperatures.
3. Light: In the three seasons of late autumn, winter, and early spring, since temperatures are not very high, give it direct sunlight to help it carry out photosynthesis and form flower buds, bloom, and set seed. In summer, if high-temperature weather occurs, it needs to be shaded from about 50% of the sunlight. If it is kept indoors for ornamental purposes after flowering, place it near a southeast-facing door or window to extend the flowering period and increase the number of flowers as much as possible.
4. Fertilizer and water: Like other herbaceous flowers, it has a relatively high demand for fertilizer and water, but it is most afraid of indiscriminate fertilization, concentrated fertilizer, and one-sided application of nitrogen, phosphorus, or potassium fertilizer. It should follow the two fertilizer (water) principles of “apply dilute fertilizer frequently, use small amounts but more often, and keep nutrition complete” and “alternate dry and wet, dry means dry thoroughly, do not water if not dry, and water thoroughly when watering”, and after fertilizing, keep the leaves and flowers dry at night:
5. Autumn: After the sown seedlings have been potted and have recovered for a period of time, fertilizer and water management should be stepped up quickly. Fertilizer and water management follows the cycle of Hyponex → Hyponex → clear water → Hyponex → Hyponex → clear water, with an interval of about 1 to 3 days.
6. Winter: Although it is still growing, the relatively low temperature will slow its growth rate, and its demand for fertilizer and water is not great; fertilizer and water may even need to be controlled. Fertilizer and water management follows the cycle of Hyponex → clear water → clear water → Hyponex → clear water → clear water, with an interval of about 4 to 7 days. Try to schedule watering at midday on sunny days when the temperature is relatively high.
7. Spring: After temperatures rise, growth recovers rapidly, and it gradually enters the flower bud differentiation stage and flowering stage, with a very high demand for fertilizer and water. Fertilizer and water management follows the cycle of Hyponex → clear water → Hyponex → clear water, with an interval of about 2 to 4 days. The interval is shorter on sunny days or during high temperatures, and longer or no watering on rainy days or during low temperatures. After entering the seed-setting stage, stop fertilizer application.