When Do Camellias Bloom? A Detailed Guide to the Blooming Period
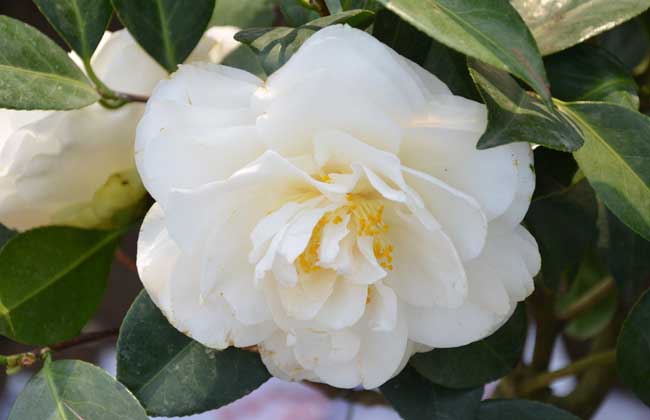
Camellia, also known as camellia flower, is a plant of the genus Camellia in the family Theaceae. It likes warm, humid environments and has a long blooming period, with flowers opening from October to May of the following year. The peak blooming period is usually from January to March. It is native to eastern China and is one of the world's precious ornamental flowers and trees. Let's take a look below at when camellias bloom!
When Do Camellias Bloom
Because camellia varieties differ, they bloom successively and continuously from late September to early May. In late autumn, deep winter, and early spring they present a scene full of vitality. Camellias produce new shoots twice a year. The first is the spring shoots, beginning in March-April, and the summer shoots emerge in July-September. Camellias have a long blooming period; most varieties bloom for 1-2 months, a single flower generally lasts 7-15 days, and the blooming period is February-March.
Care After Camellias Bloom
Camellias have bright, colorful flowers, beautiful and varied flower shapes, elegant and diverse flower postures, and a fragrant scent that delights the senses. After the blooming period, the following points should be noted in care and management:
1. Timely pruning: After the peak blooming period, remove the remaining faded flowers. At the same time, cut away overly dense overlapping branches, crossing branches, and dry, withered branches. On one hand, this prevents wasted consumption of the tree's nutrients; on the other hand, it enhances the plant's ventilation and air permeability, prevents the occurrence of pests and diseases (such as scale insects and black spot disease), and promotes robust plant growth.
2. Timely fertilizing: From bud formation to flower fading, camellias consume a large amount of nutrients. To quickly restore the tree's vigor, fertilizer must be applied to replenish them. About once a week after flowering, apply a dilute liquid fertilizer. The liquid fertilizer can be made by sealing and soaking bean cake, hoof and horn meal, fish bone meal, and black alum together; after decomposition, take the upper fermented liquid and dilute it with clean water before use. Never irrigate with concentrated fertilizer or raw fertilizer, to avoid root rot. At the same time, 0.2% monopotassium phosphate can also be used for foliar topdressing, sprayed once every ten days, for 5 consecutive applications, to promote thick, strong spring shoots and improve bud-forming ability.
3. Moderate watering: Around mid-April, camellias begin to grow their spring shoots, but at this time the climate is dry and air humidity is low, so water moderately. Spray leaf-surface water once to twice a day to increase local air humidity and benefit plant growth.
4. Timely repotting: After flowering, plants that need repotting should be repotted immediately. When repotting, it is best to use slow-release fertilizers such as hoof and horn meal and hair as base fertilizer. After repotting, water once thoroughly and place in a humid, cool place. After 20 days, normal management can be carried out.
How to Grow Camellias
1. Selection of potting soil and pots: According to the growth characteristics of camellias, it is best to choose a slightly acidic, loose, fertile, well-draining mixed soil as potting soil. Special attention should be paid to good drainage, and calcareous soil must be avoided. The ratio of the mixed soil is: 6 parts red soil, 3 parts orchid mud (leaf mold), 1-2 parts fine sandy soil. The pot size should be moderate, neither too large nor too small. Generally, the ratio of pot to seedling is: a camellia 40-50 cm tall with a crown width of 20-25 cm is best planted in a purple clay pot or clay pot with a diameter of about 20 cm. Other sizes follow the same principle.
2. Potting time: The potting time is November in winter and February-March in early spring. At this time the flower buds are plump and the flowers are in full bloom, making it the most suitable time for potting. If potting must be done when the flowers are fading and new roots are still sprouting, special care must be taken not to damage the root system. Generally, potting is stopped around the budding period, because at this time new shoots are about to grow and leaves are unfolding, requiring a large amount of water; if potting is carried out, the new roots will be injured, easily affecting that year's growth and development. Potting is also taboo in high temperatures and severe winter, to avoid causing plant shrinkage and death.
3. Potting method: First place 3-4 pieces of broken tile over the drainage hole at the bottom of the selected flower pot, then fill in some coarse soil, plant the seedling in the pot, fill fine soil around the roots, then slowly fill the larger particles of potting soil around the inside of the pot, gently shake the pot, and press with your hands so that the potting soil fits closely against the roots. For large pots, use a bamboo stick to gently press the potting soil down, being careful not to damage the roots. The potting soil should account for 4/5 of the pot height to allow for watering.
4. Watering method: For newly potted seedlings, the first watering must be thorough, until water comes out of the bottom of the pot. Keep newly potted seedlings moist; after 2 months they can be watered like other potted seedlings. The number of waterings depends on climatic conditions, following the principle of keeping the soil moist. Generally, more watering can be done in spring to meet the needs of sprouting and shoot growth. In summer, watering should be done in the morning and evening; during the plum rain period, guard against water accumulation; in autumn drought, water in time; in winter, watering should be done at noon to prevent the potting soil from freezing, as dry soil freezes even more severely.
5. Fertilizing method: Camellias do not particularly like fertilizer, so there is no need to apply too much. Generally, fertilize 2-4 times before flowering in October-November and after flowering around April-May. Generally use a mixed fertilizer (human manure and urine, cake fertilizer, barnyard manure, phosphate fertilizer), preferably mainly phosphate fertilizer with nitrogen fertilizer as a supplement, to prevent excessive shoot growth and reduced flowering. All fertilizers must be fully decomposed before use, but rapeseed cake and fish meal can be used without decomposition, directly scattered on the soil surface, covered with a thin layer of soil, and left to slowly decompose and seep into the soil for the roots to absorb. The amount of fertilizer applied should follow the principle of more for strong seedlings and less or none for weak seedlings. For seedlings that are too weak to grow, replacing the potting soil instead of fertilizing also works very well.
6. Shading and cold protection methods: Camellias like a warm, humid climate, and both excessive cold and excessive heat are unfavorable to growth and development. In spring and the plum rain period, potted camellias should be given plenty of sunlight; otherwise the branches will develop thinly and weakly, easily causing sooty mold and scale insect damage, or moss growing on the trunk, leading to withered branches, aging, or death. In the high-temperature seasons of summer and autumn, shade and cool them in time. When the winter temperature drops below zero, it will cause flower buds to fall or flower centers to freeze, affecting flowering quality. Therefore, the indoor overwintering temperature for potted seedlings is best kept at around 3-4°C. If the temperature exceeds 16°C, it will promote early sprouting and, in severe cases, cause leaf drop and bud drop.
7. Pest and disease control: The main pests of camellias are stem borers and scale insects. The main diseases are anthracnose and sooty mold on the leaves and moss parasitism on the branches and trunk. Promptly prune the affected branches and spray pesticides for control.