Cape Marigold Planting Techniques and Cultivation Management Methods
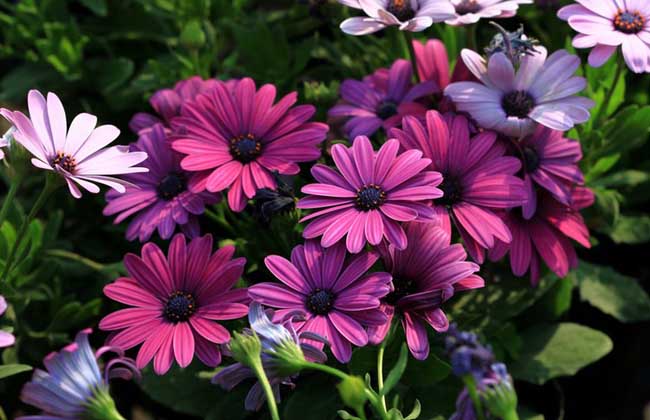
The Cape Marigold is a perennial herbaceous flowering plant of the Asteraceae family, native to South Africa. In recent years it has been introduced to China from abroad and cultivated as an annual or biennial herbaceous flower. Whether used as a potted plant for desktop display or for early spring landscaping, it is a rare and valuable floral material. Let us take a look at the planting techniques for the Cape Marigold!
Growth Habits of the Cape Marigold
The Cape Marigold prefers sunlight and has moderate cold tolerance, able to withstand low temperatures of -3°C to -5°C. It is drought-tolerant and prefers loose, fertile sandy loam. It performs even better in moist, well-ventilated environments. It has strong branching ability and does not require pinching. It blooms early and has a long flowering period. Low temperatures favor flower bud formation and blooming, and it can grow year-round in regions with mild climates.
Cuttage Propagation of the Cape Marigold
1. Cutting method: When propagating by cuttings, the cuttings must be planted in a rooting bed within 12 to 24 hours after being taken. If time does not allow, they must be temporarily stored at a temperature of 7°C to 10°C. A higher substrate temperature (20°C to 23°C) is beneficial for rooting of the cuttings. After rooting, the temperature can be lowered. Additionally, dipping in rooting hormone can stimulate earlier rooting and improve rooting uniformity.
2. Cutting management: In the early stage of cutting (within 3 to 5 days), the misting system needs to be kept running for extended periods. Take care to prevent unrooted cuttings from wilting, and reduce the frequency of misting at night. After rooting, fertilizer at a concentration of 75ppm to 100ppm can be applied, gradually increasing the fertilizer concentration to 150ppm as the root system grows. At the same time, keep the substrate moderately moist and avoid over-saturation. This not only prevents leaf yellowing caused by iron deficiency but also reduces the occurrence of diseases.
Planting Techniques of the Cape Marigold
1. Sowing method
[Time] November to January.
[Plug tray] According to the production purpose, choose 72, 128, or 200-cell plug trays.
[Method] Spot sowing, one seed per cell.
[Substrate] Mix peat moss : vermiculite = 3 : 1 by ratio, pH value 6.2-6.5. Too low a pH will lead to poisoning by certain metal elements (such as iron, sodium, etc.). Water the plug tray thoroughly the day before sowing and set aside.
[Covering material] Use medium-grade vermiculite to cover the seeds, which facilitates aeration and drainage. After sowing, to ensure the temperature and humidity needed for germination, plastic film can be used to cover the plug tray.
2. Germination stage, phase 1: From sowing to emergence of cotyledons, about 6-8 days. At this point, the plastic film can be removed.
[Substrate] Substrate moisture content 80%±5%.
[Humidity] 70%-80%.
[Temperature] 20°C-25°C.
3. Germination stage, phase 2: From cotyledon emergence to full development of cotyledons, completing the germination process.
[Temperature] Lower the temperature to 18°C-25°C.
[Substrate] Keep moist (moisture content about 80%). If necessary, mist water onto the seedling tray.
[Fertilizer] Apply 50-75ppm (EC value 0.8) of nitrogen, phosphorus, and potassium compound fertilizer.
[Light] No more than 25000lux. Supplemental lighting can promote earlier flowering of the plants.
4. Germination stage, phase 3: From the appearance of the first true leaf to the plug seedlings reaching standard specifications (more than 4 true leaves, root system filling the cells).
[Temperature] 18°C-20°C.
[Water] Moderate moisture content, avoiding the substrate being too dry or too wet.
[Fertilizer] Apply 150ppm nitrogen-phosphorus-potassium compound fertilizer (EC value 1.0-1.2) once every 3-4 days. Ammonium nitrogen fertilizer benefits the growth of above-ground stems and leaves, while nitrate nitrogen fertilizer benefits root development.
[Light] Same as phase 2.
[Control] Under normal circumstances, Cape Marigold plants grow relatively robustly and rarely become leggy. To prevent certain varieties from growing too tall, B9 or PP333 can be used for height control at the end of phase 3.
5. Germination stage, phase 4: The transitional growth stage between the end of plug seedling cultivation and potting or sale of plug seedlings.
[Temperature] Lower the growing temperature to 17°C-18°C. From the beginning of this phase until flowering, the plants must experience a low-temperature period of 5°C-8°C at night, which is beneficial for smooth flower bud differentiation and blooming.
[Water and fertilizer] Control water and excessive ammonium nitrogen fertilizer to avoid leggy growth. Keep the substrate on the dry side, strengthen ventilation and lighting, and enhance plant resistance.
6. Management after potting: Generally, the plug seedling period for Cape Marigold is 10-12 weeks. After the plug seedling period ends, they should be potted promptly, otherwise the flowering period will be advanced.
[Substrate] Mix peat moss : vermiculite : garden soil = 1 : 1 : 1 by ratio, pH value 6.2-6.5.
[Temperature] 18°C-23°C during the day, 10°C-18°C at night. Too high a temperature will make the flowers smaller, and too low a temperature may cause leaf yellowing in certain varieties.
[Water] Keep the substrate moisture alternating between dry and wet, but do not let the substrate become too dry or too wet. Excessive moisture will lead to leggy growth or trigger diseases.
[Fertilizer] Apply 150-200ppm nitrogen-phosphorus-potassium compound fertilizer (EC 1.2-1.4).
7. Pests, diseases, and their control
[Pests] Cape Marigold has simple cultivation management and few pests and diseases. The common pest is aphids, which can be controlled by spraying the plants with 80% dichlorvos emulsifiable concentrate at 800-1000 times dilution or Yibianjing at 1000 times dilution.
[Diseases] Common diseases: The first is root rot, mostly caused by overwatering. It can be prevented by appropriately controlling water and keeping the substrate slightly moist to on the dry side. Once root damage is found, repot promptly and replace the substrate. The second is leaf yellowing. The causes and control measures for leaf yellowing are as follows: ① Yellowing mainly affects young leaves and often presents with spots. The cause is too low a substrate pH value, resulting in iron toxicity. This can be adjusted by watering with an appropriate concentration of lime water to adjust the substrate pH value. ② Too low a temperature during the seedling stage; the night temperature can be appropriately raised. ③ Insufficient nitrogen fertilizer application; the amount of nitrogen fertilizer can be appropriately increased.