Key Cultivation Techniques and Management Methods for the Flying Saucer Gourd
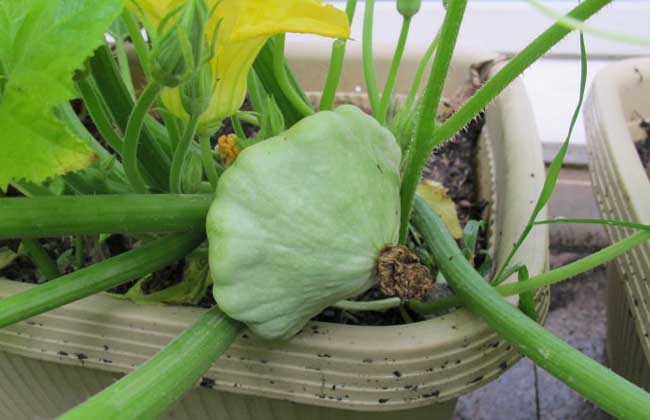
The flying saucer gourd is a rare garden plant grown both for fresh eating and ornamental use, also known as the dish gourd, saucer-shaped gourd, toothed-edge gourd, flat-round zucchini and so on. It is a variety of Cucurbita pepo in the Cucurbitaceae family, native to the Americas, and its fruit can be both enjoyed ornamentally and eaten. Its cultivation history in China is very short, having been introduced from Russia, South Korea, the United States and other places. Let's take a look at flying saucer gourd cultivation techniques below!
Flying Saucer Gourd Growth Habits
The flying saucer gourd prefers a warm environment, with a suitable growing temperature of 13-28°C. If the temperature is too high, the fruit easily fails to set, and if the temperature is below 10°C, growth stagnates and the fruit does not swell. It likes light but can tolerate a certain degree of weak light, so it is suitable for both open-field cultivation and protected cultivation. It likes moisture and is not drought-tolerant. Because its leaves are large and transpiration is strong, special attention must be paid to water management in cultivation. The air humidity should be maintained at 70-80%; excessive humidity easily leads to powdery mildew. It likes fertilizer, and sandy loam or loam is best for cultivation, with a suitable soil pH of 6.5-7.0.
Flying Saucer Gourd Seedling Raising Techniques
1. Sprouting and sowing: The flying saucer gourd is raised using paper tubes or nutrient pots. Select plump seeds free of pest damage and soak them at 28-30°C for 8-10 hours, then sprout them at 25-28°C. During sprouting, keep the sprouting bag moist and change the water 1-2 times a day. When more than 50% of the seeds have sprouted, sow them in a pre-prepared sowing tray, with a bottom layer at least 5 cm thick.
2. Mulching with plastic film: After sowing the flying saucer gourd, cover with plastic film or a small arch shed to keep warm and moist. It is best to maintain soil temperature above 25°C, which helps the seedlings emerge. After the seedlings emerge, remove the cover and lower the temperature appropriately to prevent leggy growth. After the cotyledons have flattened out, transplant the seedlings into seedling pots (10*10 cm).
3. Seedling stage management: During the seedling stage, the flying saucer gourd should receive sufficient light, maintaining about 10 hours of light per day, which is beneficial for female flower differentiation. Use alternating temperature management: on sunny days keep it at 23-28°C during the day and lower it to 12-15°C at night; on cloudy days keep it at 20-25°C during the day and lower it to 10-12°C at night, with a day-night temperature difference of 10-15°C. Harden the seedlings 5-7 days before planting out.
Flying Saucer Gourd Cultivation Techniques
1. Land preparation and planting out: After the frost period, plant out when the minimum temperature steadily exceeds 10°C. Use flat beds or ridges. For flat beds, the bed spacing is 40-50 cm, bed width 120 cm, plant spacing 80-100 cm, with 2 rows per bed. For ridges, the ridge spacing is 70 cm and plant spacing 100 cm. The plant and row spacing can be specifically determined according to the variety's characteristics. Prepare the land before planting, applying 4000-5000 kg of decomposed organic fertilizer per mu, 30 kg of diammonium phosphate, and 50-100 kg of superphosphate.
2. Fertilizer and water management: After planting out and recovery, water once together with topdressing to promote vine growth. During the flowering and fruiting period, increase the water supply. During the continuous strong-light and high-temperature period of midsummer, water twice a day if necessary. Topdress 3 times during the growing period: after recovery, at full bloom, and at full fruit set. Avoid weed overgrowth; before flowering, hoe and loosen the soil 2-3 times, and cultivate and weed to promote root development.
3. Tying vines and disease prevention: The flying saucer gourd should be tied to supports in a timely manner, and old and diseased leaves removed. Hand pollination can be done from 6-9 am to help fruit set. At the same time, pay attention to pest and disease control. A 2000-3000 times dilution of 20% fenvalerate emulsifiable concentrate can be sprayed on the leaves to control aphids, a 2000 times dilution of 25% buprofezin wettable powder to control whiteflies, and a 2000-2500 times dilution of 25% triadimefon wettable powder to control powdery mildew.
Flying Saucer Gourd Container Cultivation Techniques
1. Seedling raising and planting: For container cultivation of the flying saucer gourd, plant out once the plant has 1-2 true leaves. The planting pot should be a large pot with a top diameter of 40-50 cm, filled with nutrient soil. The nutrient soil formula is: field soil : decomposed livestock and poultry manure : sawdust (or decomposed horse manure) = 7:2:1. Plant 1 flying saucer gourd per pot, set up 1 support stake 1 m tall and 2-3 cm thick, and water thoroughly after planting.
2. Growing management: During the growing period, keep the soil moist. Because the flying saucer gourd is a light-loving plant, place the pot in a well-ventilated spot with ample light. For dwarf types, keep 2-3 fruits per plant; for vining types, keep 3-5 fruits per plant. Keep the soil moist, and tie the vines once for every 20 cm the plant extends. During the growing period, mainly prevent aphids and powdery mildew. Pick the gourds after they are fully ripe.