Detailed Explanation of Key Techniques for Soil-free Cultivation of Garlic Chives (Blanched Garlic Sprouts)
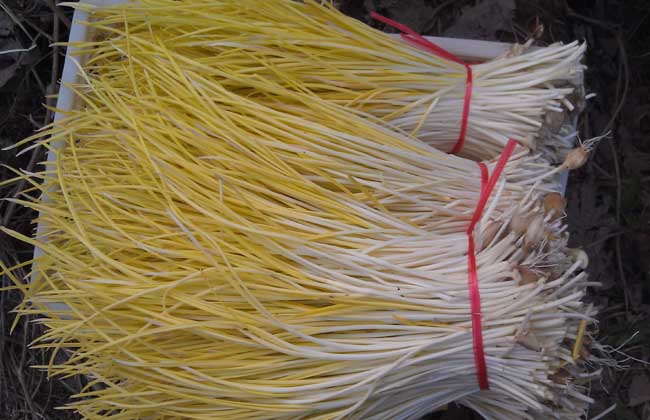
Garlic chives (blanched garlic sprouts) are a green, pollution-free vegetable produced by forcing garlic bulbs to grow under dark conditions for etiolation. They have a bright color, a rich aroma, a tender and delicious taste, and are rich in nutrients. They have a strong bactericidal effect and excellent therapeutic and health-promoting benefits, making them a popular appetizer and health vegetable. Growing garlic chives not only adds a delicious dish to people's tables but also opens up a path to prosperity for farmers.
Construction of Garlic Chive Cultivation Facilities
1. Site selection for the cultivation bed: The requirements for selecting the site of a garlic chive cultivation bed are as follows. First, choose a place with convenient water sources to provide a guarantee for garlic chive production. Second, choose a place with convenient transportation; garlic chive production requires the transport of raw materials and products, and only a place with convenient transportation can ensure smooth transport. Third, forest gaps and courtyards can all be used to grow garlic chives, with no need to occupy cultivated land.
2. Construction of the cultivation bed: The size of the cultivation bed can be determined according to actual conditions. If the site area is large, several beds can be built, which not only facilitates operation but also allows sowing in separate batches and harvesting in stages to meet market demand. Under normal circumstances, the bed is 10 m long and 2 m wide, and it is usually preferable to build two beds together. Use bricks to build the middle wall to a height of about 80 cm and the surrounding walls to a height of about 60 cm, then use cement to seal the gaps in the walls to prevent air leakage. Water inlets and outlets must be left at both ends of the bed, and the bed bottom must have a certain slope (that is, the water inlet end should be about 1° higher than the water outlet end) to facilitate the discharge of excess water from the bed and avoid rotting of the garlic seed.
3. Laying of plastic film: After the cultivation bed is completed, stretch 3 steel wires lengthwise along the bed at equal intervals and fix them securely to support the covering on top of the bed. Before sowing the garlic seed, lay a relatively thick layer of plastic film on the bottom of the bed. The film should be slightly wider and longer than the bed bottom. Use nails to fix the edges of the film to the surrounding walls so that it does not leak water and becomes a hydroponic cultivation bed inside the pool. The garlic seed is planted directly on the plastic film, which is both clean and convenient.
4. Construction of supporting facilities: Garlic chives require a relatively large amount of water, so a well must be drilled for irrigation. Well depth varies by region, and under normal circumstances the depth reaches more than 15 m. After the well is completed, install an electric water pump on it, connect the water supply pipeline, and connect the power supply to supply water to the garlic chive cultivation bed.
Sowing Techniques for Garlic Chive Cultivation
1. Selection of garlic seed: The growth of garlic chives depends entirely on the nutrients stored in the garlic cloves, so the yield of garlic chives is directly related to the quality of the garlic seed. Choose garlic bulbs that are robust, plump, free of pests and diseases, and free of mechanical damage. Generally, white-skinned garlic and red-skinned garlic with about 10 cloves per bulb can both be used as garlic seed.
2. Sowing time: Garlic chives have a wide adaptability to temperature and can grow under conditions of 10-30°C. Except during severe winter and the dog days of summer, they can be produced in early spring, early summer, autumn, and early winter. May each year is the garlic bulb harvest period. This coincides with the high-temperature summer period, when temperatures are often above 25°C and the garlic bulbs are in a dormant state. If they are sown directly after harvest without treatment, they will not sprout and grow. Therefore, if garlic seed is sown before September, its dormancy must first be broken to allow normal sprouting. The specific method is to store the garlic seed in a dark environment at 0-5°C for 1 month before sowing.
3. Soaking the garlic seed: On the day before sowing, soak the garlic packed in woven bags in a 20000-fold gibberellin solution for 3-4 hours. Although the soaking step is simple to perform, it is indispensable. Otherwise, when watered after sowing, the garlic seed will absorb water and swell, squeezing into clumps on the cultivation bed, which is detrimental to the sprouting and growth of garlic chives.
4. Sowing technique: Sowing is also called arranging the garlic, which means planting the soaked garlic seed on the plastic film inside the bed. Starting from the water inlet end of the bed, place the garlic seed directly, arranging it by hand with the heads facing up and the root discs facing down, tightly packed head to head, and some loose garlic can be placed in the gaps. The entire bed surface must be fully covered, and then press it even by hand. Generally, 15-19 kg of garlic seed is needed per sq m.
Management Techniques for Garlic Chive Cultivation
1. Preventing lodging: Lay a large-mesh net flat inside the bed at 30-35 cm from the bed bottom and fix it securely around the bed to ensure that the garlic chives grow upright. At the same time, insulation for garlic chives is very important. Place 4-6 bamboo poles at equal intervals below the steel wires above the bed, spread black plastic sheeting flat on the steel wires, and fix it firmly around the edges. Lay a layer of straw matting on the plastic sheeting to provide insulation and shade. To ensure that the straw matting does not get wet from rain or snow, lay another layer of plastic sheeting above the straw matting, fix it around the edges, and press it down with heavy objects on top to prevent it from being blown off by the wind. In this way, the temperature inside the garlic chive bed is guaranteed, laying the foundation for the normal growth of garlic chives.
2. Timely watering: Watering should follow the principle of using a small amount of water in the early stage and a large amount in the later stage. The reason is that in the early stage the garlic roots grow slowly, and if too much water is applied, the garlic bulbs will float up and some will squeeze into a pile, causing garlic rot due to lack of oxygen. In the middle and later stages, the garlic roots grow densely and spread like a felt mat, and garlic chives grow more vigorously at this time and need more water and heat. Therefore, the number of waterings should be slightly more than in the early stage, and the amount of water each time should be slightly larger. Generally, for the first 10 days, water 1-2 times per day; for each 20 sq m cultivation bed, each watering should not exceed 5 minutes and the water volume should not exceed 0.5 cubic meters. After 10 days, each watering can reach 7-8 minutes, with a water volume of about 0.7 cubic meters, and watering can reach 2-3 times per day. According to the market conditions for garlic chives, the time to market can be artificially controlled through the number of waterings. To bring them to market earlier, water 1-2 more times per day in the middle and late stages of garlic chive growth; to delay marketing, water 1 less time per day.
3. Regulating temperature and humidity: To promote early sprouting of garlic buds, the temperature should be raised in the initial period after planting garlic, with the average daily temperature controlled at 25-27°C. After sprouting, as the garlic chives grow, the room temperature should gradually be lowered to 18-22°C. Reduce the temperature 5-6 days before harvest, to 18-20°C during the day and 13-15°C at night. If the temperature is too high, garlic chives grow quickly, and the plants become thin and weak and prone to lodging, thereby reducing their yield and quality. Temperature regulation is mainly achieved through ventilation and the uncovering and covering of the straw matting. After planting the garlic, maintain the indoor air humidity at 85-90%. In the middle and late stages of growth, the garlic leaves grow densely, so humidity should be reduced to prevent rotting of the plant clumps. Before harvest, to reduce water loss and wilting of the product, indoor humidity should be maintained at 75-80%.
4. Timely harvest: Generally, after 20-25 days, when the garlic chives have grown to 35-45 cm, they can be cut. When harvesting, use a sickle to cut close above the garlic cloves. After harvesting, use a small iron rake to remove the excess garlic cloves at the base of the garlic chives, and tie them with plastic strips so that the bottom is neat and the upper part stands upright and golden yellow. The bundled garlic chives can be rinsed with clean water to lower the temperature, because garlic chives grow at a relatively high temperature and will easily rot if placed directly outdoors after harvesting. After rinsing, the garlic chives should also be covered well with plastic sheeting to avoid exposure to strong light. After harvesting, the cultivation bed should be watered thoroughly once, and every 7 days spray once with 0.1% potassium dihydrogen phosphate or 0.2-0.3% urea solution, which can increase yield. After an interval of 15-20 days, they can be harvested again. Generally, after 2 harvests of cultivated garlic chives, the residual garlic bulbs in the bed can be cleared away, and after disinfection, the second sowing can be carried out.