Detailed Explanation of Key Techniques for Greenhouse Cucumber Cultivation
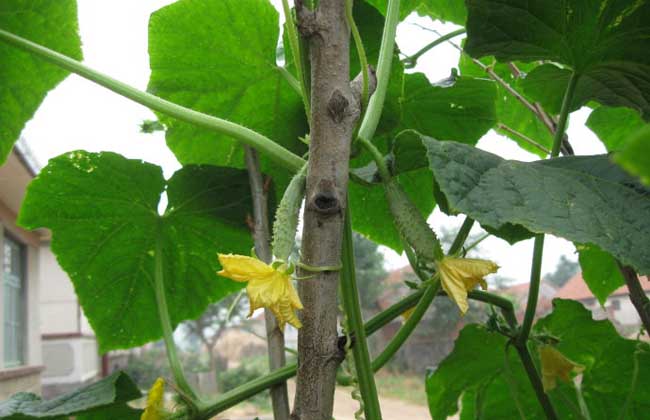
Cucumber, also known as huanggua, cigua, wanggua, qinggua, etc., is an annual trailing or climbing herbaceous plant of the Cucumis genus in the Cucurbitaceae family. It was first brought back to the Central Plains by Zhang Qian on his mission to the Western Regions during the Western Han Dynasty. It is now widely cultivated in temperate and tropical regions, and is commonly grown throughout China, with many areas using greenhouses or plastic tunnels for cultivation. Let us take a look at greenhouse cucumber cultivation techniques below!
Growth Habits of Cucumber
1. Temperature: Cucumber prefers warmth and is not cold-tolerant. The suitable temperature for growth is 10-32°C. Generally, growth is best at 25-32°C during the day and 15-18°C at night. The most suitable soil temperature is 20-25°C, with a minimum of around 15°C. The optimal day-night temperature difference is 10-15°C. At high temperatures of 35°C, photosynthesis is impaired; at 45°C, high-temperature damage occurs; at low temperatures of -2 to 0°C, the plants freeze to death. If cold-hardening of seedlings is carried out, they can withstand temperatures as low as 3°C.
2. Light: South China-type varieties are more sensitive to short-day conditions, while North China-type varieties have less strict requirements for day length and have become day-neutral plants. Their light saturation point is 55,000 lux, and their light compensation point is 1,500 lux. Most varieties grow well under short-day conditions of 8-11 hours.
3. Water: Cucumber has high yields and high water requirements. The suitable soil moisture is 60-90%. During the seedling stage, water should not be excessive, with soil moisture at 60-70%. During the fruiting stage, sufficient water must be supplied, with soil moisture at 80-90%. The suitable relative air humidity for cucumber is 60-90%. If the relative air humidity is too high, diseases are easily triggered, causing reduced yields.
4. Soil: Cucumber prefers moisture but is not waterlogging-tolerant; it likes fertilizer but is not fertilizer-tolerant. Fertile soil rich in organic matter should be selected. It generally prefers soil with a pH between 5.5-7.2, but pH 6.5 is best.
Sowing Methods for Cucumber
1. Variety Selection: For cucumber cultivation, excellent varieties should be selected that are tolerant of low temperatures in the early stage, tolerant of high temperatures in the later stage, and have strong disease resistance, such as Jinyou No. 10, Bonai No. 3, etc.
2. Seed Treatment: 1-3 days before sowing, sun-dry the seeds. After sun-drying, soak the seeds in warm water at 55°C for 10-15 minutes, stirring continuously until the water temperature drops to 30-35°C. Rub and wash the seeds repeatedly, rinse off the mucus with clean water, and soak for 3-4 hours. Wrap the soaked seeds in a clean damp cloth and place them under conditions of 28-32°C for 1-2 days to promote germination. Sow when 70% of the seeds have “broken white” (radicles emerging).
3. Soil Preparation: For cucumber nutrient soil, garden soil or field soil that has not grown cucurbit vegetables in the past 3-5 years should be mixed with high-quality decomposed organic fertilizer, with organic fertilizer accounting for 30%. Mix the soil and organic fertilizer thoroughly and sieve. To the sieved nutrient soil, add 100 grams of carbendazim per 1 cubic meter of soil and mix well to prepare medicated soil.
4. Timely Sowing: The sowing period for cucumber is mid-January or late January. Seedlings can be raised in heated greenhouses or energy-saving solar greenhouses. Use nutrient pots with a diameter of 10 cm and a height of 10 cm, filled with 8 cm of nutrient soil. Water thoroughly. After the water drains, sow 1 germinated seed in each nutrient pot, cover with 1 cm of medicated soil, and lay plastic film flat on top to help preserve moisture.
Seedling Stage Management of Cucumber
1. Plastic Film Mulching: After sowing cucumber, seal with plastic film for 2-3 days. When 2/3 of the seeds have their cotyledons emerge from the soil, remove the film promptly. Water as little as possible during the seedling stage to prevent high temperature and high humidity from causing leggy seedlings. Remove straw mats promptly to increase light exposure.
2. Temperature Management: Generally, daytime temperatures should be controlled at 25-30°C, not too high. Night temperatures must be kept below 15°C, preferably 12-13°C. 7-10 days before transplanting, carry out hardening of seedlings: remove and cover greenhouse straw mats early and late respectively, reduce watering, increase ventilation volume and duration, maintain 20-25°C during the day and 8-10°C at night, and provide 1-2 short periods of 5°C exposure.
3. Standards for Strong Seedlings: Seedling age of about 35 days, plant height of 15-20 cm, 3 leaves and 1 heart leaf, intact cotyledons, short and thick internodes, dark green and thick leaves, well-developed root system, healthy and disease-free.
Transplanting Techniques for Cucumber
1. Land Preparation and Fertilization: Fertilization should be mainly organic fertilizer, supplemented by chemical fertilizer. The fertilization method should be mainly base fertilizer, supplemented by topdressing. Based on the nutritional characteristics of vegetable growth and development, fertilizer requirements, soil nutrient content, and target yield, use an expert fertilization system to determine the fertilizer application rate for vegetables, carry out balanced fertilization, and ensure nutrient balance in the soil. For vegetable plots with medium fertility, generally apply 5,000 kg of high-quality decomposed organic fertilizer, 20 kg of urea, 75 kg of superphosphate, and 30 kg of potassium sulfate per mu. After broadcasting the base fertilizer, deep plow 30-40 cm, mix soil and fertilizer evenly, rake level, and make beds 1.2 m wide. Within each bed, form two high ridges of 10-15 cm, with a ridge spacing of 50 cm.
2. Four-Film Coverage: In early spring greenhouses, use “four-film coverage,” i.e., one layer of greenhouse film, two layers of sky-screen film, and one layer of small arch film over the seedlings. Cover the greenhouse film 20 days before transplanting to raise soil temperature. Transplant when the 10 cm soil temperature in the greenhouse has stably passed 12°C for 3 consecutive days. Hang 2 layers of sky screens 5-7 days before transplanting, with a spacing of 20-30 cm. It is best to use polyethylene anti-drip film with a thickness of 0.012 mm.
3. Timely Transplanting: One day before transplanting, spray a fungicide on the seedbed, such as 50% carbendazim 500x solution, or 77% Kocide 700x solution, or 75% chlorothalonil 1000x solution. Transplanting should be done on a sunny morning. Open furrows on the ridges and water; when the water seeps to half the furrow, place seedlings at a spacing of about 32 cm. After the water seeps in, cover the furrow with soil. This method is called “water-stabilized seedlings.” Transplant about 3,500 plants per mu. After transplanting, cover the bed with a small arch film.
Field Management of Cucumber
1. Temperature Management: Just after transplanting, the soil temperature is relatively low, so the greenhouse should be immediately closed up. Even if the temperature briefly exceeds 35°C, do not ventilate, in order to raise soil temperature as quickly as possible and promote seedling recovery. During the seedling recovery period, if there is no excessively high temperature, no ventilation is needed. Open the small arch film promptly in the morning to raise soil temperature as quickly as possible. After seedling recovery, ventilate timely according to weather conditions. Ensure that the time at 21-28°C is more than 8 hours, and maintain the minimum night temperature at around 12°C. As the outside temperature rises, gradually increase the ventilation opening. When the outside temperature stabilizes above 12°C, ventilate day and night. The best greenhouse temperature is 25-30°C in the morning and 20-25°C in the afternoon.
2. Cultivation and Loosening Soil: After seedling recovery, carry out 3-4 times of cultivation and soil loosening, from near to far, from shallow to deep. Combine cultivation with hilling soil around the cucumber seedlings, ultimately forming small high-ridge cultivation.
3. Reasonable Watering: After transplanting cucumber, water once to help seedling recovery, and thereafter water only when the soil is dry. When cucumber grows to 12 leaves and about 60% of the vines have small cucumbers about 12 cm long, water the second time. After entering the fruiting stage, water requirements increase. Adjust the watering interval based on growth conditions, weather, and other factors. In the early growth period, water once every 7-10 days; in the middle period, once every 5-7 days; in the later period, once every 3-5 days. Watering in the early period is best done on sunny mornings.
4. Timely Topdressing: After cucumber enters the fruiting stage, carry out topdressing in combination with watering, generally applying fertilizer with every other watering. Each time, apply 3 kg of urea and 5 kg of potassium sulfate per mu, or 10 kg of high-nitrogen-potassium water-soluble fertilizer.
5. Humidity Control: The relative humidity in the greenhouse for cucumber should be controlled below 85%. Try to prevent dew formation and dripping on leaves. It is best to use long-life anti-drip fog-reducing greenhouse film. After watering on a sunny morning, first close the greenhouse to raise the temperature to 33°C, then slowly open the ventilation opening to release moisture. When the temperature drops to 25°C, close the ventilation opening. Repeat this 2-3 times a day for 2-3 consecutive days to reduce air humidity in the greenhouse.
6. Plant Adjustment: When the plant grows to 7-8 leaves and a height of about 25 cm, remove the small arch film and begin hanging strings. Side vines below the first cucumber should be removed early, and vines before the cucumber should be pinched after 2 leaves. When the main vine grows to 25 leaves, pinch the growing tip to encourage the formation of secondary fruits. The root cucumber should be harvested promptly to prevent vine decline.
7. Removal of Arch Film: The small arch film is generally removed 15-20 days after transplanting, when string hanging begins. As the outside temperature rises, gradually remove the sky screens to increase light transmission. Generally, remove the lower layer of sky screens in mid-March, and remove the second layer of sky screens at the end of March or early April.
Pest and Disease Control of Cucumber
1. Downy Mildew
[Symptoms] Downy mildew is a fungal disease. The affected area is the middle and upper leaves of cucumber. When observing in the field, the following points should be noted: around 8 AM each day, check whether there are water-soaked, angular lesions on the underside of leaves, and whether there is a gray mold layer on the lesions. If all three points are present, it can be diagnosed as downy mildew.
[Chemical Control] Options include Anke, Previcur, Mieke, cymoxanil mancozeb, Yikuaijing, Jialeiduomier, and Amistar. In addition, when controlling downy mildew, attention should be paid to the simultaneous occurrence of bacterial angular leaf spot. A chemical for controlling bacterial angular leaf spot can be added to the downy mildew control agent.
2. Gray Mold
[Symptoms] It can damage cucumbers, leaves, and stems. When damaging cucumber fruits, it often first infects withered flowers, causing the flowers to rot. After growing a light gray-brown mold layer, it further infects young cucumbers. The affected small cucumbers rapidly soften, shrink, and rot, with dense gray-white mold on them. Leaf lesions are mostly circular, nearly circular, to irregular, 20-50 mm in diameter, with distinct edges and a light reddish-brown surface, bearing a small amount of gray mold. Stem damage causes local rotting; in severe cases, the diseased stem breaks, and the entire plant dies.
[Chemical Control] In protected cultivation, at the early stage of disease, use 10% procymidone smoke agent or 45% chlorothalonil smoke agent, 250 grams per mu each time, fumigating for 3-4 hours. Alternatively, use 50% iprodione wettable powder 1500x solution, or 2.5% Taisuo wettable powder 600x solution, or 50% Limeikang 500x solution, or 25% Amistar suspension concentrate 1500x solution. Apply once every 6-7 days, for 3-4 consecutive treatments. The spray must reach the flowers and young cucumbers. When treating flowers at the beginning of the flowering stage, adding 0.1% of 50% procymidone wettable powder or 25% Taisuo wettable powder 200-300x solution for flower dipping or flower spraying has a clear effect.
3. Powdery Mildew
[Symptoms] Small circular powdery mildew spots first appear on the upper or lower surface of lower leaves, gradually expanding, becoming thick and dense, and soon merging into patches. In the late stage of disease, the entire leaf is covered with white powder, which later turns gray-white, and finally the leaf becomes yellow-brown and withered. Similar lesions also appear on stems and petioles, densely covered with white powdery mold spots. In autumn, sometimes yellow-brown small granules form on the lesions, later turning black. This disease is characterized by the entire leaf being covered with white powder, and in the early stage of disease, the epidermis below the mold layer remains green, making it easy to distinguish from other leaf diseases.
[Control Methods] Powdery mildew fungi are particularly sensitive to “sulfur.” Before transplanting, use 1.8 kg of sulfur powder per mu plus sawdust or other combustion aids, ignite and fumigate, keeping the greenhouse sealed for one day and night to kill powdery mildew fungi. Fumigate again after 3 days, then sow or transplant. During cucumber growth, sulfur powder can be reduced by half, with fumigation time reduced to one night, and fumigate again after 5-7 days for good results. When center diseased plants appear in the field, spray promptly for control. Options include 20% triadimefon wettable powder 1000x solution, or 75% Daconil wettable powder 500-600x solution, or 10% Shigao 2500x solution, or 2% Jiasoumi 400x solution, etc. Spray once every 5-7 days, and alternate the pesticides. When spraying, do not neglect spraying the ground.
4. Viral Disease
[Symptoms] Cucumber viral disease mainly damages leaves and cucumbers. It can occur at both the seedling stage and the adult plant stage. At the seedling stage, cotyledons turn yellow and wither, and young leaves show a mosaic pattern of dark green and light green alternating. At the adult plant stage, affected plants are stunted, with short and thick internodes, and leaves noticeably wrinkled and thickened. New leaves show yellow-green mosaic patterns, and severely affected leaves curl backward. Old leaves at the lower part of diseased plants gradually turn yellow and wither. Affected cucumber fruits stop growing, with light and dark green mottled patterns on the surface. In severe cases, the fruit surface becomes uneven or deformed. Severely affected plants have shortened internodes, clustered small leaves, bear no fruit, and eventually shrink and die.
[Control Methods] During seedling raising, use shade netting to lower temperature and block light, and keep away from diseased crops. After transplanting, immediately spray and drench the roots with “Tianda 2116” 1000x solution + Tianda Yufeng 1000x solution to promote seedling growth and prevent disease. At the early stage of disease, spray with 20% Dukexing 500x solution or 20% Bingdu A 500x solution, once every 7 days.
5. Bacterial Angular Leaf Spot
[Symptoms] At the seedling stage, circular or oval water-soaked lesions appear on cotyledons, slightly sunken, later turning brown and withered. At the adult plant stage, needle-head-sized water-soaked spots first appear on leaves. The lesions expand and are limited by leaf veins, forming angular, yellow-brown spots. When humidity is high, milky white mucus is produced on the lesions on the underside of leaves, which dries to form a white film or white powdery substance. In the late stage, the lesions are brittle and easily perforated. Lesions on stems, petioles, and young cucumber fruits are water-soaked, nearly circular to oval, later turning light gray. The lesions often crack. When moist, bacterial pus oozes from the lesions on the fruit. The lesions extend into the interior of the fruit, discoloring the flesh along the vascular bundles and extending all the way to the seeds, causing seed contamination. Diseased fruits rot in the late stage and have a foul odor. Affected young fruits often rot and drop early.
[Control Methods] At the early stage of disease, spray with Xinzhiromycin 5000x solution, or 30% copper bis(gluconate) (DT fungicide) wettable powder 500x solution, or 77% Kocide wettable powder 400x solution, or 47% Jiaruinong wettable powder 600-800x solution. The above chemicals can be used alternately, sprayed once every 7-10 days, for 3-4 consecutive sprays. Excessive use of copper preparations can easily cause phytotoxicity, generally not exceeding 3 times. Spray carefully and thoroughly on both the upper and lower surfaces of leaves to improve control effectiveness.
6. Root-Knot Nematode
[Symptoms] Root-knot nematodes mainly damage roots. After roots are affected, they develop poorly, with many lateral roots, and spherical or conical nodules of varying sizes form at the root tips, sometimes in chains. They are initially white and soft, later turning brown to dark brown, with the surface sometimes cracking. The aboveground parts of affected plants develop poorly, with yellow leaves. In dry weather, they wilt and die, and are easily mistaken for Fusarium wilt-infected plants.
[Control Methods] Before planting, apply 80 kg of lime nitrogen per mu in combination with deep plowing. Disinfect the soil with 1.8% abamectin EC at 1-1.5 mL per square meter diluted in 6 liters of water, or broadcast 4-6 kg of 3% Miral granules per mu mixed with 50 kg of dry fine soil. During the growing period, drench the roots with 1.8% abamectin EC 1000-1500x solution 1-2 times, with an interval of 10-15 days. After harvest, thoroughly remove diseased and residual plants from the field, burn them in a centralized manner or bury them deep, or use them for composting. In addition, applying 2 tons of biogas residue per mu can effectively control root-knot nematodes. Where conditions permit, planting a crop of rice after vegetable harvest gives even better results.
7. Whitefly
[Symptoms] Whiteflies have a very mixed diet and can damage many vegetables. Mainly nymphs cause damage, congregating on the underside of cucumber leaves to suck sap, causing leaves to fade, turn yellow, and wilt. In severe cases, plants die. During damage, they also secrete honeydew, contaminating leaves and causing mold infections, affecting plant photosynthesis and seriously affecting yield and quality.
[Control Methods] Try to avoid mixed planting, especially cucumber, tomato, and snap bean, which should not be mixed. Adjusting the production sequence is also an effective method, i.e., arrange celery, sweet pepper, and other vegetables less damaged by whiteflies in the first crop, then plant cucumber and tomato in the next crop. Older nymphs are mostly distributed on lower leaves; remove old leaves and burn them. Setting yellow boards in the greenhouse can effectively control whiteflies. Use a knapsack motorized smoke generator to atomize 1% deltamethrin or 2.5% fenvalerate (sumicidin) oil formulation into droplets suspended in the air to kill adults with good results. You can use 25% buprofezin wettable powder, or 2.5% deltamethrin or 20% fenvalerate (sumicidin) EC 2000x solution spray at 6-7 day intervals, for 3 consecutive treatments. Smoke agents can also be used for fumigation, for 2-3 consecutive times.