Detailed Explanation of Asparagus Planting Techniques and Management Key Points
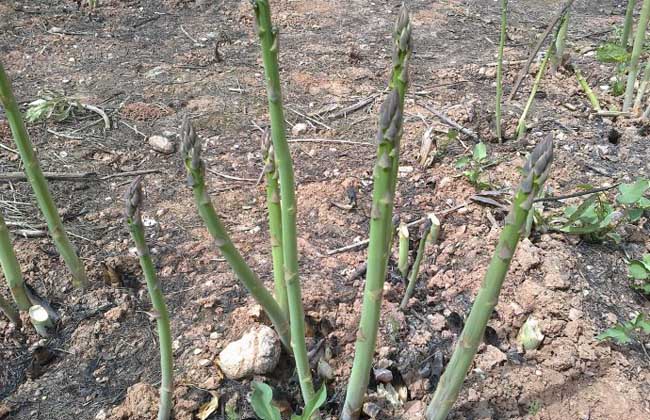
Asparagus, also known as shidiao bai or longxu cai, with the local name shan baomi, is a perennial plant of the Liliaceae family. The young stems of asparagus turn green after emerging from the soil and being exposed to light, and are called green asparagus, mainly for fresh consumption. When earthed up and blanched, they turn white and are called white asparagus, mostly used as raw material for canned food. Asparagus contains protein, fat, calcium, iron and various vitamins. It is a precious vegetable with a delicious taste and rich nutrition, and also has high medicinal value. It can lower blood pressure, prevent and treat diseases of the cardiovascular, urinary and lymphatic systems, and has a unique anti-cancer effect. It is a world-famous fine vegetable and good medicine, and its products sell well both domestically and internationally. Asparagus is easy to cultivate and convenient to manage. At the same time, asparagus can be harvested continuously for 10 to 15 years from a single planting. It grows year-round in the south, and enters dormancy in winter in northern regions. It will continue to grow the next year. Asparagus has strong adaptability, is easy to cultivate, and has low temperature requirements. In winter, the underground part can withstand -20°C low temperatures in the soil, and during the growing season it can withstand 35 to 37°C high temperatures. In cultivation, it also has the advantages of low labor input, convenient management and high yield.
Asparagus Seed Treatment
Before sowing, soak in warm water at 25°C to 30°C for 3 to 5 days, changing the water 1 to 2 times a day. Wait until the seeds have absorbed enough water, then remove them, mix with fine sand or vermiculite, place in a container, cover with a wet towel, and place under 25 to 30°C conditions for germination. Turn twice a day. After 5 to 8 days, once the seeds show white sprouts, they can be sown.
Asparagus Seedling Raising Techniques
For friends growing in home pots or small gardens, peat soil or seedling soil plus seedling trays, or seedling blocks plus seedling boxes can be used for raising seedlings. The covering soil thickness is about 2-3 cm. The best temperature for raising seedlings is 25-30°C. In agricultural production, the following method is used:
1. Seedbed preparation: The seedbed should preferably be fertile, loose sandy loam. Apply 2500 to 3000 kg of decomposed farmyard manure, 20 kg of diammonium phosphate, and 15 kg of potassium fertilizer per mu of seedbed. Plow into the soil, finely prepare the land, then make beds 1.3 to 1.5 m wide. For sowing, open furrows across the bed lengthwise, with a row spacing of 20 to 30 cm and a plant spacing of 7 to 10 cm. Use a hole puncher to make holes, sow one seed per hole, cover with 2.5 cm of soil, then cover with a thin layer of grass to increase temperature and maintain warmth. The sowing time is from late April to early May (when the ground temperature steadily passes 10°C).
2. Greenhouse seedling raising
① Nutrient soil preparation: 30% decomposed farmyard manure, 30% peat, 20% aged stove ash, 20% farmland soil (no pesticide residue). Add 50 g of diammonium phosphate per kg of nutrient soil.
② Nutrient pot (8×12 cm) seedling raising: sow one seed per pot, at a sowing depth of 2 cm, cover with 2 cm of soil, and water thoroughly.
③ Temperature and humidity management: The suitable temperature for asparagus germination is 25°C to 28°C, 25°C after emergence, with a maximum not exceeding 30°C and a minimum not lower than 8°C. It is best to keep the soil moist. After emergence, the seedling root system is weak, so water promptly during drought and weed promptly. 7 to 10 days before transplanting, begin large ventilation for hardening off the seedlings so they adapt to the external natural environment and reach the standard of healthy seedlings, with more than 3 aboveground stems and 5 to 7 underground storage roots.
Asparagus Transplanting Methods
1. Site selection: Choose sandy loam with loose soil, good air permeability, high terrain, smooth drainage, deep soil layer and rich organic matter. A pH of 5.8 to 6.7 is suitable. The previous crop should not be carrot or sugar beet.
2. Land preparation and fertilization: Deep plow 20 to 25 cm and form ridges. Apply 3000 kg of decomposed farmyard manure per mu, plus 25 kg of ternary compound fertilizer as base fertilizer. Ridge width 1.2 to 1.4 m. 3. Transplanting method. Plant spacing 30 to 40 cm. Use a shovel to dig transplanting trenches 30 cm deep and 30 to 40 cm wide. Apply 25 kg of ternary compound fertilizer plus 1500 kg of organic fertilizer per mu into the trenches, mix evenly, then scatter 10 cm of topsoil, with the center of the trench slightly higher. Place the graded asparagus seedlings into the trench. For large strong seedlings, one plant per hole; for weak small seedlings, two plants per hole. Spread the root system out in all directions, with the buds facing the same direction along the trench, arranged in a straight line, to facilitate management, earthing up and harvesting. Hold the seedling body with one hand, first cover with a small amount of soil and press firmly, then cover with 4 to 5 cm of fine soil, water thoroughly, and after the water seeps down, cover with another 1 to 2 cm of soil to prevent crusting and water evaporation. 3 to 4 days after transplanting, check for missing seedlings and replant promptly to prevent gaps.
Management After Asparagus Transplanting
15 days after transplanting, carry out one intertillage and weeding to loosen the soil, improve aeration and preserve moisture. Keep soil moisture at 60% to 70%. Water moderately if too dry. In the rainy season, dig drainage ditches to prevent water accumulation and root rot.
The Second Year After Asparagus Transplanting and Subsequent Harvest Years
1. To bring to market earlier, in early April, build small tunnels over the ridges, with an arch height of 30 cm and width of 40 to 50 cm, and cover with plastic film. After the spears emerge, the tunnel temperature should preferably be 25°C; ventilate and cool promptly if it exceeds 30°C. When the outside temperature reaches 20°C, the tunnel film can be removed. Generally, harvesting begins when the spears are 20 to 25 cm tall.
2. Harvest time: Generally, harvesting begins in mid-May, and the same in subsequent years. Green asparagus should have a dark green color, be fresh and tender, uniform, with the spear tip scales tightly closed and not scattered, the spears straight and not curved, without deformities or insect damage. The best harvest time is from 9 to 11 a.m.
3. Harvesting method: Use a dedicated stainless steel knife to cut off the young stems neatly. Do not leave high stubble at the base. Place in a basket, cover with a wet towel, and keep in a cool place to prevent water loss and aging. Promptly cut off excessively thin, curved, deformed, damaged, weak or diseased stems. Leave 1 to 2 healthy stalks per plant for photosynthesis. When their height reaches 70 cm, pinch off the tips promptly to control plant height.
4. Fertilization: For the sprouting fertilizer, in spring together with plowing, open furrows 30 to 50 cm from the plants and apply 20 kg of ternary compound fertilizer per mu. During the spear growing period, topdress once a month with 5 to 10 kg of ternary compound fertilizer or urea per mu. Water after topdressing and weed promptly, otherwise the asparagus spears will be thin, curved, fibrous and aged. Before the rainy season, raise the ridges and dig drainage ditches well to avoid water accumulation in the field after autumn.
Pest and Disease Control of Asparagus
1. Stem blight
[Symptoms] During the onset period, on the main stem about 30 cm above the ground, water-soaked brown small spots appear, then turn pale green to grayish brown, and at the same time expand into a prismatic shape; multiple lesions can also connect into strips. The lesion edges are reddish brown, and the center is slightly sunken and grayish brown, densely covered with needle-tip-like small black dots. If the air is dry, the lesion edges are clear and no longer expand, becoming chronic-type lesions. If the weather is cloudy and rainy with high humidity, the lesions can expand and spread rapidly, causing the upper branches and stems to die. When infection occurs on small branchlets and cladodes, faded small spots first appear, then the edges turn purplish red and the center grayish white, with small black dots borne on them. Because they rapidly expand and surround the branchlets, they are easily broken or lodging occurs, and the inside of the stem is grayish white and rough, leading to death.
[Onset conditions] This disease is caused by fungi. Under rainy and windy conditions, it spreads rapidly, and rain splash can also transmit it. Airborne transmission is the main cause of large-area outbreaks. The direction of field spread and the speed of onset are often affected by wind. In addition, low-lying terrain, heavy clay soil, excessive nitrogen fertilizer, etc., all easily aggravate the disease.
[Control methods] ① Choose high, dry terrain with good drainage for cultivation. ② Clean the field, cut off diseased stems, and burn or deeply bury them. ③ Cover the field with plastic film, control nitrogen fertilizer, and prevent excessive growth. ④ Chemical control. In the early stage of the disease, use 70% thiophanate-methyl 800 to 1000 times liquid, 1:1:240 Bordeaux mixture; 50% amobam 1000 times liquid once every 7 to 10 days, spraying 2 to 3 times consecutively.
2. Brown spot
[Symptoms] On branches, stems and cladodes, the disease appears as large numbers of small reddish-brown lesions; as the lesions gradually expand, the central part first turns pale brown, then gray, and in the later stage produces a mold layer and purplish-brown concentric rings, with a yellow halo around the lesion edge. Most oval lesions expand and connect into irregular lesions. If lesions encircle the stem, the branches and stems above wither. When the weather is humid, white mold may appear, causing the cladodes to fall early and the plant vigor to decline rapidly.
[Onset conditions] This disease is caused by fungi, spreads through the air, and occurs severely under high temperature conditions.
[Control methods] Same as stem blight.
3. Sclerotinia rot
[Symptoms] Young stems are mostly affected near the ground, first fading in color, then turning brown, and then producing black mouse-dropping-like sclerotia.
[Onset conditions] This disease is caused by fungi.
[Control methods] Same as stem blight.
4. Root rot
[Symptoms] After onset, the cortex at the stem base rots, and the absorbing roots are also damaged, causing the main stem to turn yellow and the plant to decline.
[Onset conditions] This disease is caused by fungi and is a disease caused by multiple pathogens. It is mainly transmitted through soil.
[Control methods] When transplanting seedlings, soak the roots for 15 minutes in a 400 to 500 times liquid of benomyl or benodanil based on active ingredients for control.
5. Damping-off
[Symptoms] During the seedling stage, reddish and slightly purplish lesions form slightly above the ground, causing the whole plant to die. Wounds during spear harvesting can also be infected, and in severe cases the whole plant dies.
[Control methods] Same as root rot.
6. Rust
[Symptoms] It damages stems and cladodes. In summer, orange rust spots appear, and after the epidermis ruptures, orange powder is released. In autumn, the lesions are dark brown. The cladodes may fall early because of this, and in severe cases the whole plant discolors and dies.
[Onset conditions] This disease is caused by fungi. Humid air and poor ventilation easily lead to this disease.
[Control methods] ① Use disease-resistant varieties, such as Mary Washington, etc. ② Clean the field and do a good job in ventilation and drainage. ③ Chemical control. In the early stage of the disease, spray 75% chlorothalonil 800 times liquid; 50% folpet 800 times liquid.
7. Insect pests
The main insect pests of asparagus are underground pests such as white grubs, mole crickets, seed maggots and wireworms. They can be controlled by scattering poisonous soil made of 25% trichlorfon powder plus 5 times fine soil in the field; or using 90% trichlorfon 30 times liquid mixed with wheat bran or soybean cake and scattered in the field as poisonous bait; or spraying 80% dichlorvos emulsion 800 times liquid during fertilization.